 ggp
ggp一,前置知识
1,产品分类
- web开发:
- 特点:运行在浏览器上的应用
- 常见:官网,管理系统,webapp,H5
- App开发:
- 原生App,指的是Android 和 iOS 12年~16年
- 跨平台App,指的是写一套,可以在多端运行,Uniapp,RN
- Flutter,使用dart语言
- 混合App(Hybrid),指:原生App + Web开发 在原生App中嵌套网页
- 小程序
2,前端就业方向
- React开发(核心)
- Vue3 / Vue2(核心)
- Uniapp (开发小程序,使用vue语法+微信小程序语法)(核心)
- Node
- Angular
- 小程序(微信小程序<微信用户基数大>,支付宝小程序,360小程序....)
- RN
- 前后端不分离的项目
- 低代码开发
- flutter
- web3
- ....
二,搭建小程序开发环境
1,小程序介绍
小程序:运行在App中的小应用。
特点:
- 无须安装,只能运行在指定的App中,小而美。
- 工具类,营销类(转发,拼团...)
学习小程序:
- 网站:https://mp.weixin.qq.com/,注册一个小程序账号,登录上去,得到一个管理系统。在这个管理系统中就可以做很多事情。
- 小程序文档(https://developers.weixin.qq.com/miniprogram/dev/framework/),只需要关注一级目录中的开发模块。其它模块都是了解。
- 内容:项目环境搭建,组件,路由,状态管理,功能API....
2,小程序管理后台
- 成员管理(开发):添加开发者,添加体验者
- 版本管理(上线):使用开发者工具,直接提交代码,提交上去就是开发版本,提交审核就有审核版本,审核通过就有线上版本。
- 开发管理(开发):开发相关配置,有appid。
- 开发工具,写代码,就需要利用开发工具来写代码。
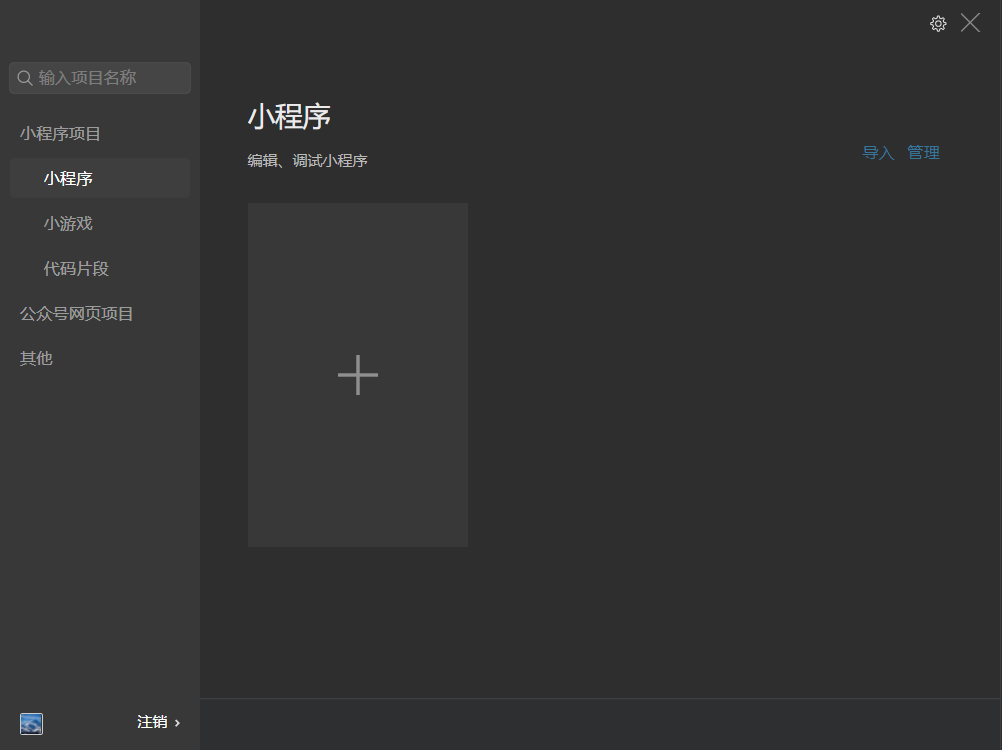
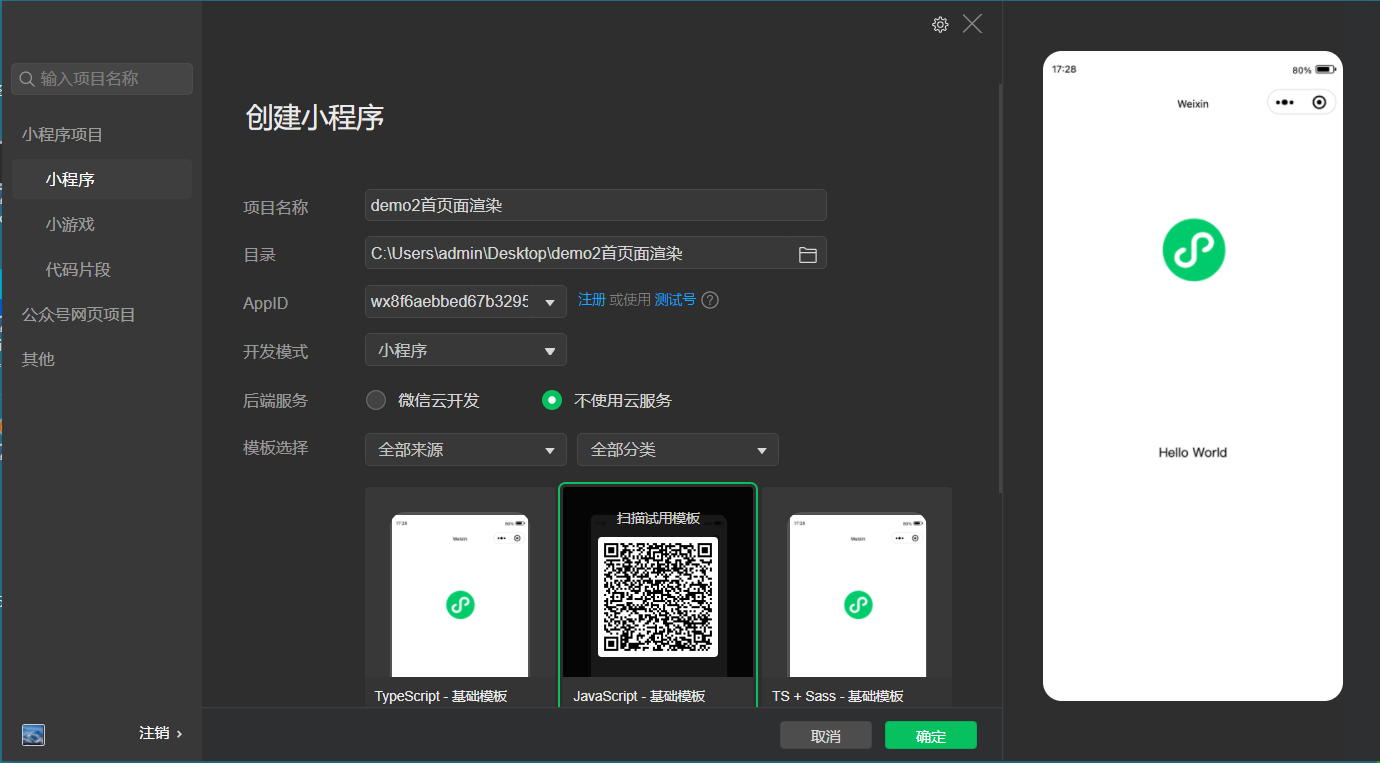
3,微信开发者工具
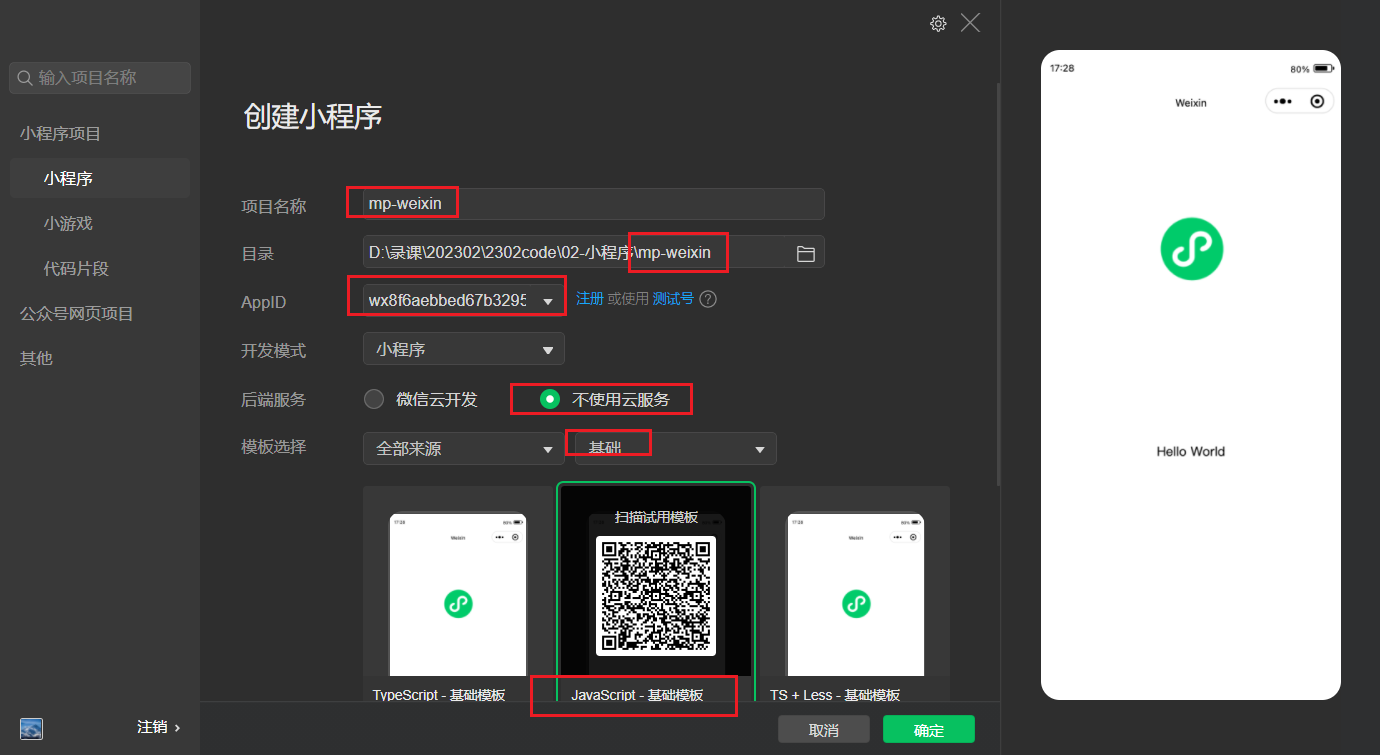
下载:https://developers.weixin.qq.com/miniprogram/dev/devtools/download.html
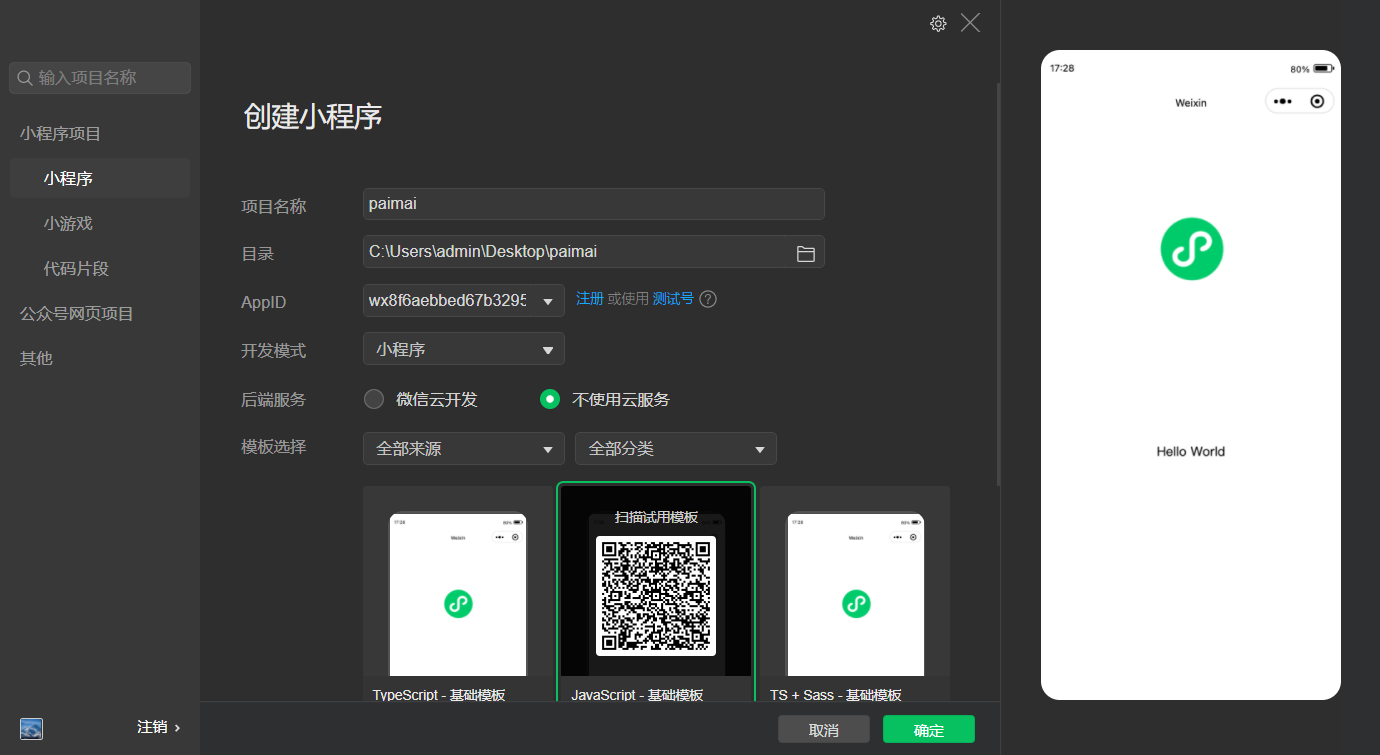
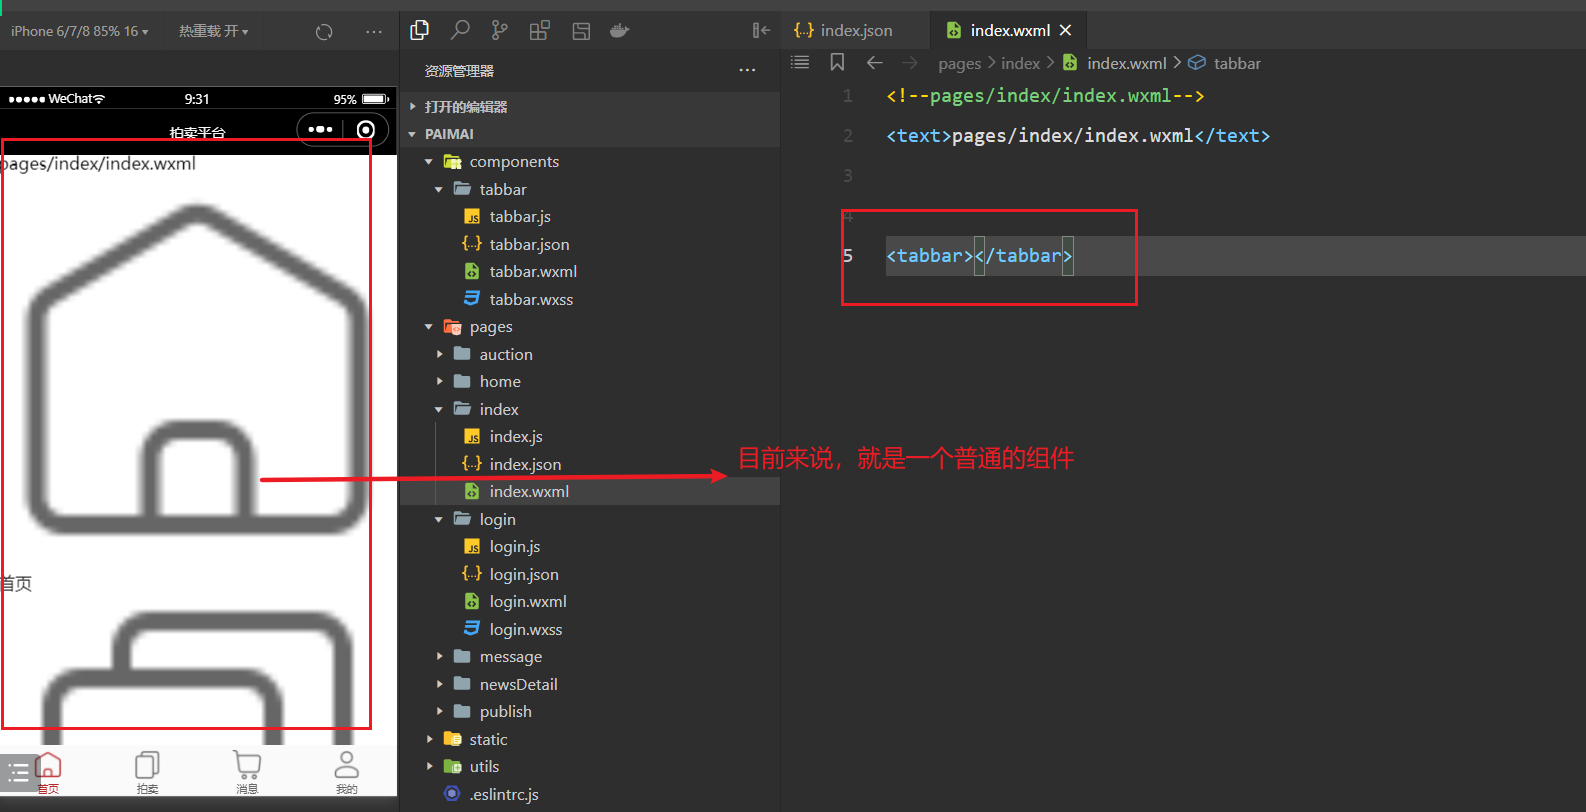
下载稳定版本的64位。下载微信开发者工具,安装之。安装是傻瓜式安装。打开微信开发者工具,创建原生小程序项目。创建时,需要有appid。安装完后,桌面上就多了如下的图标:
双击创建项目,流程如下:

使用微信扫一下,如下 :
点击+号,创建小程序项目,先创建一个空的文件夹,如下:

创建项目后,如下:
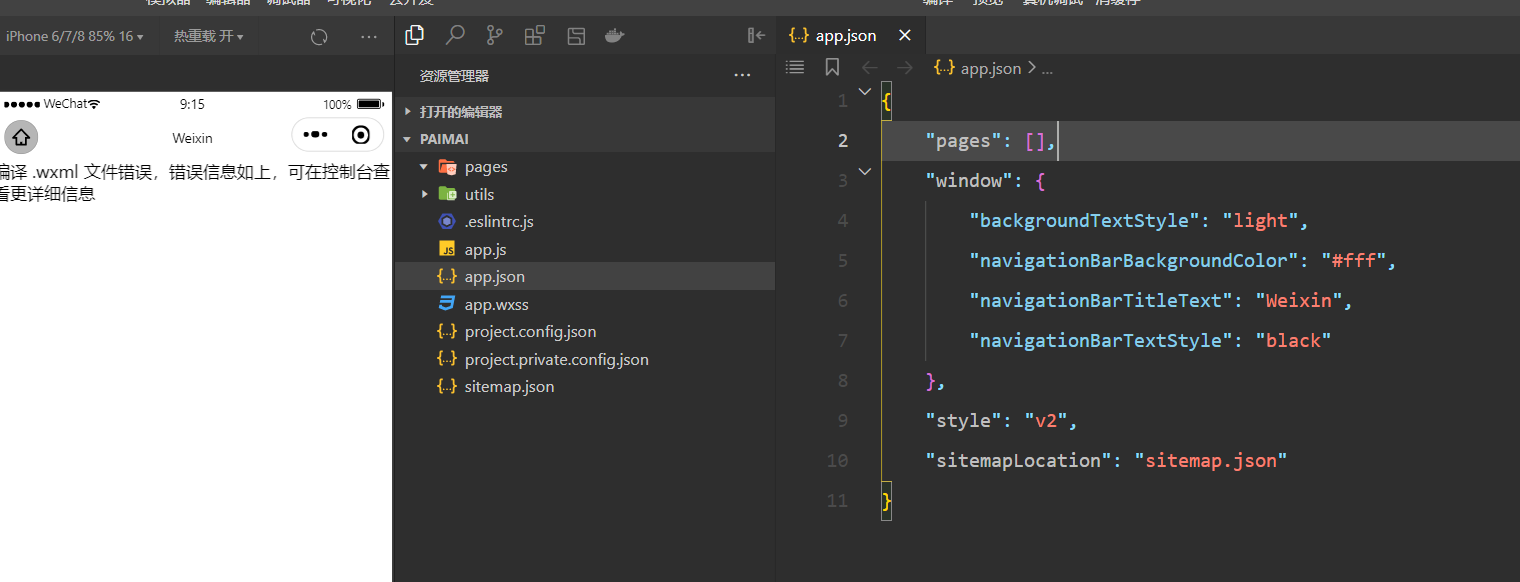
4,小程序的目录结构
- 一个小程序是由N张页面组成的,一个页面就是一个文件夹
- 一个页面是一个文件夹,一个文件夹中有4个文件
- xxx.js 页面的逻辑
- xxx.json 页面的配置
- xxx.wxml 写结构
- xxx.wxss 写样式
- .eslitrc.js 约束写代码的规范 后面讲webpack时,讲到eslint时再说
- app.js 小程序的入口文件
- app.json 小程序的全局配置文件 在小程序中,只要是json文件,都是配置文件
- app.wxss 小程序的全局样式 是针对所有的页面的
- project.config.json 项目的配置文件
- sitemap.json 做SEO优化
三,小程序配置
1,小程序配置
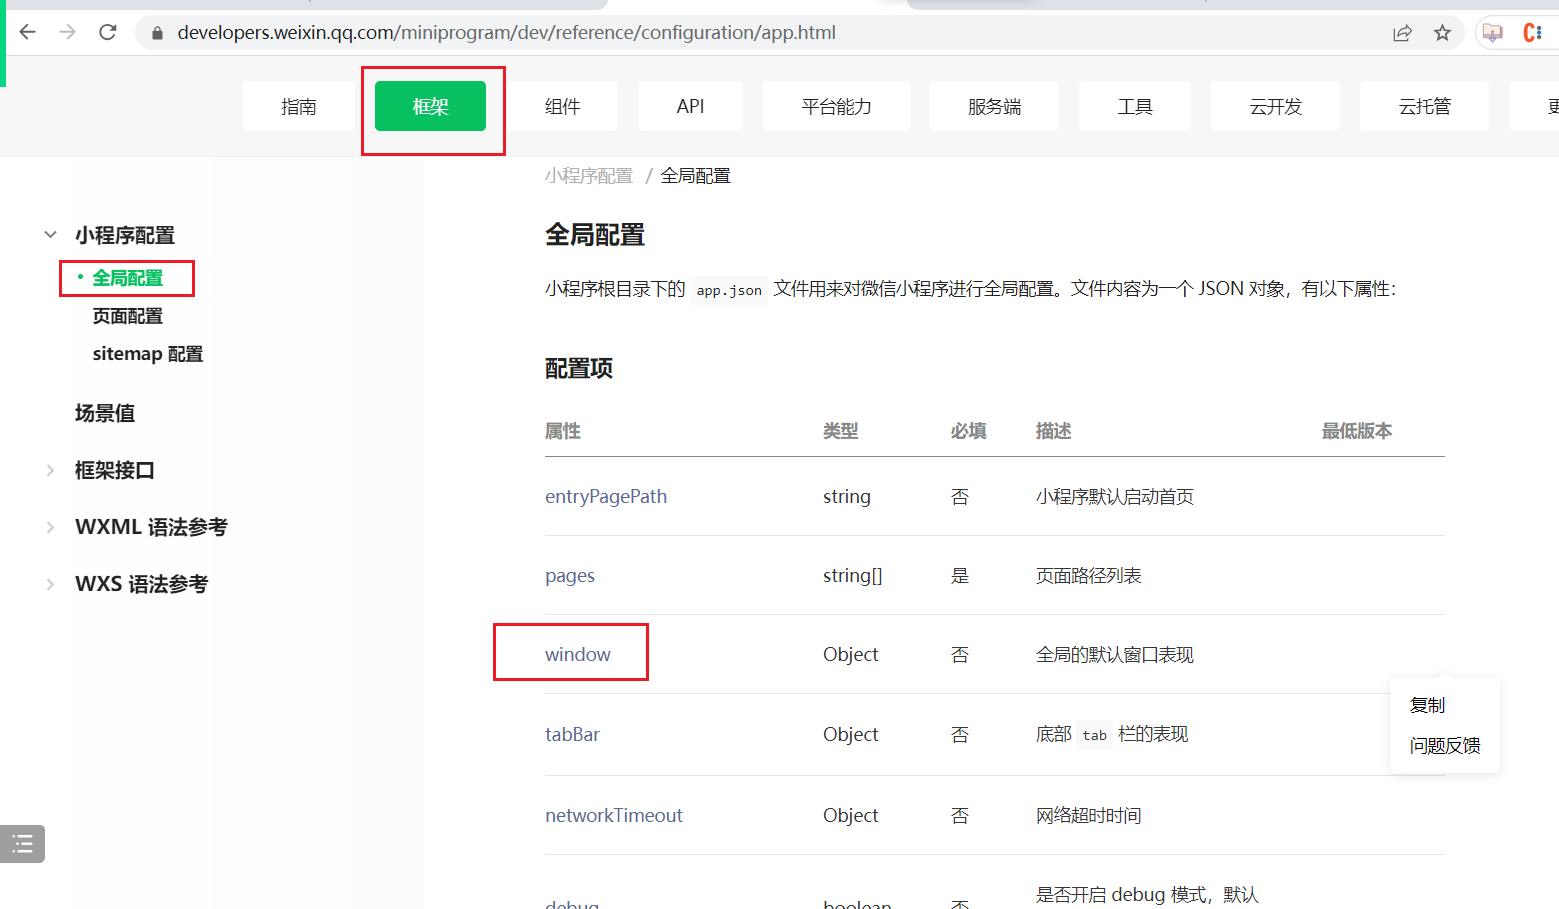
- 配置分全局配置 和 页面独有的配置
- 全局配置,不需要我们去记,只需要学会查文档,地址:https://developers.weixin.qq.com/miniprogram/dev/framework/config.html#全局配置
- 页面配置,如果全局配置和页面配置冲突了,肯定是页面配置的优先级高 。地址:https://developers.weixin.qq.com/miniprogram/dev/framework/config.html#页面配置
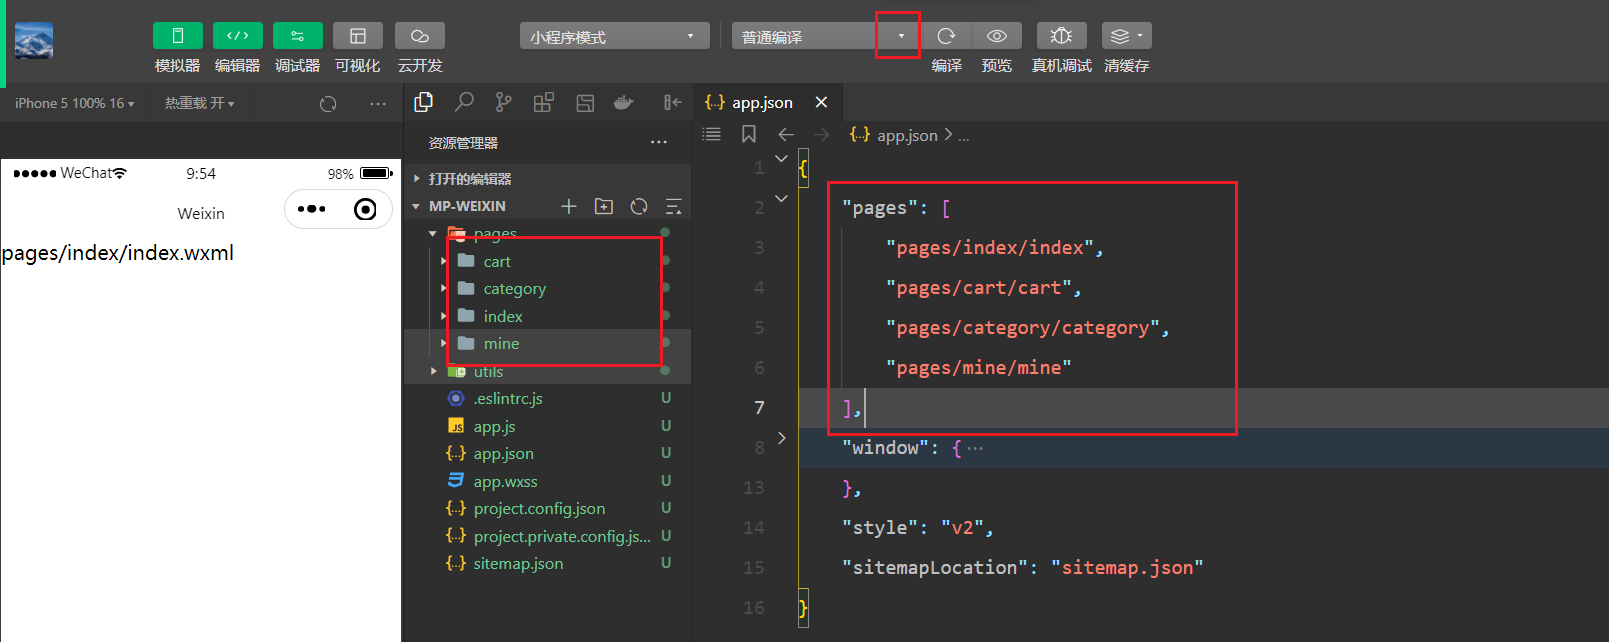
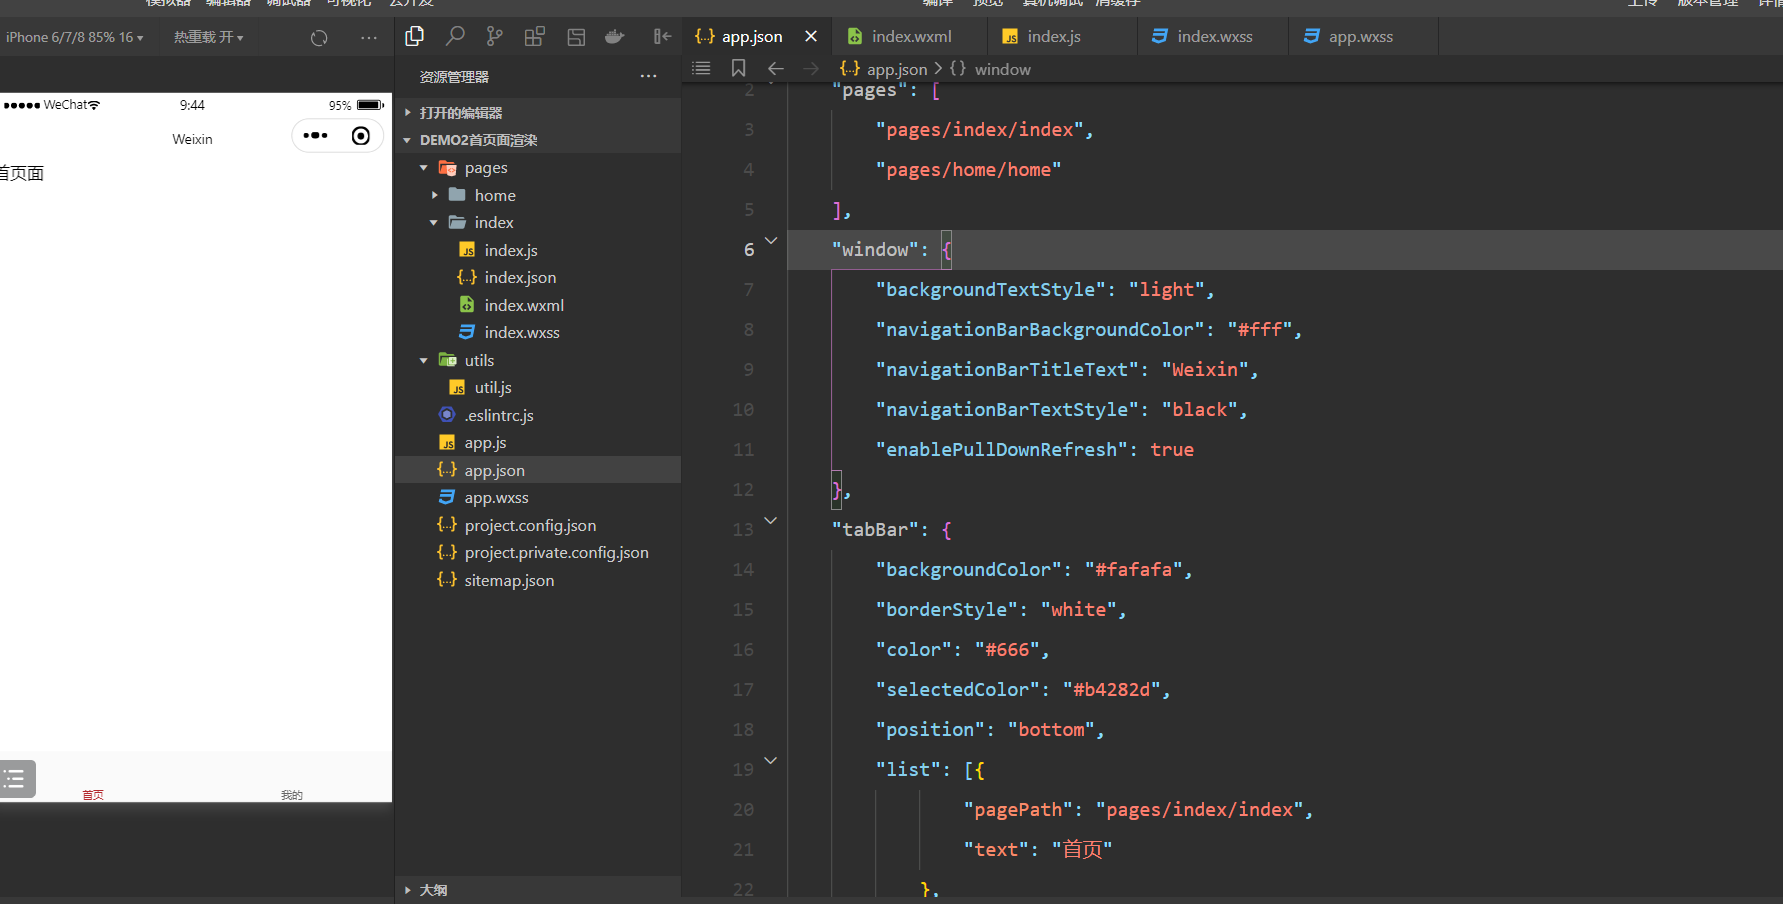
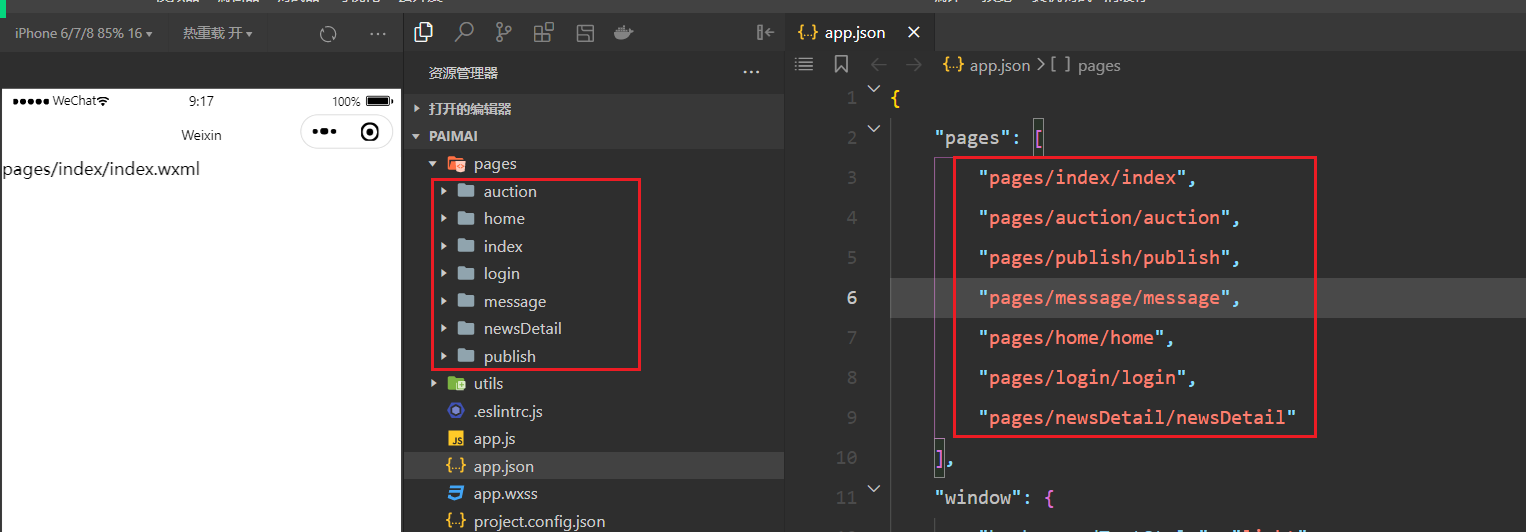
2,在app.json中配置pages
3,在app.json中配置window
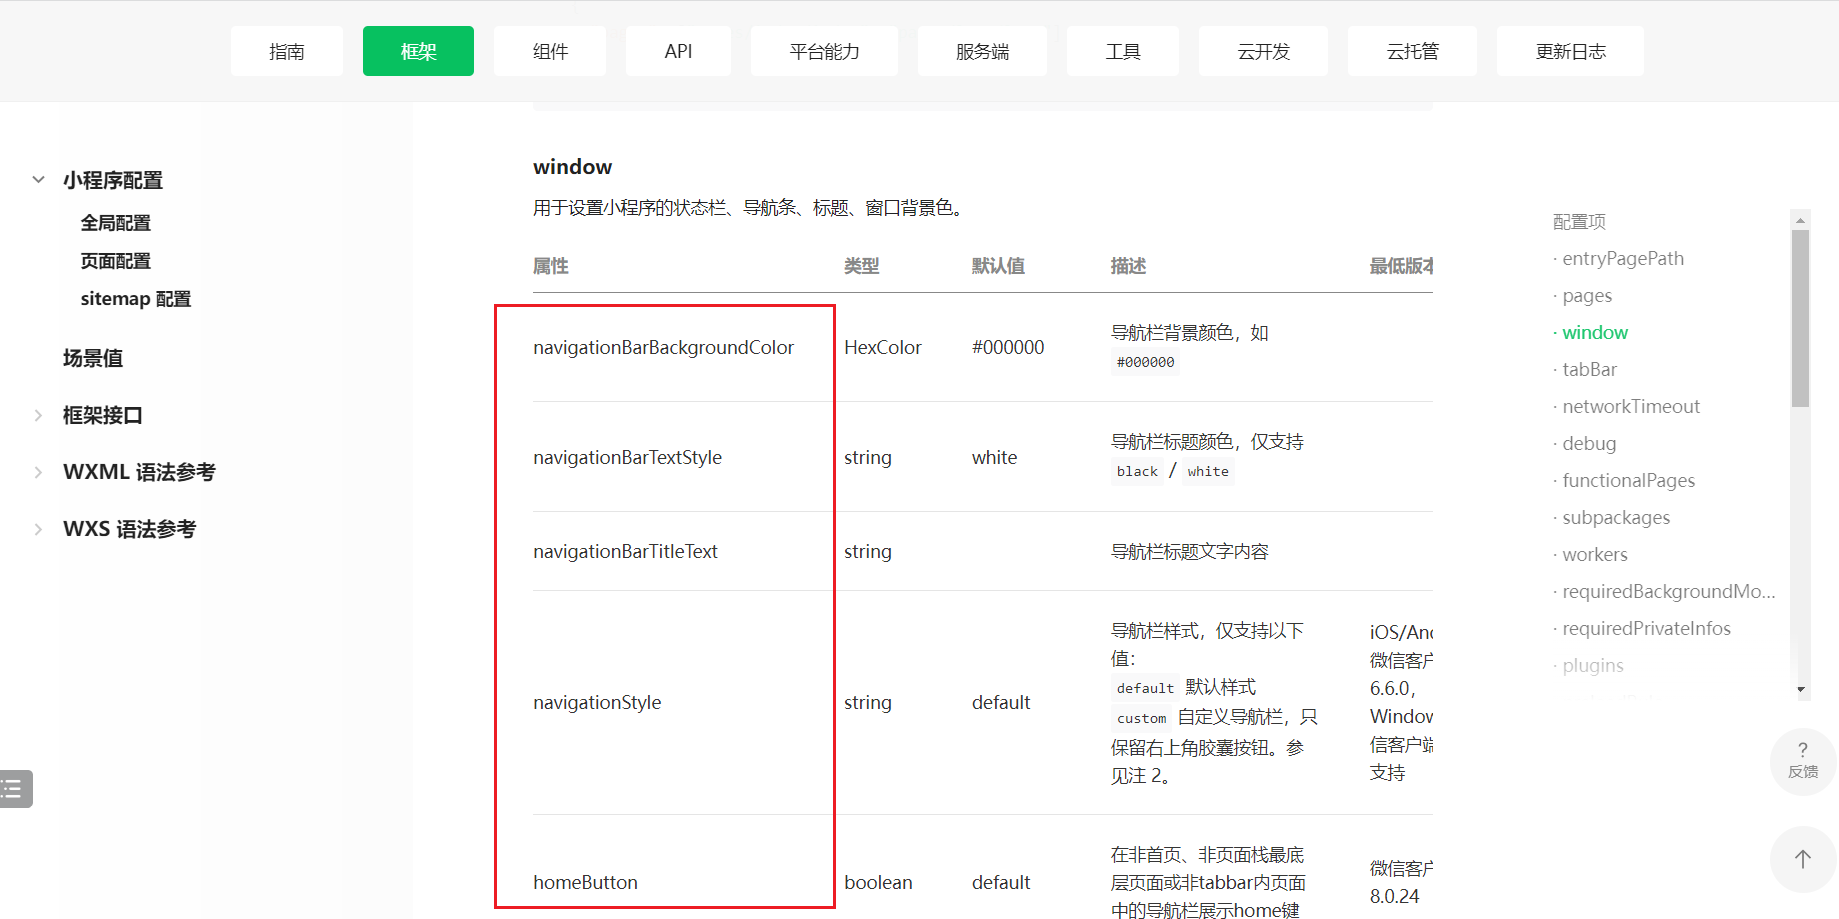
代码如下:
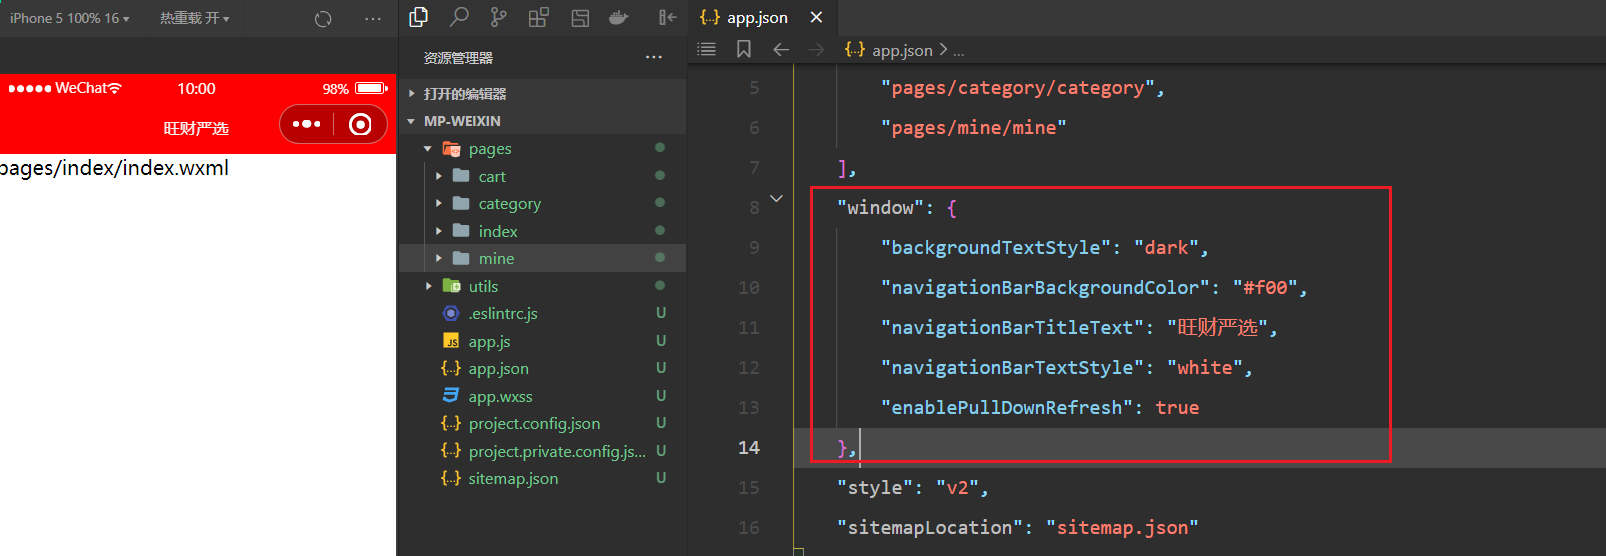
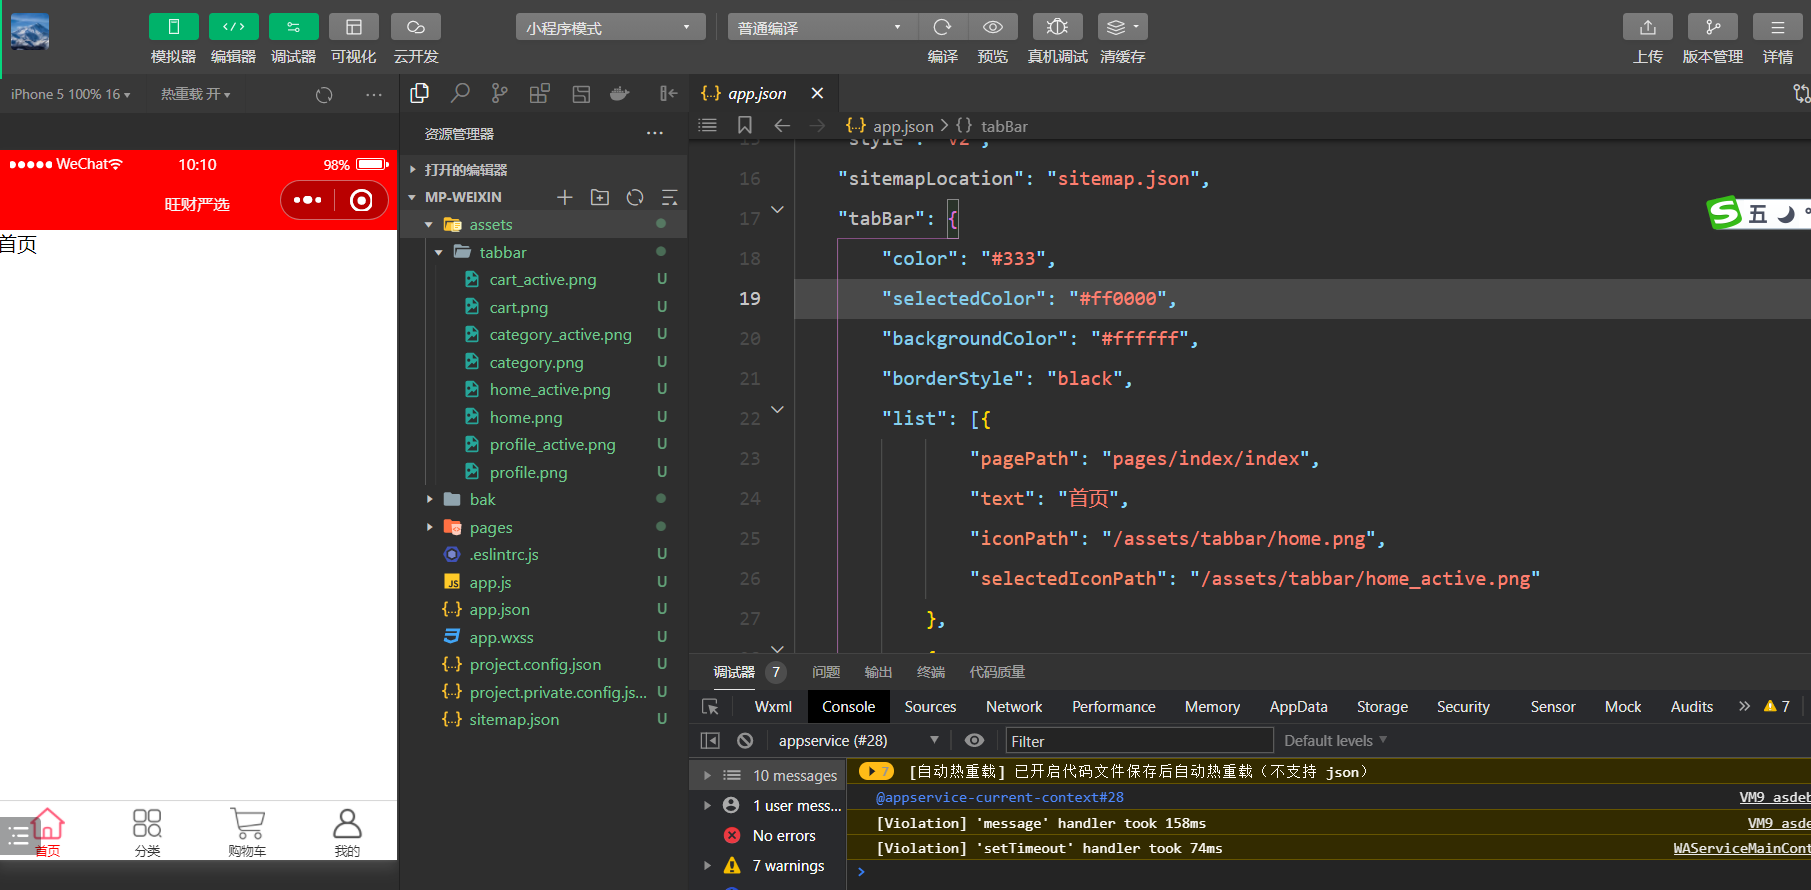
4,在app.json中配置tarbbar
{
    "pages": [
        "pages/index/index",
        "pages/cart/cart",
        "pages/category/category",
        "pages/mine/mine"
    ],
    "window": {
        "backgroundTextStyle": "dark",
        "navigationBarBackgroundColor": "#f00",
        "navigationBarTitleText": "旺财严选",
        "navigationBarTextStyle": "white",
        "enablePullDownRefresh": true
    },
    "style": "v2",
    "sitemapLocation": "sitemap.json",
    "tabBar": {
        "color": "#333",
        "selectedColor": "#ff0000",
        "backgroundColor": "#ffffff",
        "borderStyle": "black",
        "list": [{
                "pagePath": "pages/index/index",
                "text": "首页",
                "iconPath": "/assets/tabbar/home.png",
                "selectedIconPath": "/assets/tabbar/home_active.png"
            },
            {
                "pagePath": "pages/category/category",
                "text": "分类",
                "iconPath": "/assets/tabbar/category.png",
                "selectedIconPath": "/assets/tabbar/category_active.png"
            },
            {
                "pagePath": "pages/cart/cart",
                "text": "购物车",
                "iconPath": "/assets/tabbar/cart.png",
                "selectedIconPath": "/assets/tabbar/cart_active.png"
            },
            {
                "pagePath": "pages/mine/mine",
                "text": "我的",
                "iconPath": "/assets/tabbar/profile.png",
                "selectedIconPath": "/assets/tabbar/profile_active.png"
            }
        ]
    }
}
目录结构如下:
四,小程序内置组件
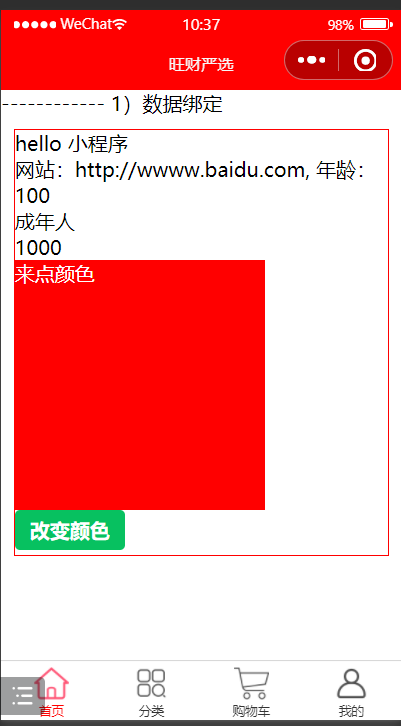
1,数据绑定
结构:
<view>------------ 1)数据绑定</view>
<view class="page">
    <view>{{msg}}</view>
    <view>网站:{{site}}, 年龄:{{age}}</view>
    <!-- {{}} 可以放任何表达式 -->
    <view>{{age>18 ? "成年人":"未成年"}}</view>
    <view>{{age*10}}</view>
    <view class="box1 {{showColor ? 'on':''}}">来点颜色</view>
    <button type="primary" size="mini" bindtap="onToggle">改变颜色</button>
</view>
样式:
.page {
    border: 1px solid red;
    margin: 10px 10px;
}

.box1 {
    width: 200px;
    height: 200px;
    background-color: red;
}

.on {
    color: white;
}
逻辑:
Page({
    // 数据驱动视图
    data: {
        msg: "hello 小程序",
        site: "http://wwww.baidu.com",
        age: 100,
        showColor: true,
    },
    onToggle() {
        // this.showColor = !this.showColor;  数据是响应式的
        // 小程序不是这样,小程序如果想改变数据,又想刷新页面,专属API:setData
        this.setData({
            showColor: !this.data.showColor
        })
    }
})
效果:
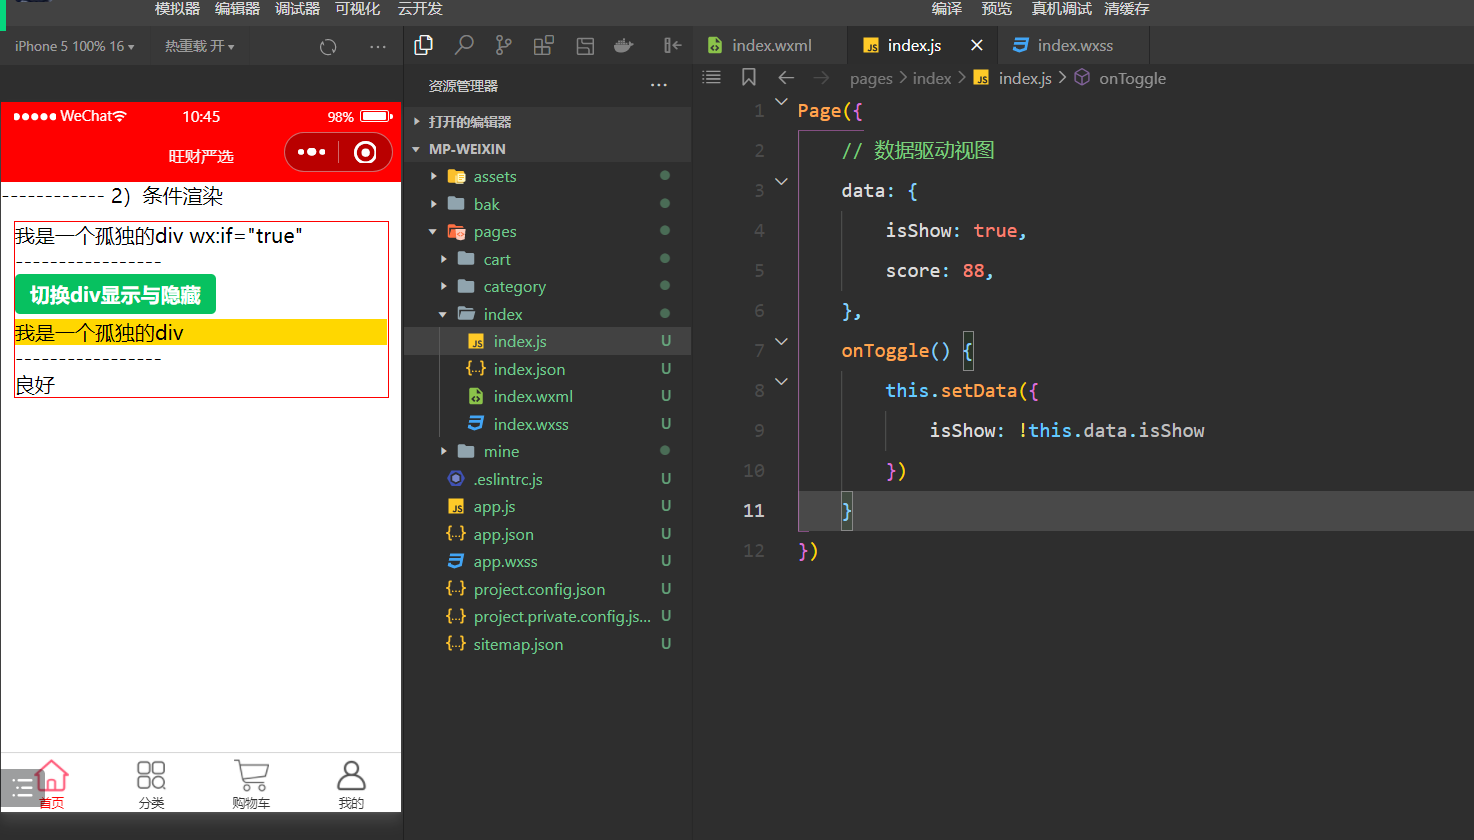
2,条件渲染
结构:
<view>------------ 2)条件渲染</view>
<view class="page">
    <view wx:if="{{true}}">我是一个孤独的div wx:if="{{true}}"</view>
    <view wx:if="{{false}}">我是一个孤独的div wx:if="{{false}}"</view>

    <view>-----------------</view>

    <button type="primary" size="mini" bindtap="onToggle">切换div显示与隐藏</button>
    <view wx:if="{{isShow}}" style="color: black; background-color: gold;">我是一个孤独的div</view>

    <view>-----------------</view>

    <view wx:if="{{score>=90}}">优秀</view>
    <view wx:elif="{{score>=80}}">良好</view>
    <view wx:elif="{{score>=60}}">及格</view>
    <view wx:else>不及格</view>
</view>
样式:
.page {
    border: 1px solid red;
    margin: 10px 10px;
}
逻辑:
Page({
    // 数据驱动视图
    data: {
        isShow: true,
        score: 88,
    },
    onToggle() {
        this.setData({
            isShow: !this.data.isShow
        })
    }
})
效果:
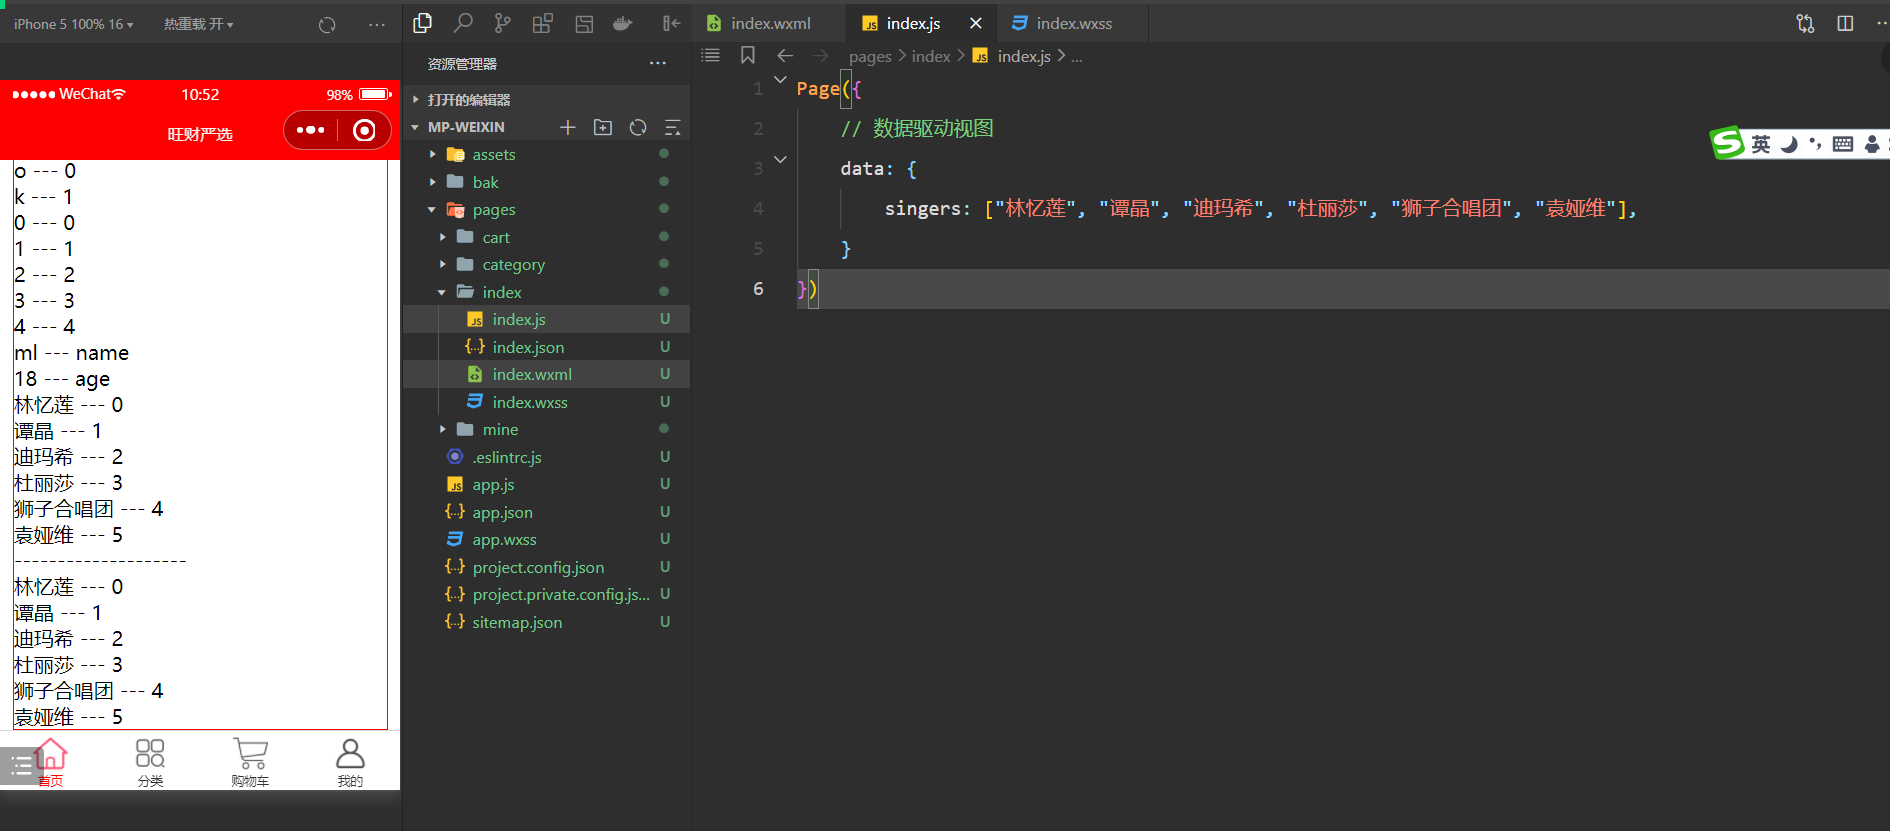
3,列表渲染
结构:
<view>------------ 3)列表渲染</view>
<view class="page">
    <!-- <div v-for="(item,index) in 'malu'" :key="item"></div> -->
    <view wx:for="malu" wx:key="*this">
        {{item}} --- {{index}}
    </view>
    <view wx:for="{{'ok'}}" wx:key="*this">
        {{item}} --- {{index}}
    </view>
    <!-- 循环一个数字 -->
    <view wx:for="{{5}}" wx:key="*this">
        {{item}} --- {{index}}
    </view>
    <!-- 循环一个对象,item表示值,index表示键 -->
    <view wx:for="{{ {name:'ml',age:18} }}" wx:key="*this">
        {{item}} --- {{index}}
    </view>
    <!-- 循环一个数组 -->
    <view wx:for="{{ singers }}">
        {{item}} --- {{index}}
    </view>
    <view>--------------------</view>
    <view wx:for="{{ singers }}" wx:for-item="singer" wx:for-index="i">
        {{singer}} --- {{i}}
    </view>
</view>
样式:
.page {
    border: 1px solid red;
    margin: 10px 10px;
}
逻辑:
Page({
    // 数据驱动视图
    data: {
        singers: ["林忆莲", "谭晶", "迪玛希", "杜丽莎", "狮子合唱团", "袁娅维"],
    }
})
效果:
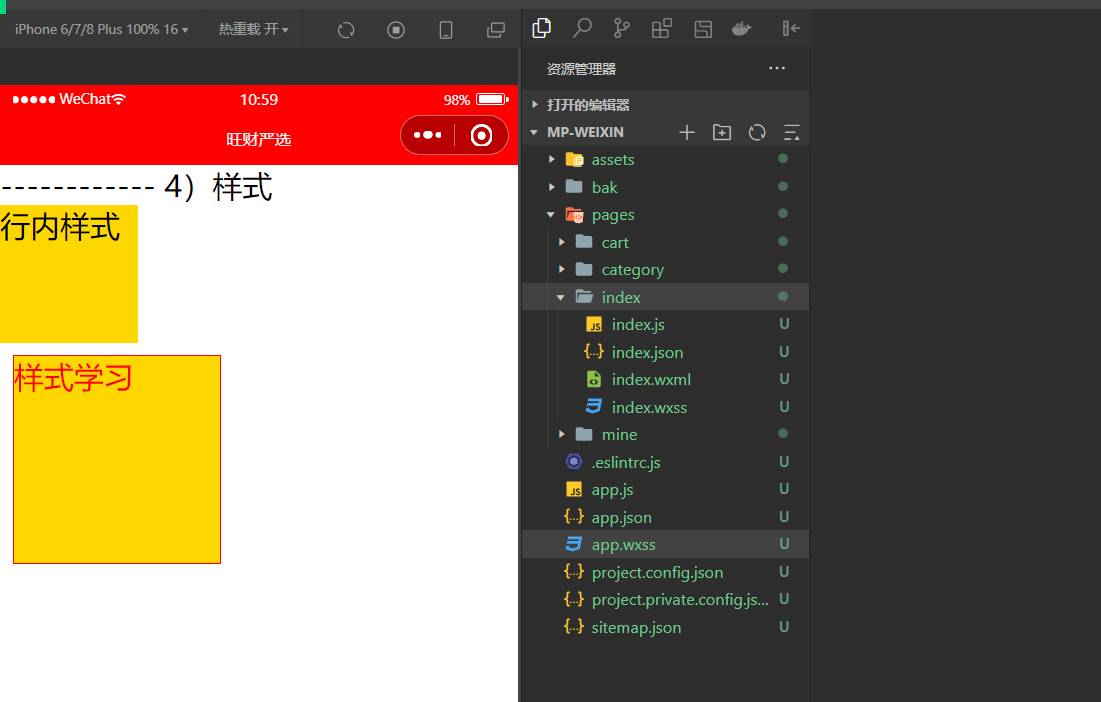
4,样式
结构:
<view>------------ 4)样式</view>
<view style="width: 200rpx; height: 200rpx; background-color: gold;">行内样式</view>

<!--
     rem的目的是适配:大屏上盒子大一点,小屏上盒子小一点。
     rpx: 也是为了适配   在iphone6: 2rpx = 1px
 -->
<view class="page item ml">样式学习</view>

<!--
    全局样式:定义在app.wxss中的样式,针对所有的页面。
 -->
样式:
.page {
    border: 1px solid red;
    margin: 10px 10px;
}

.item {
    width: 300rpx;
    height: 300rpx;
    background-color: gold;
}

.ml {
    color: red;
}
逻辑:
Page({
    data: {
    }
})
全局样式:
view {
    font-size: 24px;
}
效果:
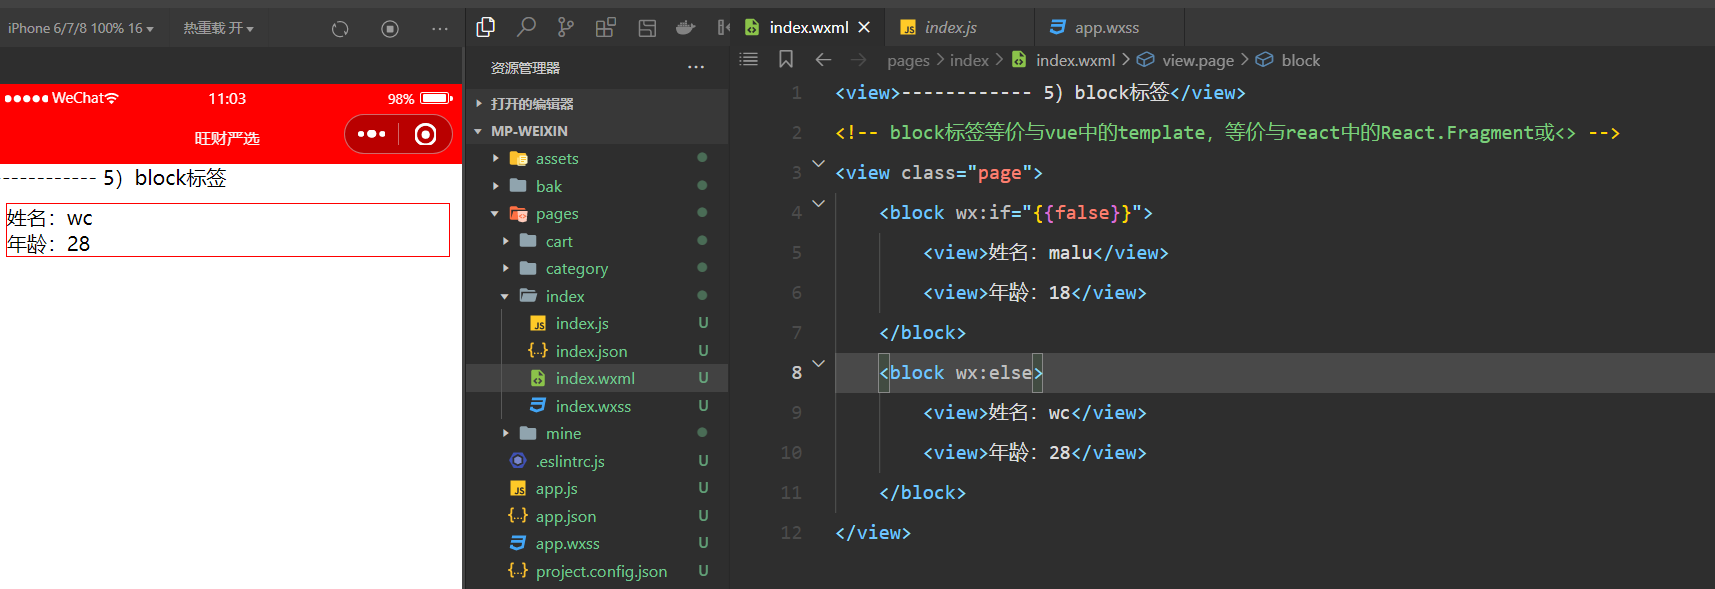
5,block标签
结构:
<view>------------ 5)block标签</view>
<!-- block标签等价与vue中的template,等价与react中的React.Fragment或<> -->
<view class="page">
    <block wx:if="{{false}}">
        <view>姓名:malu</view>
        <view>年龄:18</view>
    </block>
    <block wx:else>
        <view>姓名:wc</view>
        <view>年龄:28</view>
    </block>
</view>
样式:
.page {
    border: 1px solid red;
    margin: 10px 10px;
}
逻辑:
Page({
    data: {
    }
})
效果:
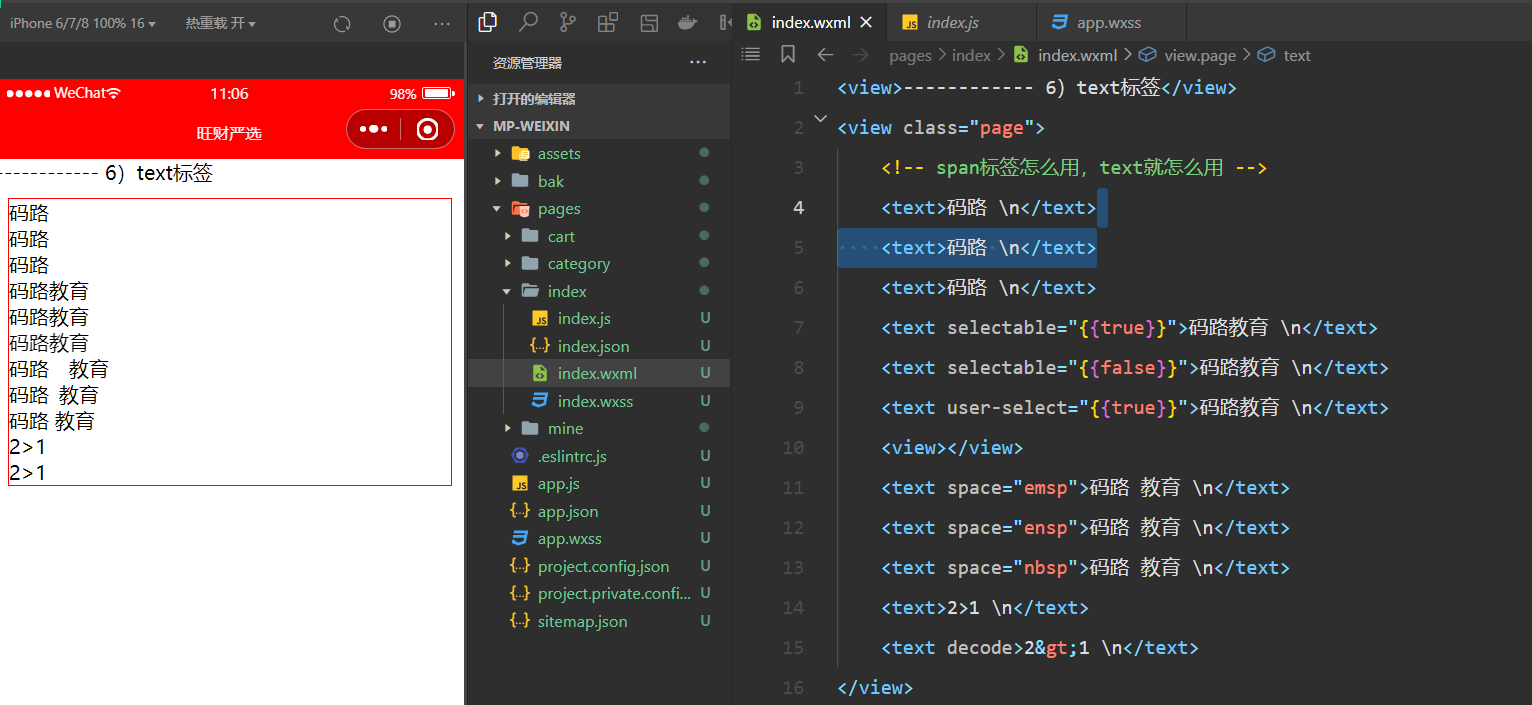
6,text
结构:
<view>------------ 6)text标签</view>
<view class="page">
<!-- span标签怎么用,text就怎么用 -->
<text>码路 \n</text>
<text>码路 \n</text>
<text>码路 \n</text>
<text selectable="{{true}}">码路教育 \n</text>
<text selectable="{{false}}">码路教育 \n</text>
<text user-select="{{true}}">码路教育 \n</text>
<view></view>
<text space="emsp">码路 教育 \n</text>
<text space="ensp">码路 教育 \n</text>
<text space="nbsp">码路 教育 \n</text>
<text>2>1 \n</text>
<text decode>2>1 \n</text>
</view>效果:
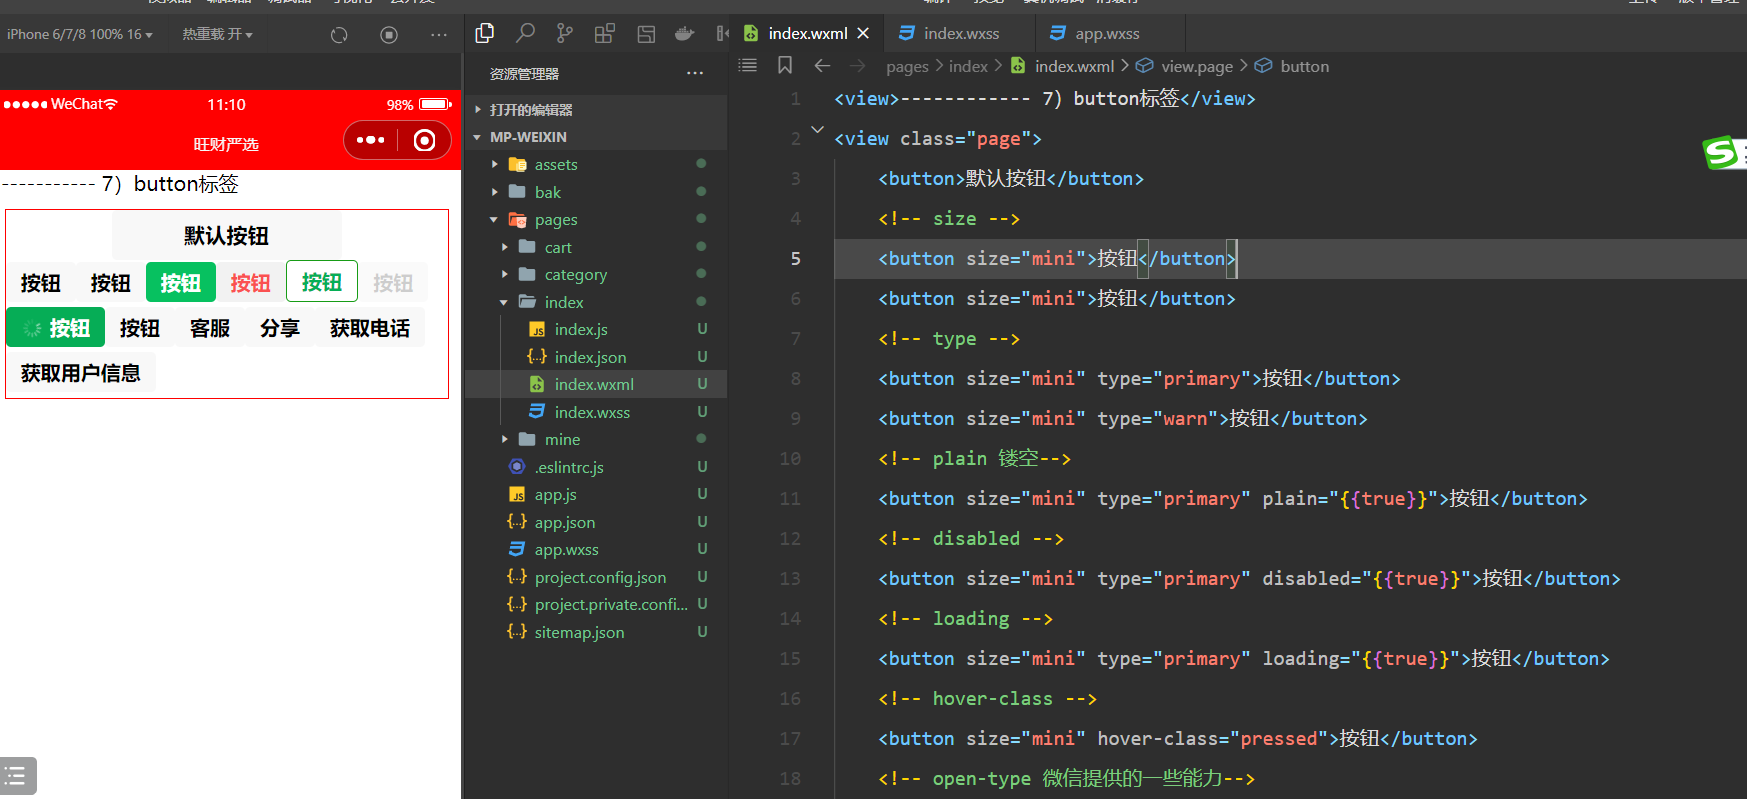
7,button
结构:
<view>------------ 7)button标签</view>
<view class="page">
    <button>默认按钮</button>
    <!-- size -->
    <button size="mini">按钮</button>
    <button size="mini">按钮</button>
    <!-- type -->
    <button size="mini" type="primary">按钮</button>
    <button size="mini" type="warn">按钮</button>
    <!-- plain 镂空-->
    <button size="mini" type="primary" plain="{{true}}">按钮</button>
    <!-- disabled -->
    <button size="mini" type="primary" disabled="{{true}}">按钮</button>
    <!-- loading -->
    <button size="mini" type="primary" loading="{{true}}">按钮</button>
    <!-- hover-class -->
    <button size="mini" hover-class="pressed">按钮</button>
    <!-- open-type 微信提供的一些能力-->
    <button size="mini" hover-class="pressed" open-type="contact">客服</button>
    <button size="mini" hover-class="pressed" open-type="share">分享</button>
    <button size="mini" hover-class="pressed" open-type="getPhoneNumber">获取电话</button>
    <button size="mini" hover-class="pressed" open-type="getUserInfo">获取用户信息</button>
</view>
样式:
.page {
    border: 1px solid red;
    margin: 10px 10px;
}

.pressed {
    background: red;
    color: white;
}
效果:
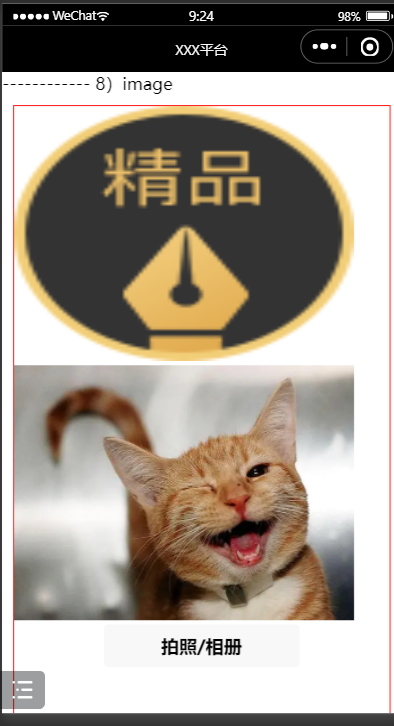
8,image
结构:
<view>------------ 8)image</view>
<view class="page">
    <!-- 一个image组件,默认大小是320*240 -->
    <image show-menu-by-longpress src="../../static/images/icon/home_essays_icon_show.png"></image>
    <!-- 由于小程序上线,对小程序的体积是有要求,所以图片通常使用线上的图片 -->
    <image src="https://img0.baidu.com/it/u=1645014943,3294260658&fm=253&fmt=auto&app=138&f=JPEG" />
    <button bindtap="handleChooseAlbum">拍照/相册</button>
    <image src="{{imgPath}}"></image>
    <view>-------------------</view>
    <view bindtap="uploadImage">请上传图片+</view>
    <view class="container">
        <image wx:for="{{imageList}}" src="{{item}}"></image>
    </view>
</view>
样式:
.page {
    border: 1px solid red;
    margin: 10px 10px;
}

.container image {
    width: 200rpx;
    height: 200rpx;
    padding: 5rpx;
}
逻辑:
Page({
    data: {
        imgPath: "",
        imageList: ['/static/images/icon/balancepay_icon_show.png', '/static/images/icon/balancepay_icon_show.png']
    },
    uploadImage() {
        let that = this;
        wx.chooseImage({
            count: 9,
            sizeType: ['original', 'compressed'],
            sourceType: ['album', 'camera'],
            success(res) {
                // 覆盖原本的图片
                // that.setData({
                //     imageList: res.tempFilePaths
                // })

                // 默认图片 + 选择的图片;
                console.log("--res.tempFilePaths", res.tempFilePaths);
                that.setData({
                    imageList: that.data.imageList.concat(res.tempFilePaths)
                });
                // 图片目前是上传到了内存
                // 后期需要把图上上传到远程服务器(腾讯云中的对象存储)
            }
        })
    },
    handleChooseAlbum() {
        wx.chooseImage({
            count: 1,
            sizeType: ['original', 'compressed'],
            sourceType: ['album', 'camera'],
            success: res => {
                // tempFilePath可以作为img标签的src属性显示图片
                const tempFilePaths = res.tempFilePaths
                this.setData({
                    imgPath: tempFilePaths
                })
            }
        })
    }
})
效果:
9,progress
结构:
<view>------------ 9)progress</view>
<view class="page">
    <progress percent="20" show-info stroke-width="20" />
    <progress percent="20" show-info border-radius="10" stroke-width="30" />
    <!-- 动态的进度条 -->
    <progress percent="60" color="#10AEFF" active stroke-width="30" />

    <view>------------------------------</view>

    <view wx:for="{{imageList}}">
        <view>{{item.title}}</view>
        <progress percent="{{item.percent}}" show-info></progress>
    </view>

    <button bindtap="changePercent">点击</button>
</view>
样式:
.page {
    border: 1px solid red;
    margin: 10px 10px;
}
逻辑:
Page({
    data: {
        imageList: [{
                id: 1,
                title: "图片1",
                percent: 20
            },
            {
                id: 1,
                title: "图片2",
                percent: 30
            },
            {
                id: 1,
                title: "图片3",
                percent: 60
            },
        ]
    },
    changePercent() {
        // 方式1:不行
        // this.setData({
        //     this.imageList[0].percent : 80
        // })

        // 方式2: 不行
        // 由于需要全部修改, 所以性能差。
        // let dataList = this.data.imageList;
        // dataList[0].percent = 80;
        // this.setData({
        //     imageList: dataList
        // })

        // 方式3:推荐
        // 如何修改data中的局部数据
        let count = 2;
        this.setData({
            ["imageList[0].percent"]: 80,
            ["imageList[1].title"]: '上传成功',
            ["imageList[" + count + "].title"]: '上传失败',
        })
    }
})
效果:
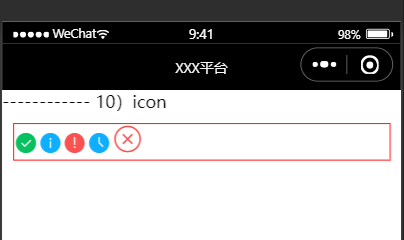
10,icon
结构:
<view>------------ 10)icon</view>
<view class="page">
    <view class="icon-box">
        <icon class="icon-box-img" type="success"></icon>
        <icon class="icon-box-img" type="info"></icon>
        <icon class="icon-box-img" type="warn"></icon>
        <icon class="icon-box-img" type="waiting"></icon>
        <icon class="icon-box-img" type="cancel" size="30"></icon>
    </view>
</view>
样式:
.page {
    border: 1px solid red;
    margin: 10px 10px;
}
逻辑:
无效果:
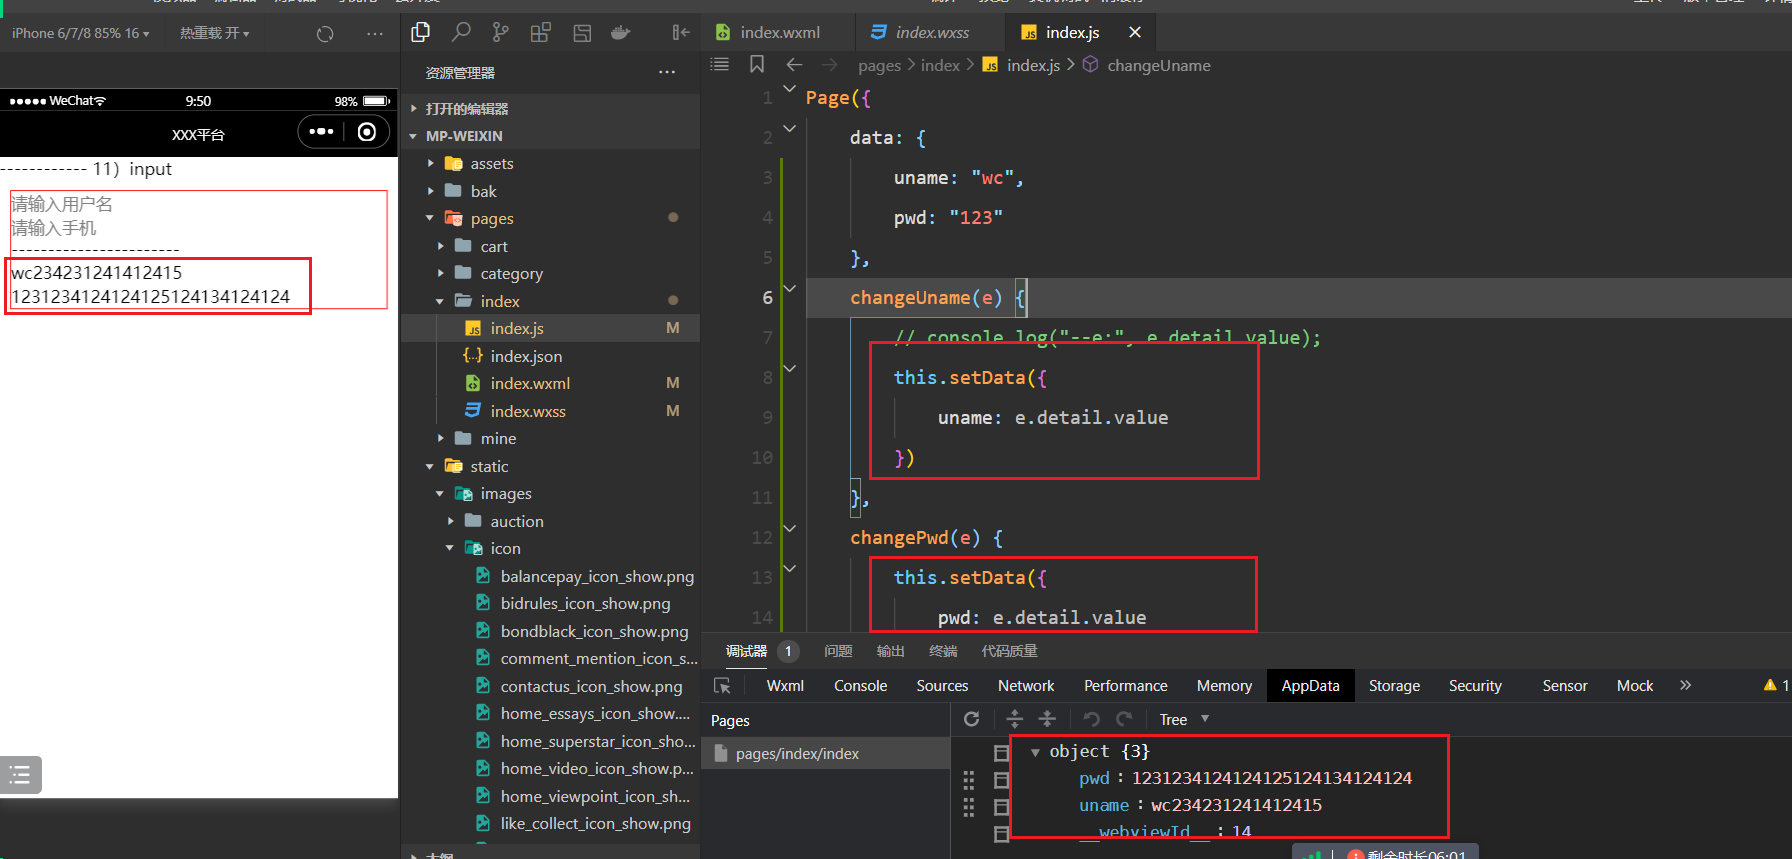
11,input
结构:
<view>------------ 11)input</view>
<view class="page">
    <!-- vant也有对应的小程序版本,在真实开发中,一般情况下,都会使用一些第三方的UI组件库,如:vant -->
    <input type="text" auto-focus placeholder="请输入用户名" />
    <!-- type=number,在真机上,只会拉起数字键盘,  但是不限制你输入其它字母-->
    <input type="number" auto-focus placeholder="请输入手机" />
    <view>-----------------------</view>
    <!-- vue: v-model -->
    <input bindinput="changeUname" value="{{uname}}" type="text" auto-focus placeholder="请输入用户名" />
    <input  bindinput="changePwd"  value="{{pwd}}" type="text" auto-focus placeholder="请输入密码" />
</view>
样式:
.page {
    border: 1px solid red;
    margin: 10px 10px;
}
逻辑:
Page({
    data: {
        uname: "wc",
        pwd: "123"
    },
    changeUname(e) {
        // console.log("--e:", e.detail.value);
        this.setData({
            uname: e.detail.value
        })
    },
    changePwd(e) {
        this.setData({
            pwd: e.detail.value
        })
    }
})
效果:
12,滚动视图
结构:
<view>------------ 12)滚动视图</view>
<scroll-view class="tab" scroll-x>
    <text class="item1">新闻1</text>
    <text class="item1">新闻2</text>
    <text class="item1">新闻3</text>
    <text class="item1">新闻4</text>
    <text class="item1">新闻5</text>
    <text class="item1">新闻6</text>
    <text class="item1">新闻7</text>
    <text class="item1">新闻8</text>
    <text class="item1">新闻9</text>
    <text class="item1">新闻10</text>
</scroll-view>

<scroll-view scroll-y class="container-y">
    <view wx:for="{{10}}" class="item02"></view>
</scroll-view>

<scroll-view scroll-x class="container-x">
    <view wx:for="{{10}}" class="item01"></view>
</scroll-view>
样式:
.tab {
    width: 100%;
    height: 80rpx;
    white-space: nowrap;
    border: 1px solid red;
    overflow: hidden;
}

.tab .item1 {
    display: inline-block;
    width: 100rpx;
}

.container-y {
    height: 250px;
    border: 1px solid red;
}

.item02 {
    height: 100px;
    background-color: red;
    margin: 10px;
}
.container-x {
    /* 里面的子元素不换行 */
    white-space: nowrap;
    border: 1px solid red;
}

.item01 {
    width: 100px;
    height: 100px;
    background-color: red;
    margin: 10px;
    display: inline-block;
}
逻辑:
无效果:

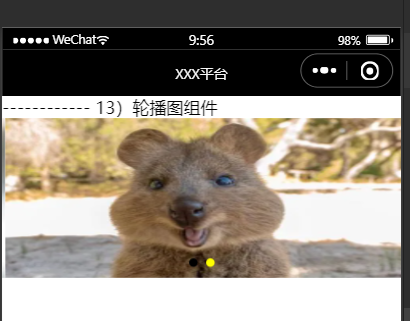
13,轮播图组件
结构:
<view>------------ 13)轮播图组件</view>
<view class="page">
    <swiper indicator-dots="true" indicator-color="yellow" interval="3000" autoplay="true">
        <swiper-item>
            <image style="width: 100%;" src="https://img0.baidu.com/it/u=1645014943,3294260658&fm=253&fmt=auto&app=138&f=JPEG" alt=""></image>
        </swiper-item>
        <swiper-item>
            <image style="width: 100%;" src="https://img1.baidu.com/it/u=2599614845,484438007&fm=253&fmt=auto&app=138&f=JPEG?w=500&h=500" alt=""></image>
        </swiper-item>
    </swiper>
</view>
样式:
无逻辑:
无效果:
五,绘制页面
1,练习页面一
结构:
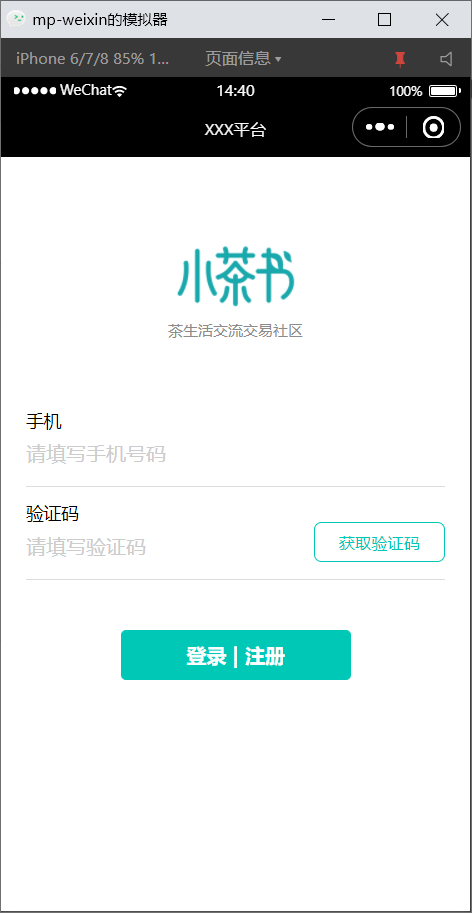
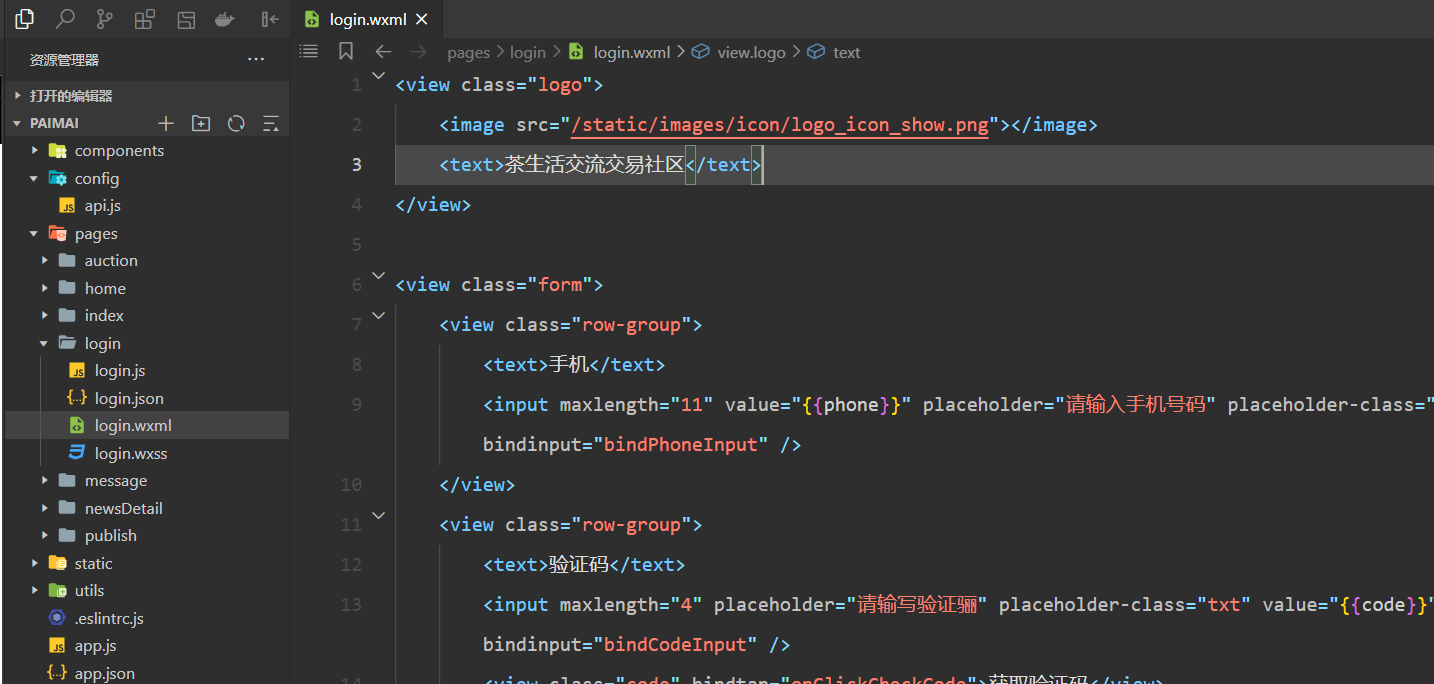
<view class="logo">
    <image src="/static/images/icon/logo_icon_show.png"></image>
    <text>茶生活交流交易社区</text>
</view>

<view class="form">
    <view class="row-group">
        <text>手机</text>
        <input maxlength="11" placeholder="请输入手机号码" placeholder-class="txt" />
    </view>
    <view class="row-group">
        <text>验证码</text>
        <input maxlength="4" placeholder="请输写验证骊" placeholder-class="txt" />
        <view class="code" bindtap="onClickCheckCode">获取验证码</view>
    </view>
    <view>
        <button class="submit">登录 | 注册</button>
    </view>
</view>
样式:
.logo {
    display: flex;
    flex-direction: column;
    align-items: center;
}

.logo image {
    margin-top: 140rpx;
    width: 216rpx;
    height: 100rpx;
}

.logo text {
    font-size: 24rpx;
    color: #8c8c8c;
    margin-top: 26rpx;
    margin-bottom: 50rpx;
    font-weight: 400;
    line-height: 24rpx;
}

.form {
    padding: 40rpx;
}

.form .row-group {
    border-bottom: 1rpx solid #ddd;
    position: relative;
    padding: 20rpx 0;
}

.form .row-group text {
    font-size: 28rpx;
}

.form .row-group input {
    padding: 10rpx 0;
}

.form .row-group .txt {
    color: #ccc;
}

.form .row-group .code {
    position: absolute;
    right: 0;
    bottom: 26rpx;

    width: 206rpx;
    height: 60rpx;
    border: 2rpx solid #00c8b6;
    border-radius: 12rpx;
    font-size: 26rpx;
    font-weight: 400;
    color: #00c8b6;
    display: flex;
    align-items: center;
    justify-content: center;
}

.form .submit {
    margin-top: 80rpx;
    color: #fff;
    border: 2rpx solid #00c8b6;
    background-color: #00c8b6;
    font-size: 32rpx;
    font-weight: bold;
}
2,练习页面二
结构:
<view class="container">
    <view class="top-view">
        <view class="user">
            <view class="row">
                <image class="avatar" src="/static/images/auction/hh.png"></image>
                <view class="name">
                    <navigator url="/pages/login/login">登录</navigator>
                    |
                    <navigator url="/pages/login/login">注册</navigator>
                </view>
            </view>
            <view class="site">查看个人主页</view>
        </view>
        <view class="numbers">
            <view class="row">
                <text>0</text>
                <text>关注</text>
            </view>
            <view class="row">
                <text>0</text>
                <text>粉丝</text>
            </view>
            <view class="row">
                <text>0</text>
                <text>赞与收藏</text>
            </view>
            <view class="row">
                <text>0</text>
                <text>好友动态</text>
            </view>
        </view>
    </view>

    <view class="middle-view">
        <navigator class="item" url="/pages/order/order">
            <image src="/static/images/icon/transaction_order1_icon_show.png"></image>
            <text>未支付</text>
        </navigator>
        <navigator class="item" url="/pages/order/order">
            <image src="/static/images/icon/transaction_order2_icon_show.png"></image>
            <text>待收货</text>
        </navigator>
        <navigator class="item" url="/pages/order/order">
            <image src="/static/images/icon/transaction_order3_icon_show.png"></image>
            <text>已完成</text>
        </navigator>
        <navigator class="item" url="/pages/order/order">
            <image src="/static/images/icon/transaction_order5_icon_show.png"></image>
            <text>逾期未支付</text>
        </navigator>
    </view>

    <view class="function-view">
        <view class="row">
            <view class="left">我的钱包</view>
            <view class="right">
                <text>¥20</text>
                <image class="go-icon" src='/static/images/icon/to_icon_show_small.png'></image>
            </view>
        </view>
        <navigator class="row" url="/pages/myCoupon/myCoupon">
            <view class="left">我的优惠券</view>
            <view class="right">
                <text>暂无课用</text>
                <image class="go-icon" src='/static/images/icon/to_icon_show_small.png'></image>
            </view>
        </navigator>
        <navigator class="row" url="/pages/coupon/coupon">
            <view class="left">领劵中心</view>
            <view class="right">
                <text>你的福利都在这里</text>
                <image class="go-icon" src='/static/images/icon/to_icon_show_small.png'></image>
            </view>
        </navigator>
    </view>

    <view class="contact-view">
        <button open-type="contact">
            <image src="/static/images/icon/wechat_contact_icon_show.png"></image>
        </button>
        <button bindtap="onClickCall">
            <image src="/static/images/icon/phone_contact_icon_show.png"></image>
        </button>
    </view>
</view>
样式:
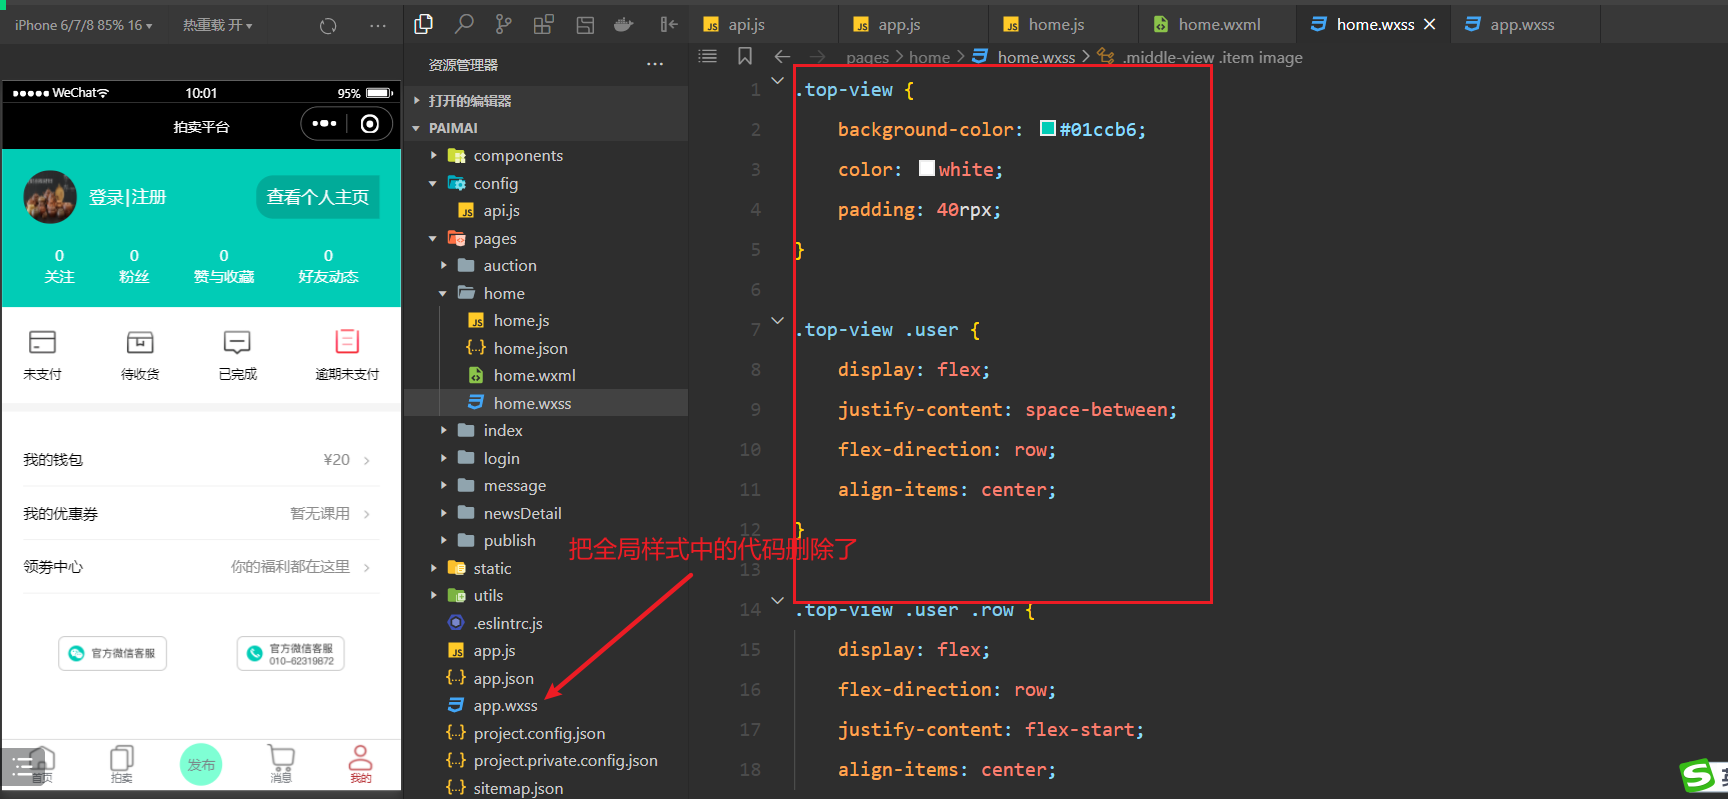
.top-view {
background-color: #01ccb6;
color: white;
padding: 40rpx;
}
.top-view .user {
display: flex;
justify-content: space-between;
flex-direction: row;
align-items: center;
}
.top-view .user .row {
display: flex;
flex-direction: row;
justify-content: flex-start;
align-items: center;
}
.top-view .user .avatar {
width: 100rpx;
height: 100rpx;
border-radius: 50%;
}
.top-view .user .name {
display: flex;
flex-direction: row;
justify-content: flex-start;
padding-left: 20rpx;
}
.top-view .user .name navigator {
padding: 0 5rpx;
}
.top-view .site {
background-color: rgba(0, 0, 0, 0.16);
padding: 20rpx;
border-top-left-radius: 32rpx;
border-bottom-left-radius: 32rpx;
}
.top-view .numbers {
display: flex;
justify-content: space-between;
font-size: 28rpx;
padding: 40rpx;
padding-bottom: 0rpx;
}
.top-view .numbers .row {
display: flex;
flex-direction: column;
align-items: center;
}
.middle-view {
padding: 40rpx;
display: flex;
flex-direction: row;
justify-content: space-between;
font-size: 25rpx;
border-bottom: 16rpx solid #f5f5f5;
}
.middle-view .item {
display: flex;
flex-direction: column;
align-items: center;
}
.middle-view .item image {
width: 50rpx;
height: 50rpx;
margin-bottom: 20rpx;
}
.function-view {
padding: 40rpx;
font-size: 28rpx;
}
.function-view .row {
display: flex;
flex-direction: row;
justify-content: space-between;
border-bottom: 1px solid #efefef;
padding: 30rpx 0;
}
.function-view .row .right {
color: #8c8c8c;
}
.function-view .row .go-icon {
margin: 0 20rpx;
width: 16rpx;
height: 16rpx;
}
.contact-view {
padding: 40rpx;
display: flex;
flex-direction: row;
justify-content: space-around;
}
.contact-view button {
background-color: transparent;
border: 0;
padding: 0;
}
.contact-view button::after {
border: 0;
}
.contact-view image {
width: 204rpx;
height: 66rpx;
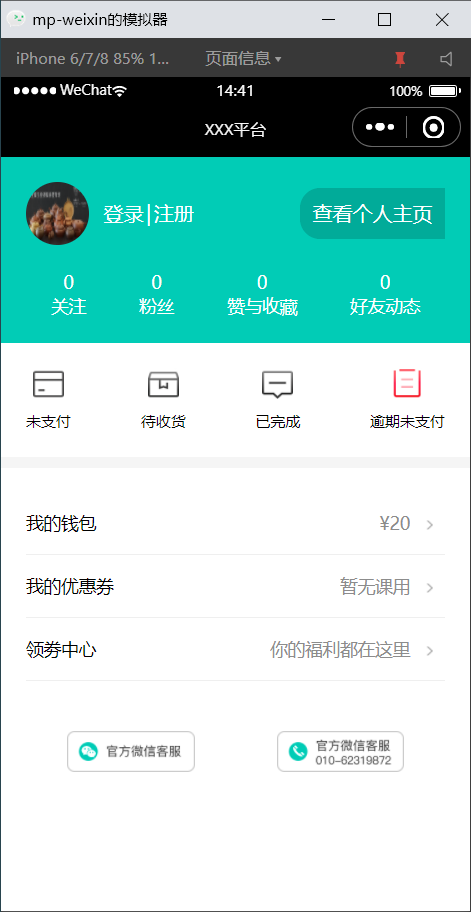
}3,练习页面三
4,练习页面四
5,练习页面五
6,练习页面六
7,练习页面七
六,事件绑定
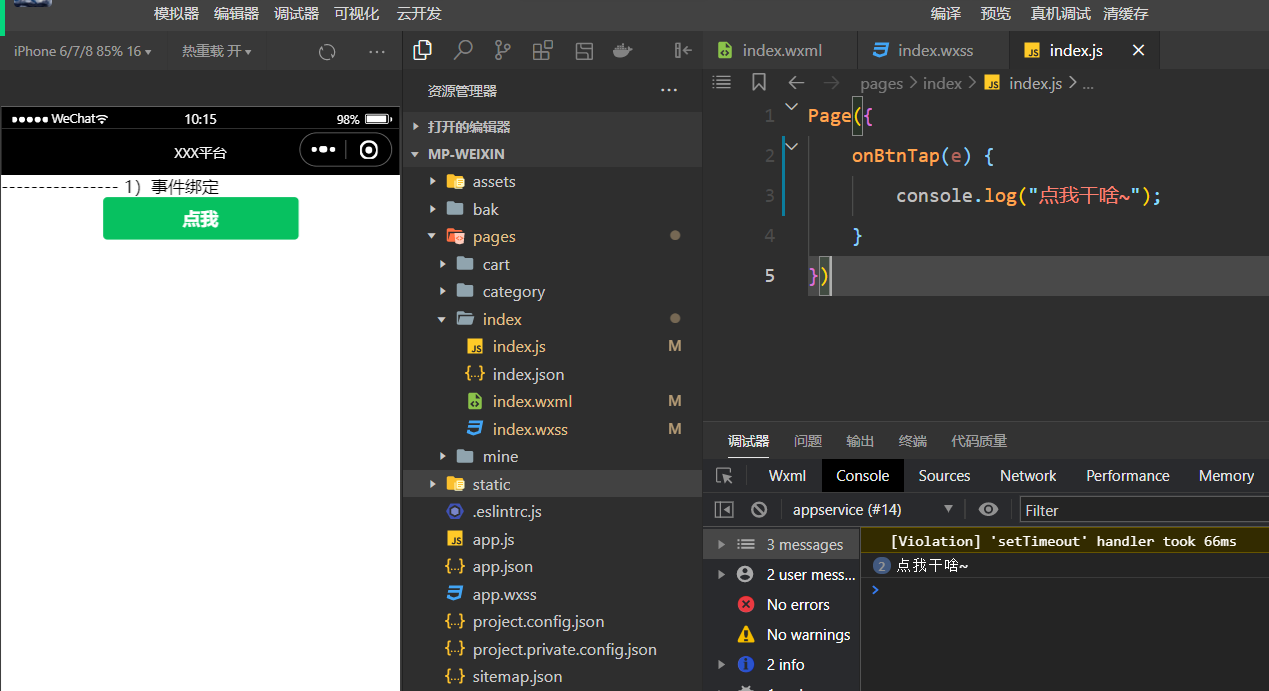
1,简单事件绑定
结构:
<view>---------------- 1)事件绑定</view>
<view class="page">
    <button type="primary" bindtap="onBtnTap">点我</button>
</view>
样式:
.page {
    border: 1px solid red;
    margin: 10px 10px;
}
逻辑:
Page({
    onBtnTap(e) {
        console.log("点我干啥~");
    }
})
效果:
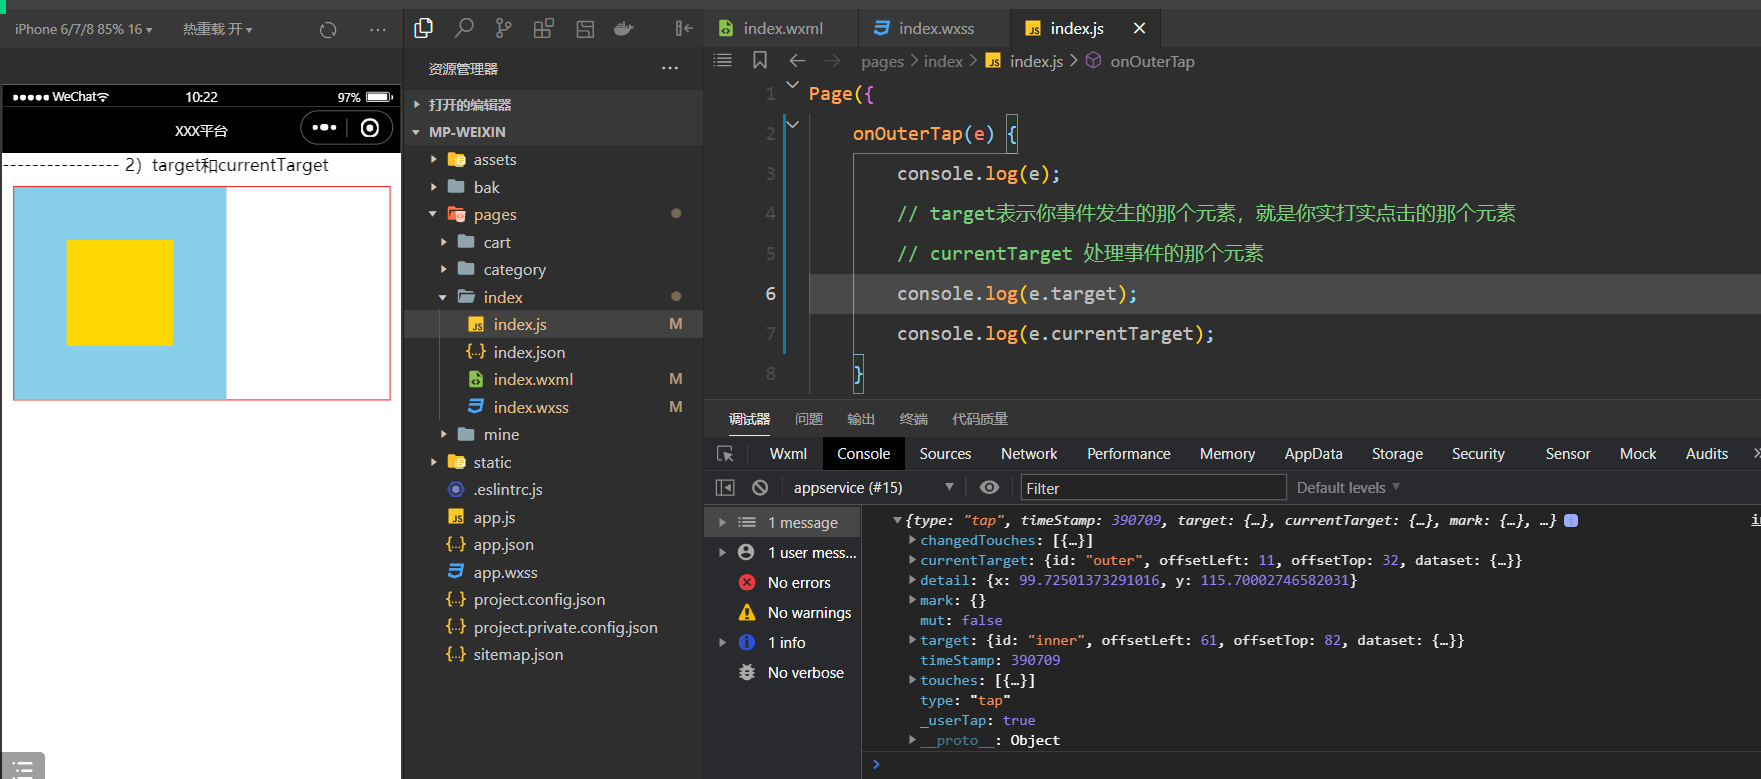
2,target和currentTarget
结构:
<view>---------------- 2)target和currentTarget</view>
<view class="page">
    <!-- html5中的自定义属性必须以data-打头 -->
    <view data-name='ml' class="outer" bindtap="onOuterTap" id="outer">
        <view data-age='18' class="inner" id="inner"></view>
    </view>
</view>
样式:
.page {
    border: 1px solid red;
    margin: 10px 10px;
}

.outer {
    display: flex;
    justify-content: center;
    align-items: center;
    width: 400rpx;
    height: 400rpx;
    background-color: skyblue;
}

.inner {
    width: 200rpx;
    height: 200rpx;
    background-color: gold;
}
逻辑:
Page({
    onOuterTap(e) {
        console.log(e);
        // target表示你事件发生的那个元素,就是你实打实点击的那个元素
        // currentTarget 处理事件的那个元素
        console.log(e.target);
        console.log(e.currentTarget);
    }
})
效果:
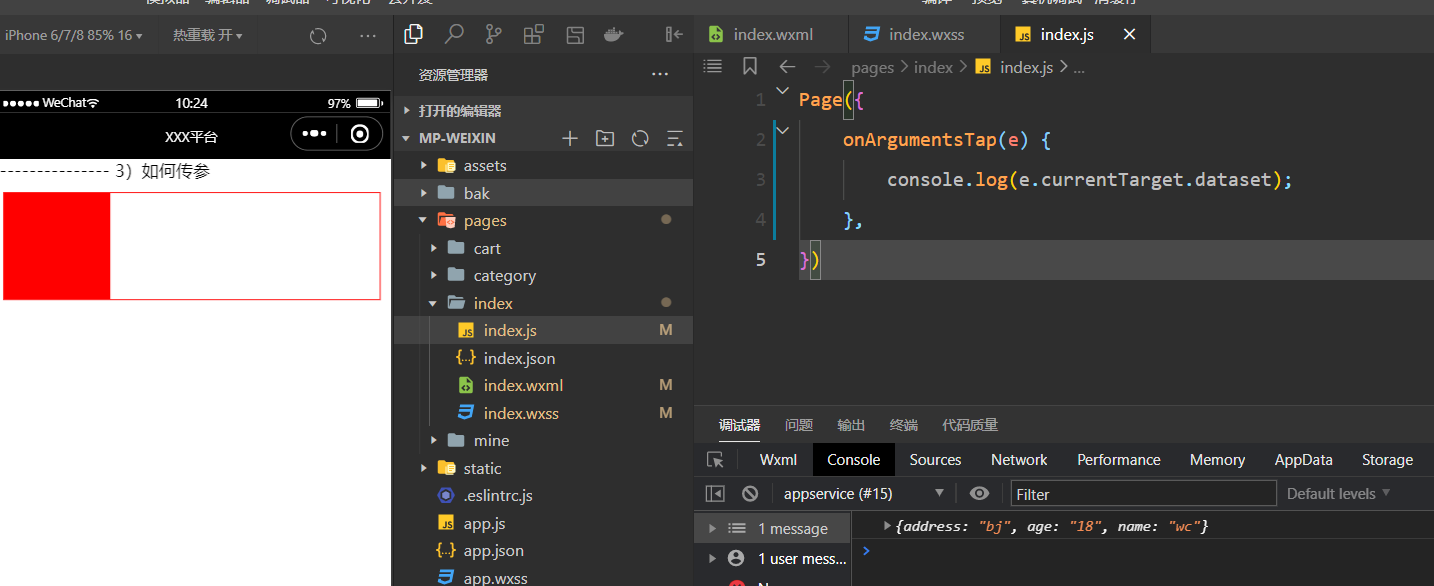
3,如何传参
结构:
<view>---------------- 3)如何传参</view>
<view class="page">
    <!-- 绑定事件又想传参,必须通过自定义属性 -->
    <view data-name="wc" data-age="18" data-address="bj" bindtap="onArgumentsTap" style="width:200rpx;height:200rpx;background-color:red;">
    </view>
</view>
样式:
.page {
    border: 1px solid red;
    margin: 10px 10px;
}
逻辑:
Page({
    onArgumentsTap(e) {
        console.log(e.currentTarget.dataset);
    },
})
效果:
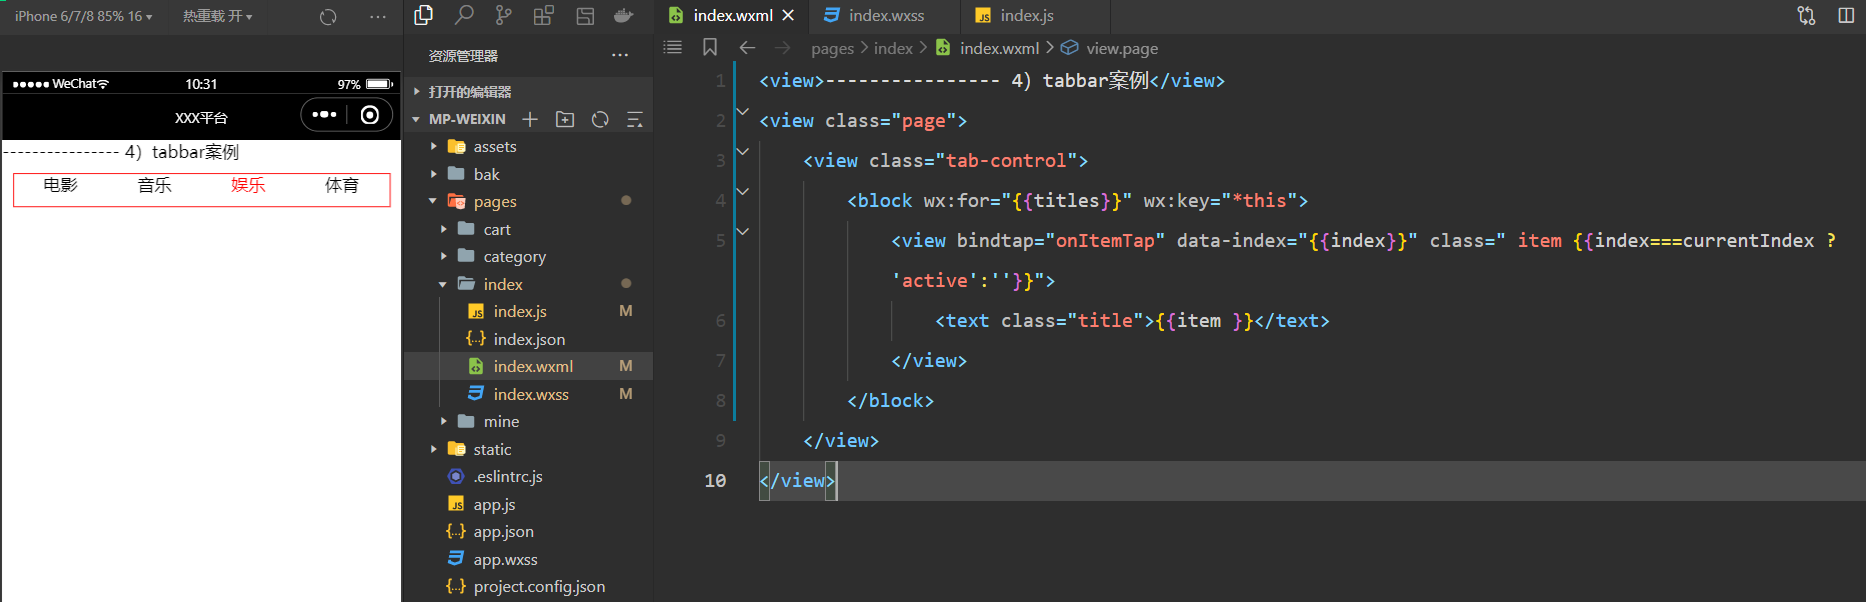
4,tabbar案例
结构:
<view>---------------- 4)tabbar案例</view>
<view class="page">
    <view class="tab-control">
        <block wx:for="{{titles}}" wx:key="*this">
            <view bindtap="onItemTap" data-index="{{index}}" class=" item {{index===currentIndex ?'active':''}}">
                <text class="title">{{item }}</text>
            </view>
        </block>
    </view>
</view>
样式:
.page {
    border: 1px solid red;
    margin: 10px 10px;
}

.tab-control {
    display: flex;
    height: 60rpx;
    line-height: 40rpx;
    text-align: center;
}

.tab-control .item {
    flex: 1;
}

.tab-control .item.active {
    color: red;
}
逻辑:
Page({
    data: {
        titles: ["电影", "音乐", "娱乐", "体育"],
        currentIndex: 0
    },
    onItemTap(e) {
        this.setData({
            currentIndex: e.currentTarget.dataset.index
        })
    },
})
效果:
5,事件冒泡和捕获
结构:
<view>---------------- 5)事件冒泡和捕获(默认是冒泡)</view>
<view class="page">
    <view class="view01" bindtap="onView01Tap">
        <view class="view02" bindtap="onView02Tap">
            <view class="view03" bindtap="onView03Tap"></view>
        </view>
    </view>
</view>

或

<view>---------------- 5)事件冒泡和捕获(默认是冒泡)</view>
<view class="page">
    <view class="view01" bind:tap="onView01Tap">
        <view class="view02" bind:tap="onView02Tap">
            <view class="view03" bind:tap="onView03Tap"></view>
        </view>
    </view>
</view>

或

<view>---------------- 5)事件冒泡和捕获(捕获)</view>
<view class="page">
    <view class="view01" capture-bind:tap="onView01CaptureTap" bind:tap="onView01Tap">
        <view class="view02" capture-bind:tap="onView02CaptureTap" bind:tap="onView02Tap">
            <view class="view03" capture-bind:tap="onView03CaptureTap" bind:tap="onView03Tap"></view>
        </view>
    </view>
</view>
样式:
.page {
    border: 1px solid red;
    margin: 10px 10px;
}

.view01 {
    display: flex;
    justify-content: center;
    align-items: center;
    width: 600rpx;
    height: 600rpx;
    background-color: gold;
}

.view02 {
    display: flex;
    justify-content: center;
    align-items: center;
    width: 400rpx;
    height: 400rpx;
    background-color: skyblue;
}

.view03 {
    width: 200rpx;
    height: 200rpx;
    background-color: pink;
}
逻辑:
Page({
    onView01Tap(e) {
        console.log("View01");
    },
    onView02Tap(e) {
        console.log("View02");
    },
    onView03Tap(e) {
        console.log("View03");
    },
})
效果:
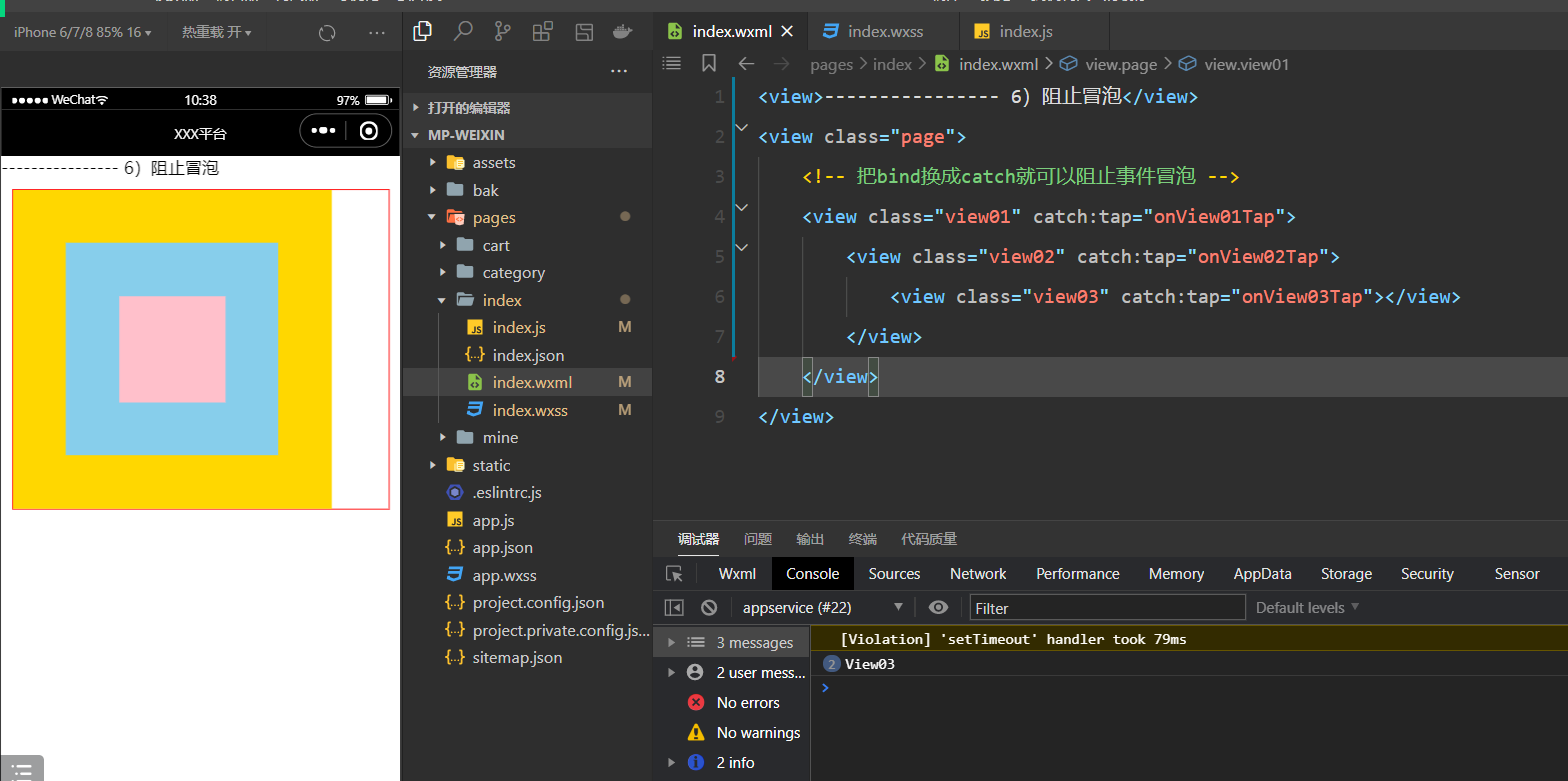
6,阻止冒泡
结构:
<view>---------------- 6)阻止冒泡</view>
<view class="page">
    <!-- 把bind换成catch就可以阻止事件冒泡 -->
    <view class="view01" catch:tap="onView01Tap">
        <view class="view02" catch:tap="onView02Tap">
            <view class="view03" catch:tap="onView03Tap"></view>
        </view>
    </view>
</view>
样式:
.page {
    border: 1px solid red;
    margin: 10px 10px;
}

.view01 {
    display: flex;
    justify-content: center;
    align-items: center;
    width: 600rpx;
    height: 600rpx;
    background-color: gold;
}

.view02 {
    display: flex;
    justify-content: center;
    align-items: center;
    width: 400rpx;
    height: 400rpx;
    background-color: skyblue;
}

.view03 {
    width: 200rpx;
    height: 200rpx;
    background-color: pink;
}
逻辑:
Page({
    onView01Tap(e) {
        console.log("View01");
    },
    onView02Tap(e) {
        console.log("View02");
    },
    onView03Tap(e) {
        console.log("View03");
    },
})
效果:
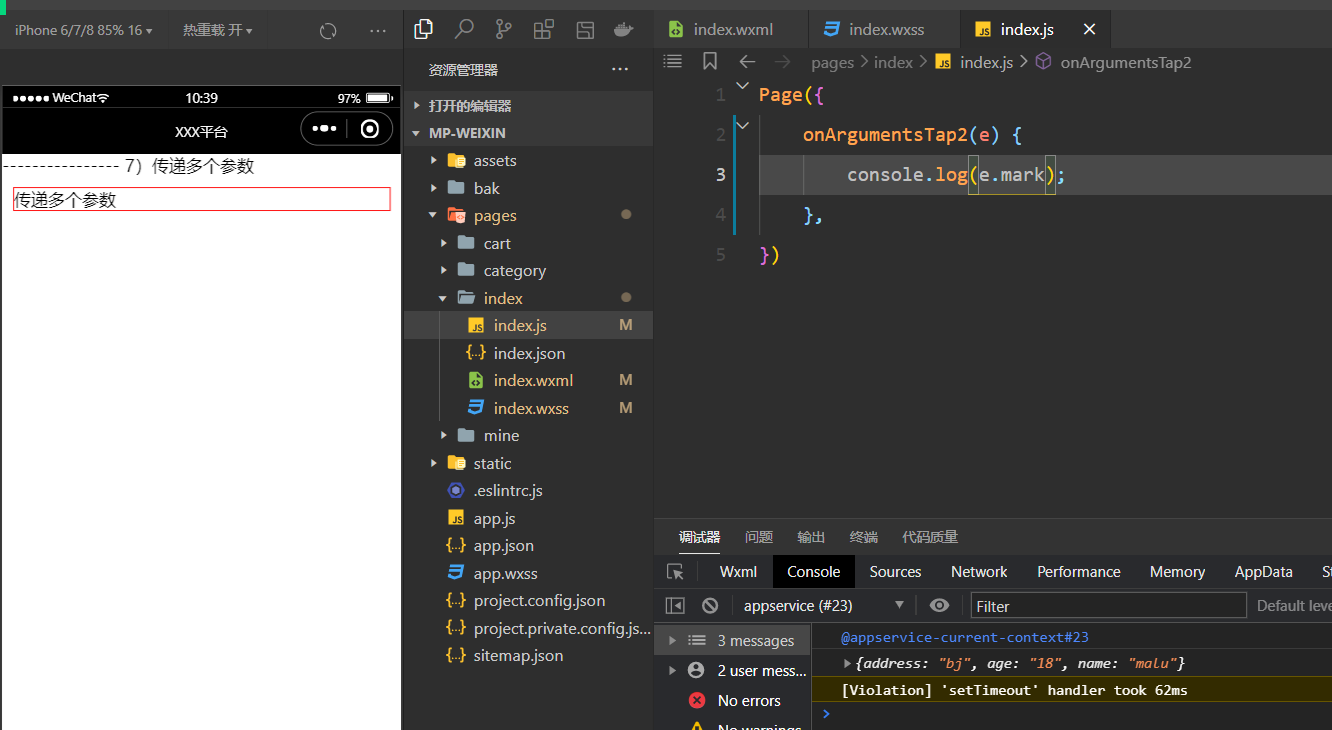
7,传递多个参数(mark)
结构:
<view>---------------- 7)传递多个参数</view>
<view class="page">
    <view mark:name="malu" mark:age="18" bindtap="onArgumentsTap2">
        <text mark:address="bj">传递多个参数</text>
    </view>
</view>
样式:
无逻辑:
Page({
    onArgumentsTap2(e) {
        console.log(e.mark);
    },
})
效果:
七,组件通信
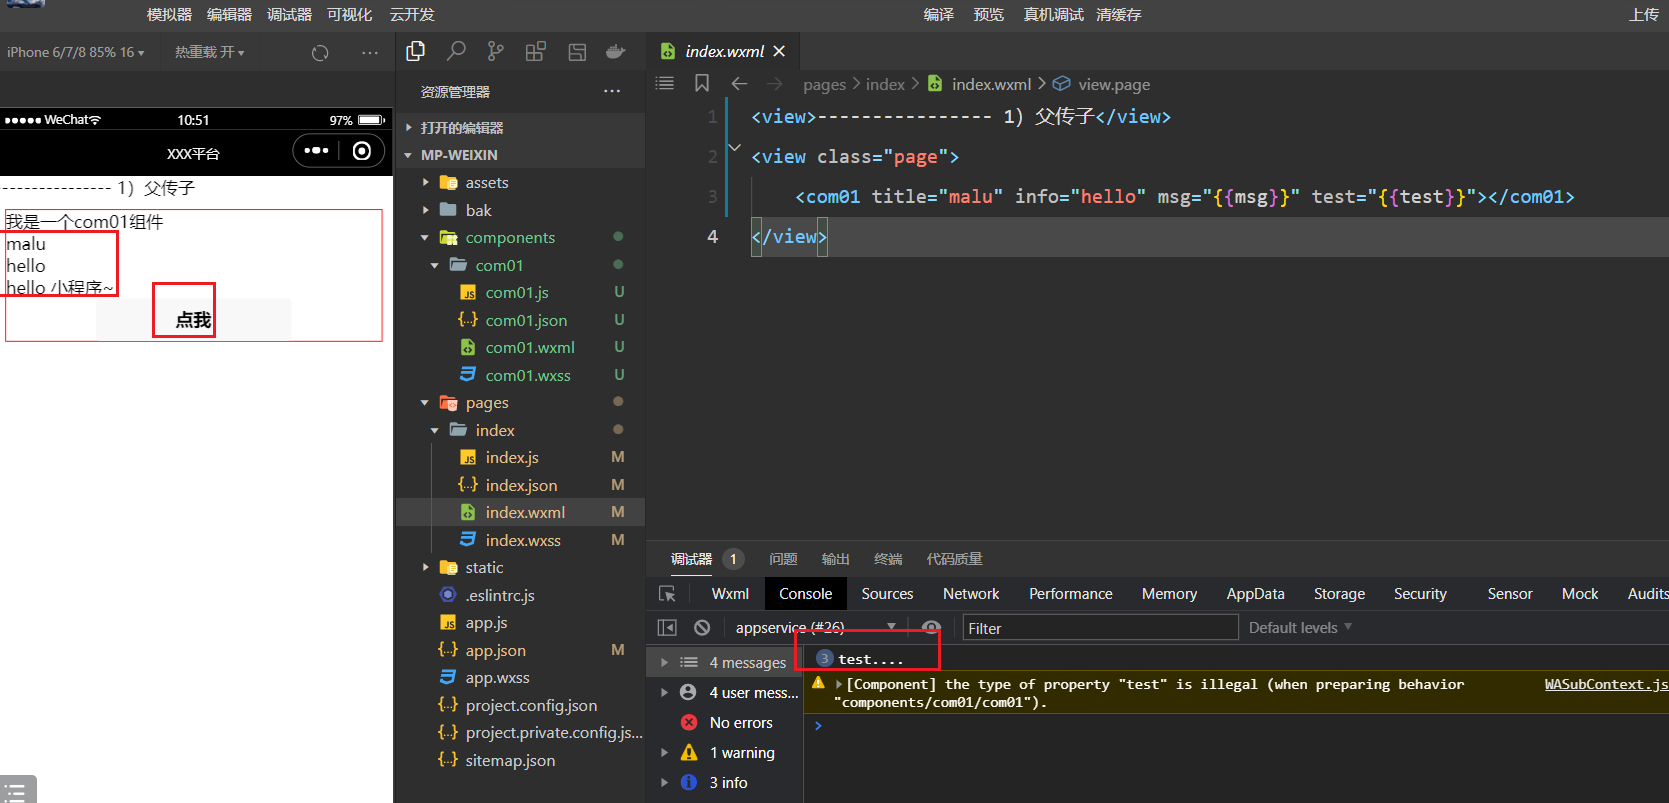
1,父传子
定义组件如下:
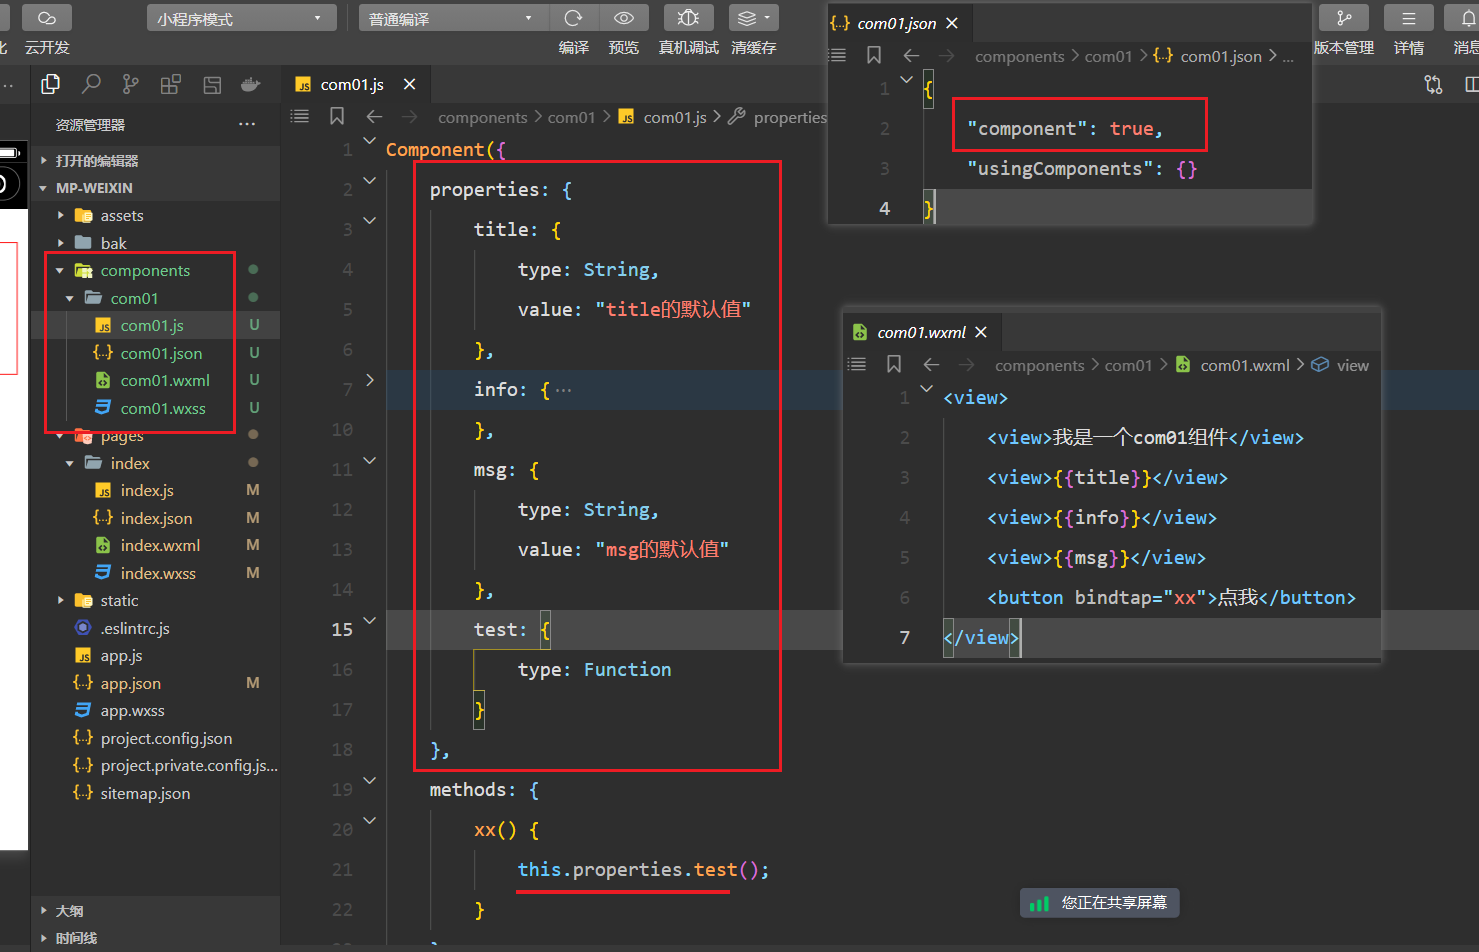
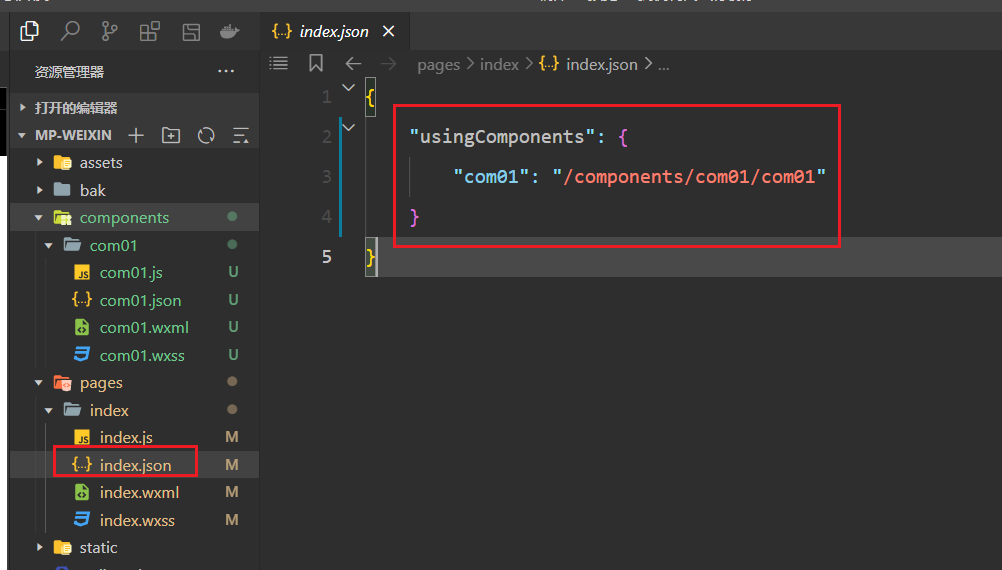
在页面中注册组件:
使用组件,如下:
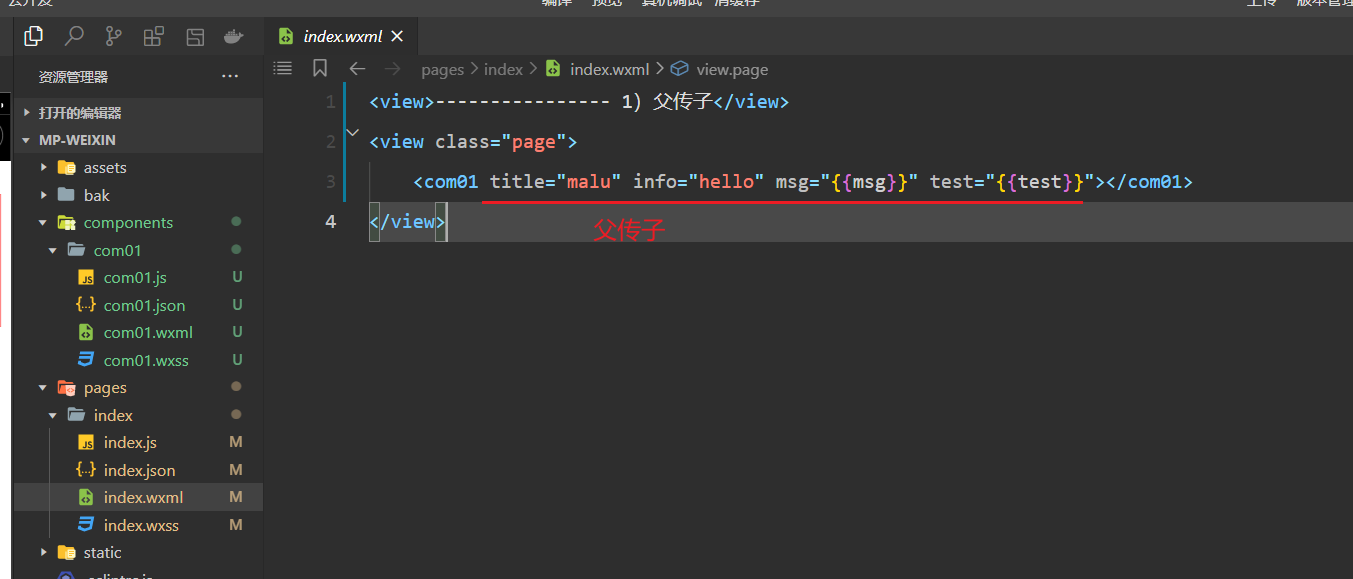
效果如下 :
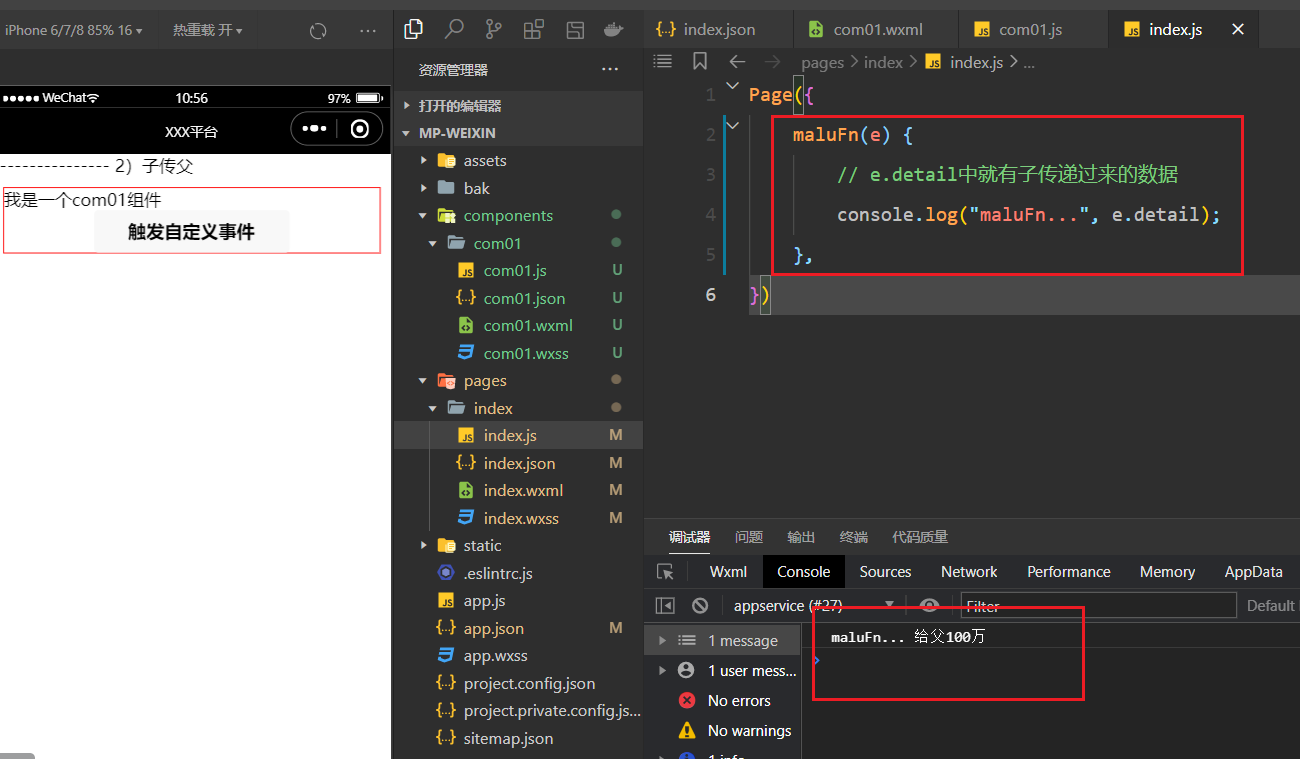
2,子传父
页面中使用子组件,在子组件上绑定自定义事件,如下:
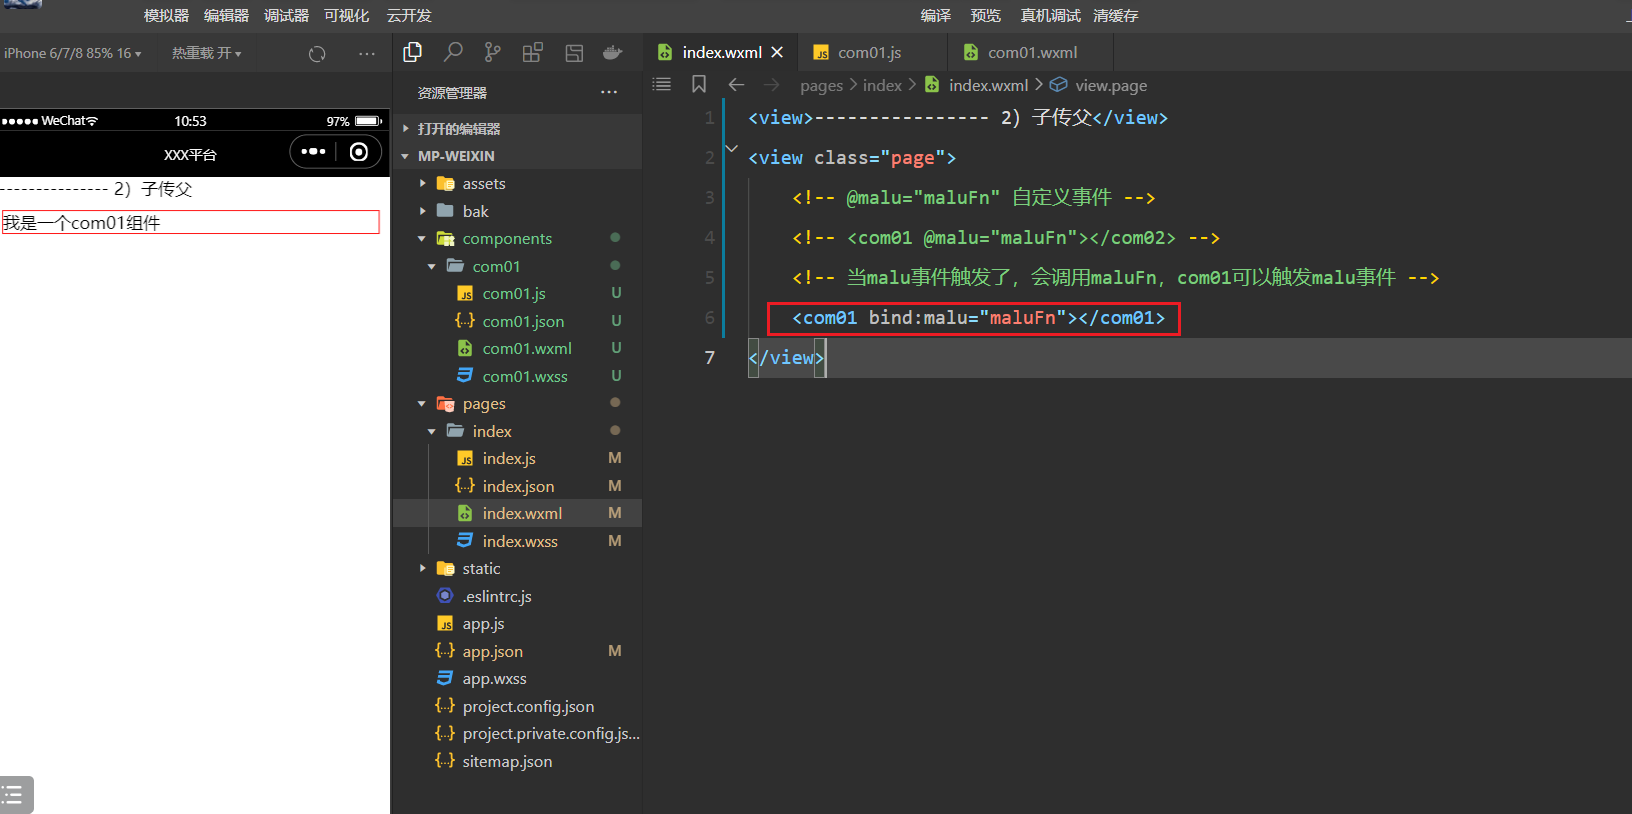
不要忘了注册:

开始写com01组件,如下:
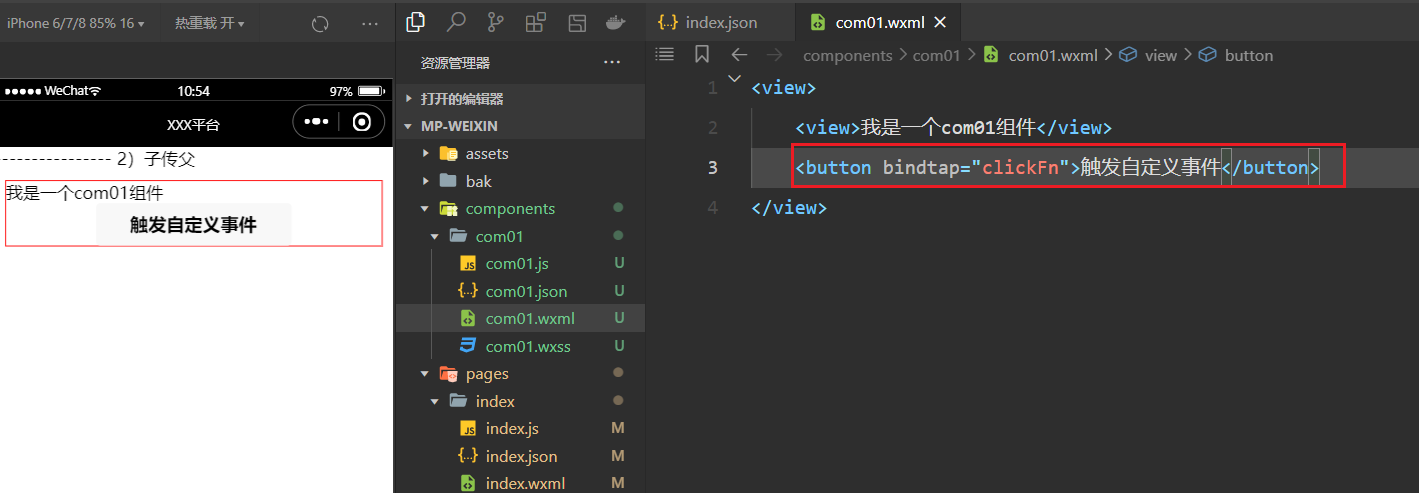

子触发了malu事件,接收数据了,如下:
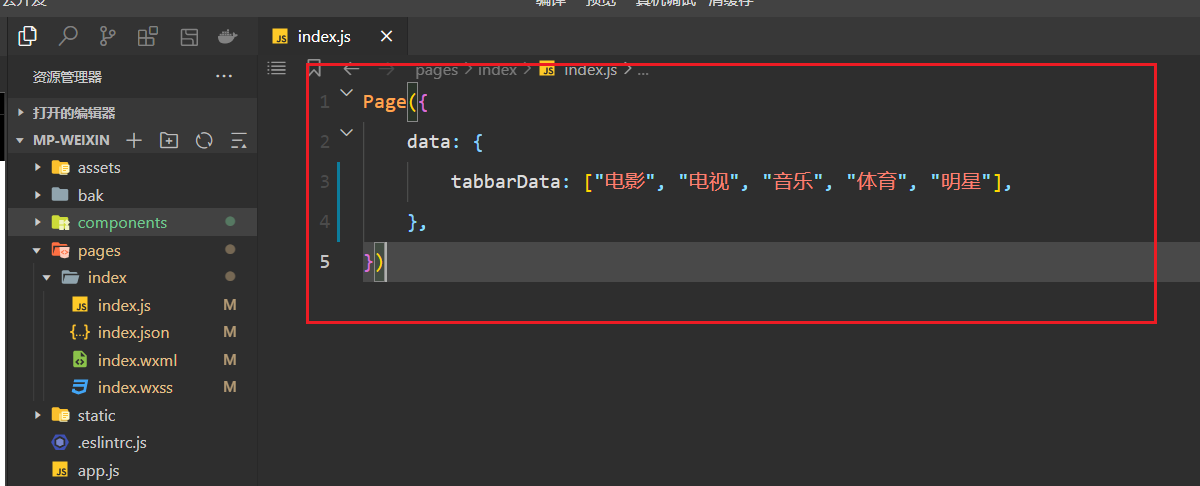
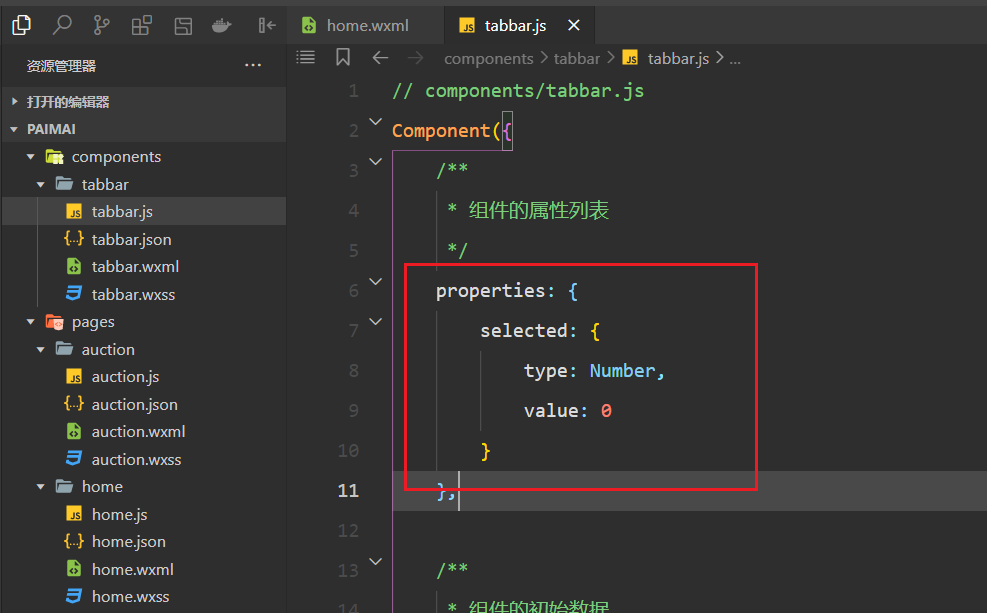
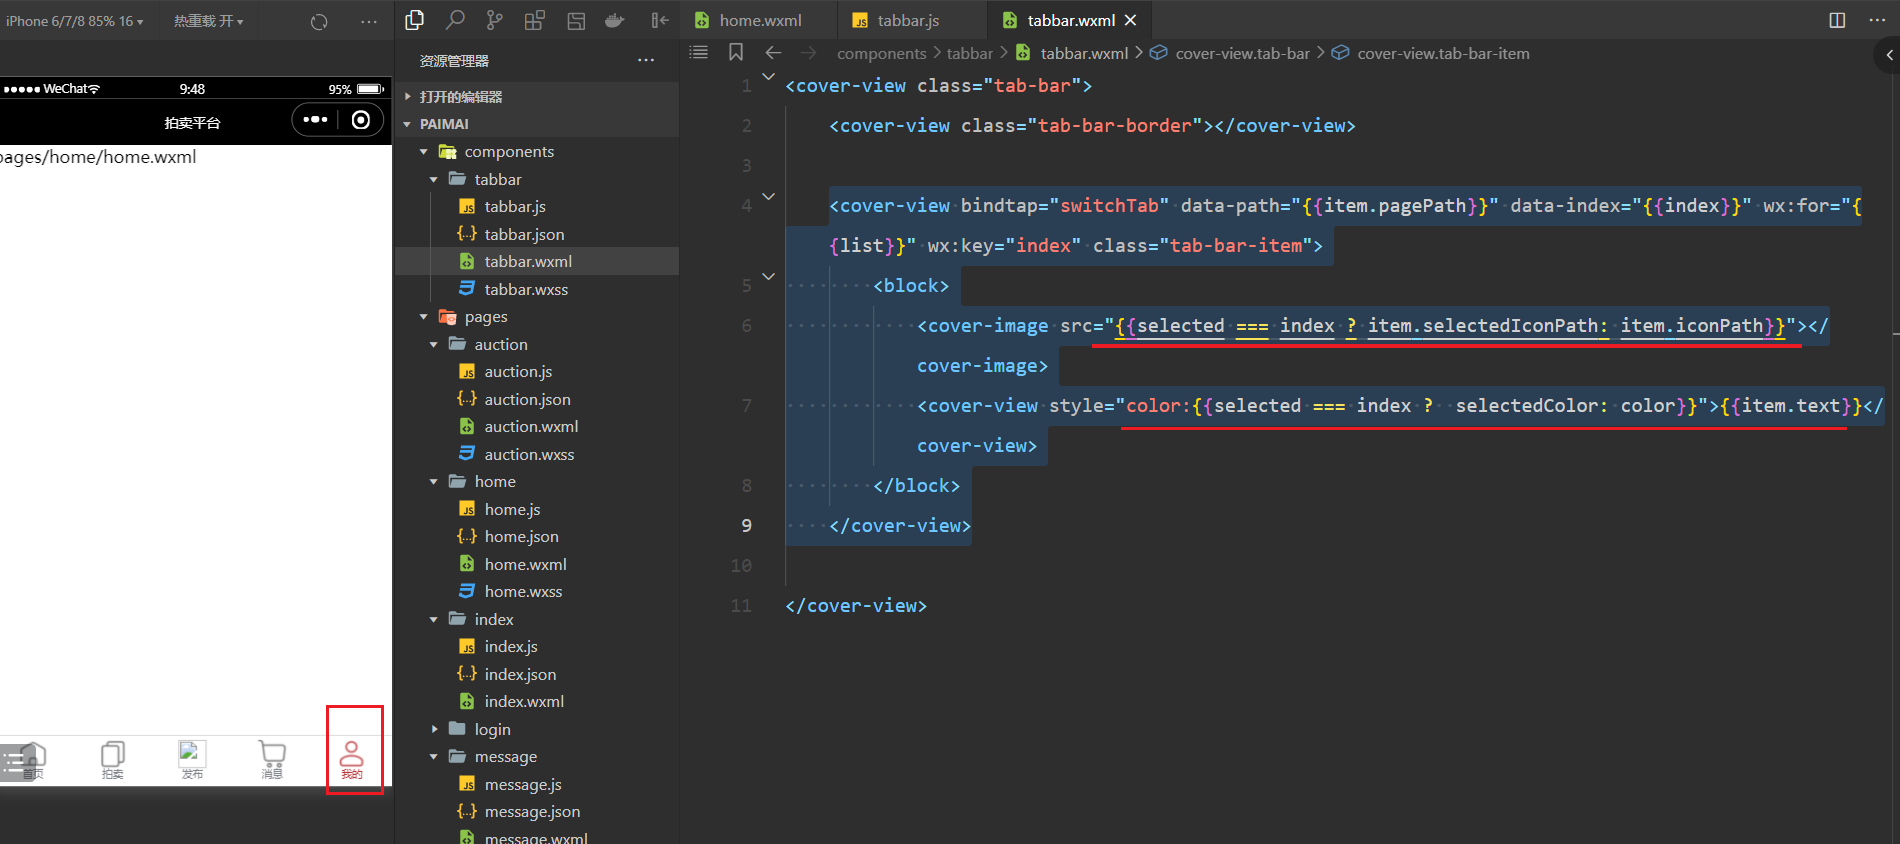
3,Tabbar案例
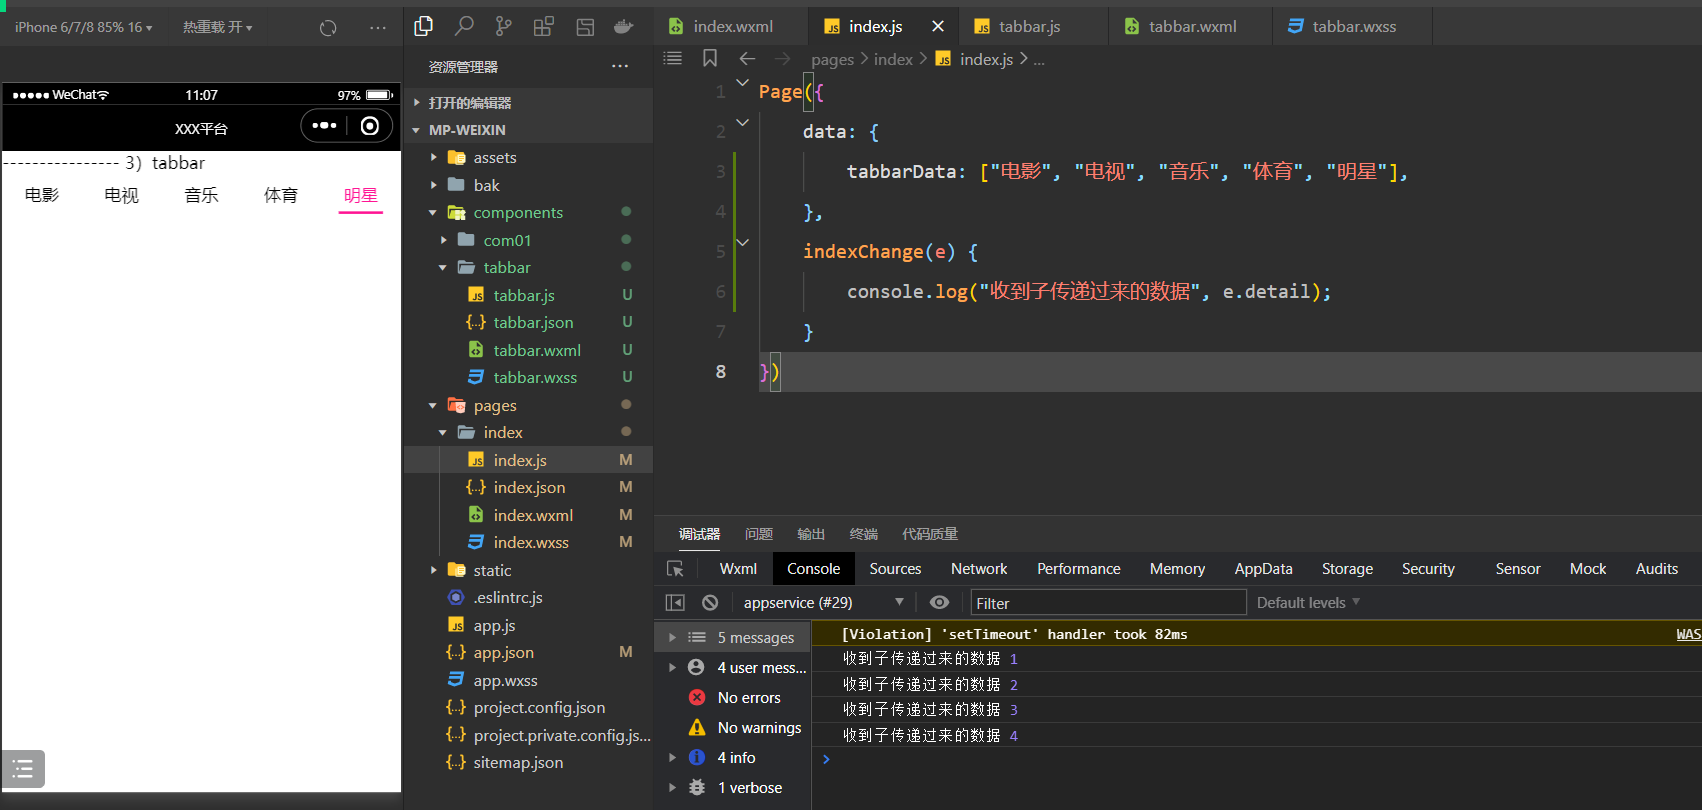
在父中定义数据,如下:
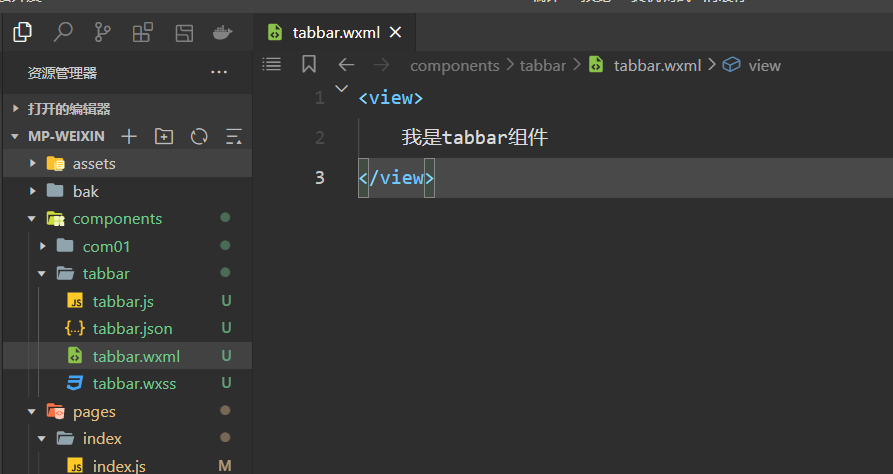
把tabbar封装成一个组件,如下:
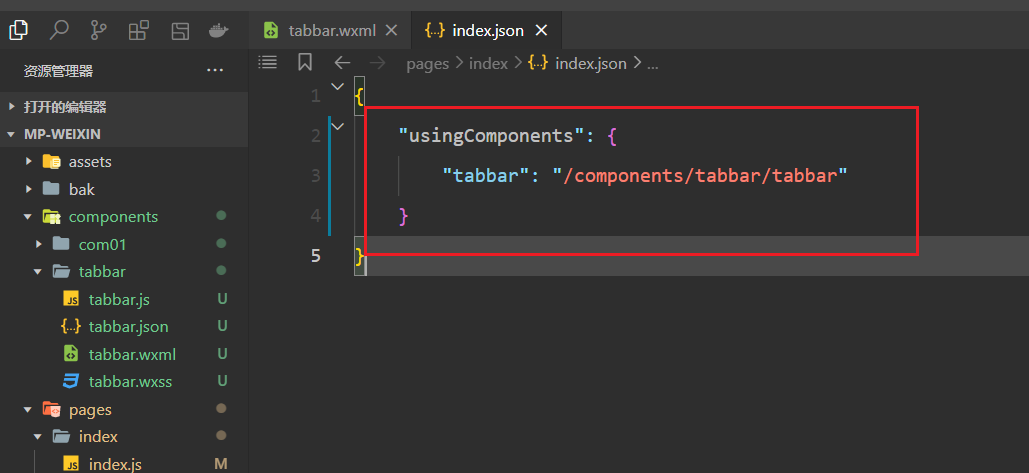
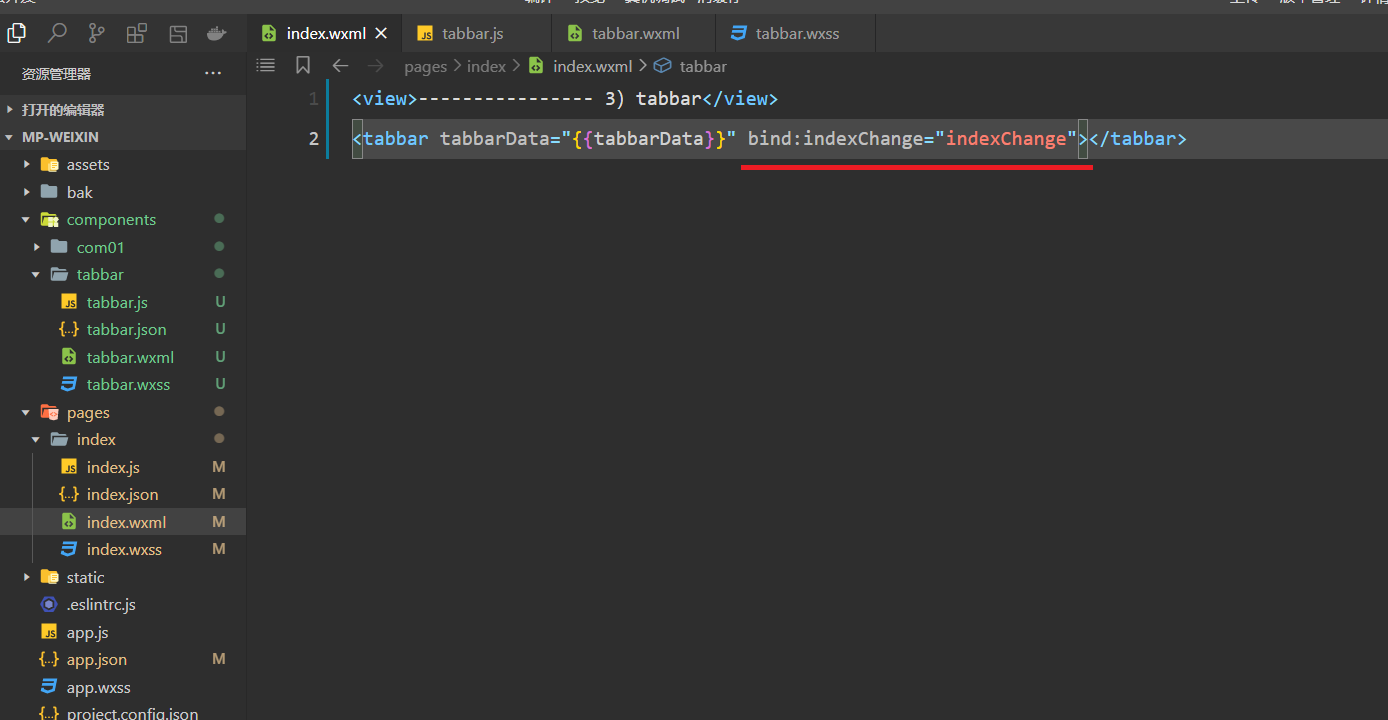
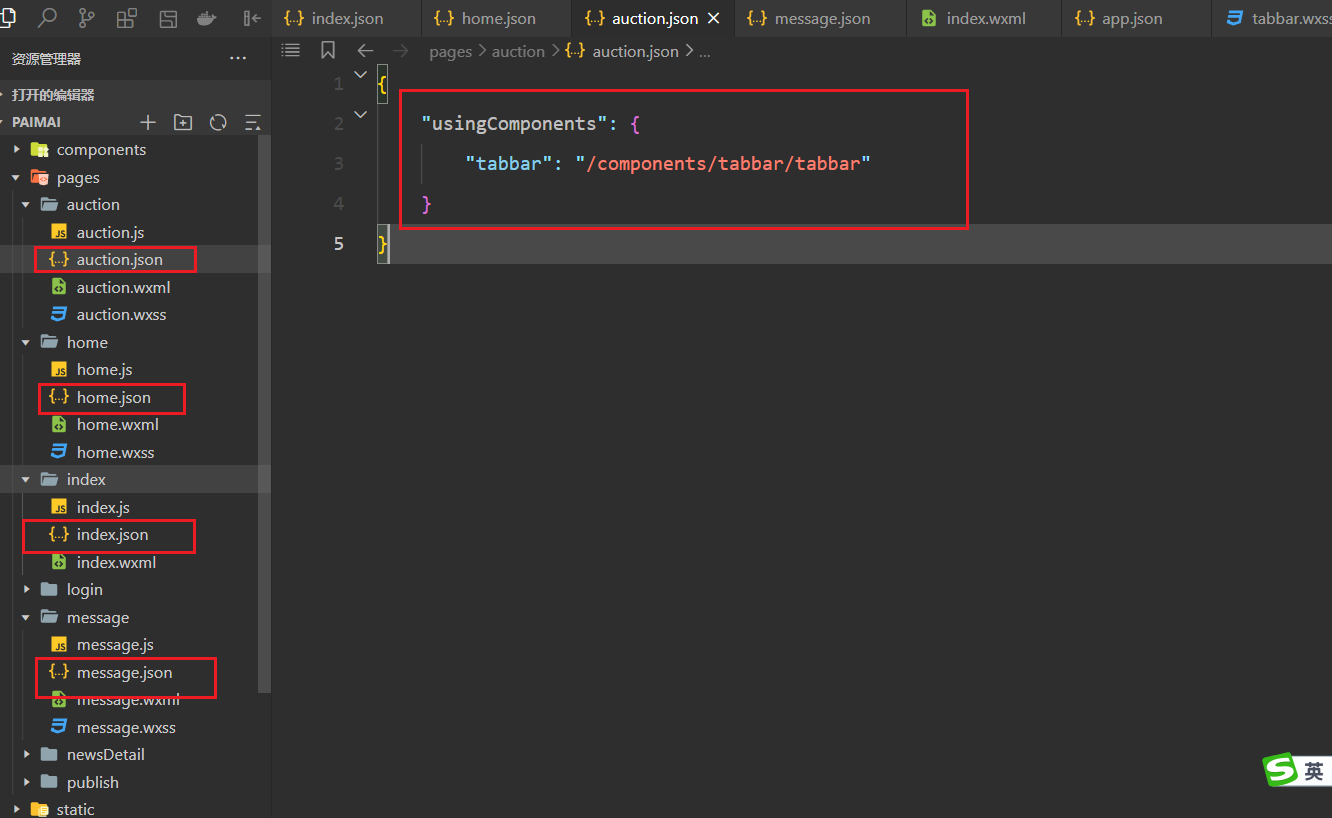
在index.json中注册,如下:
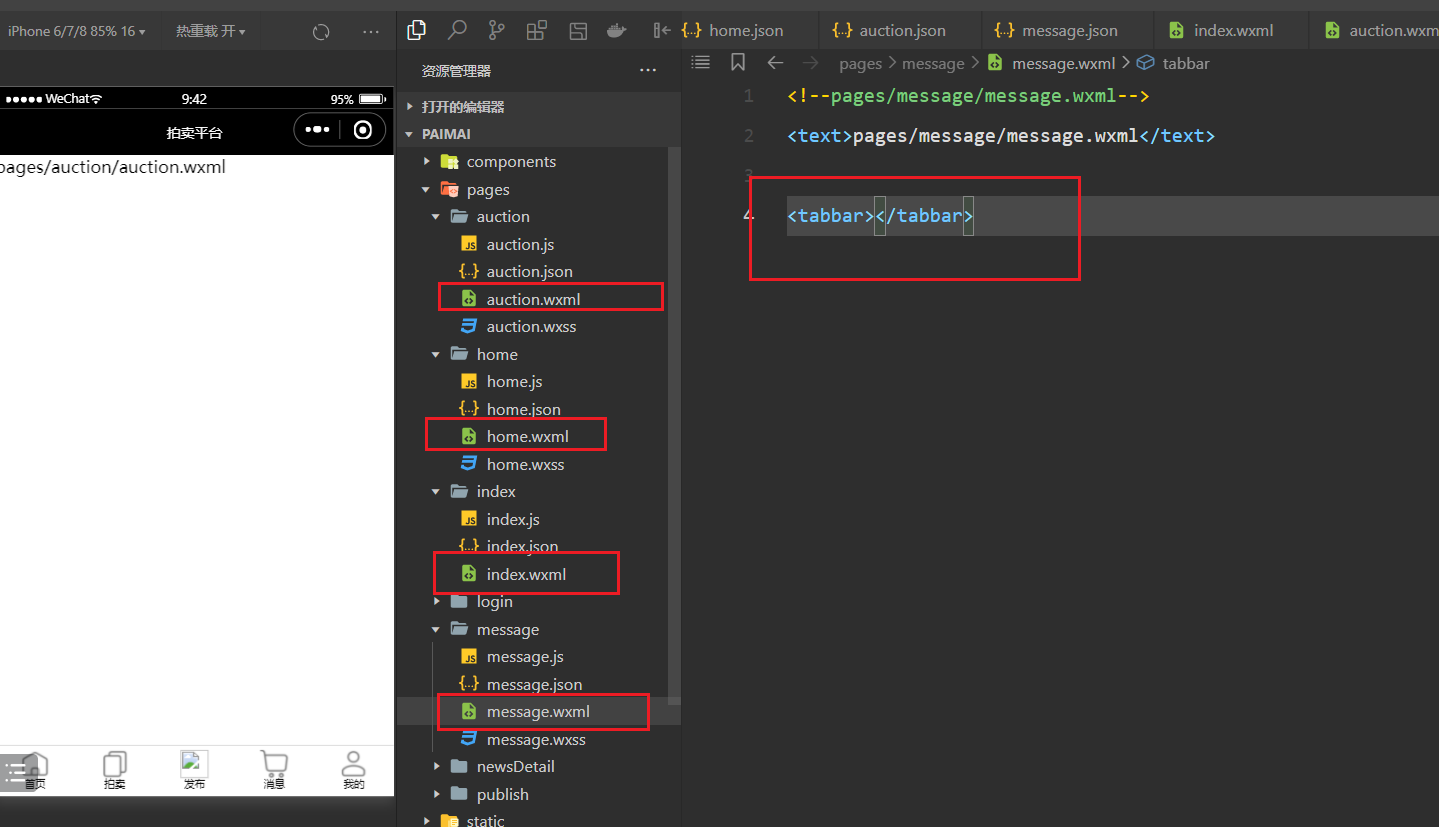
在index.wxml中使用之,并传递参数,如下:
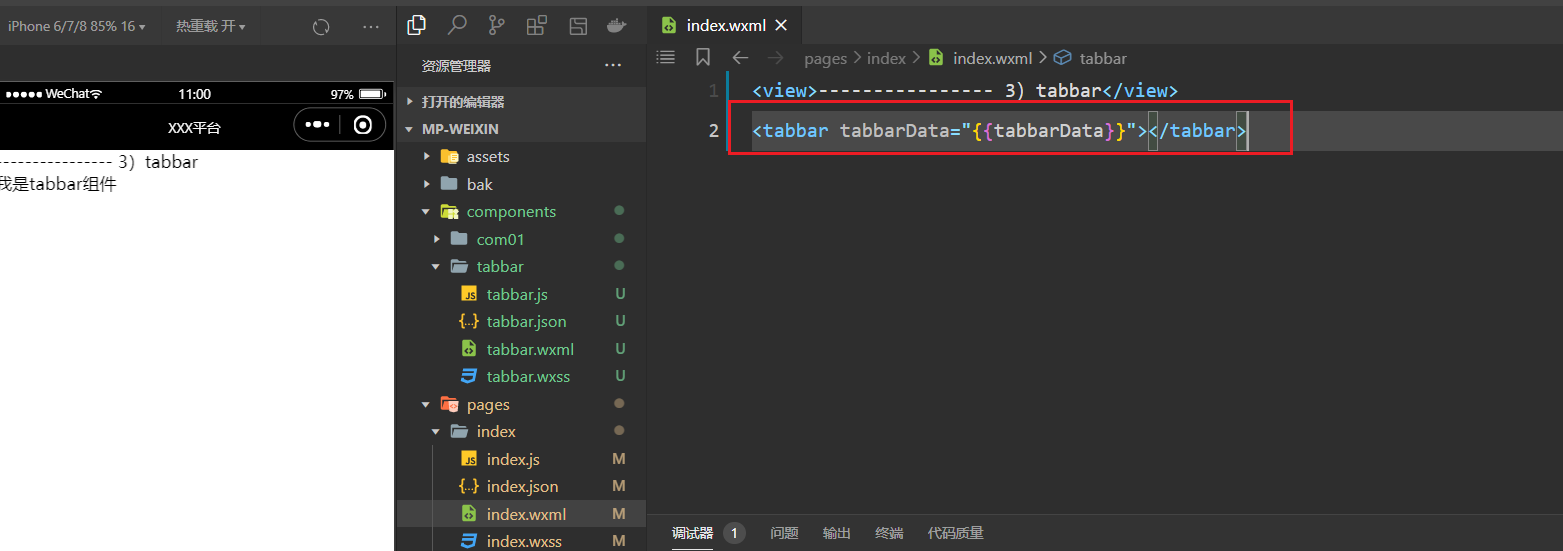
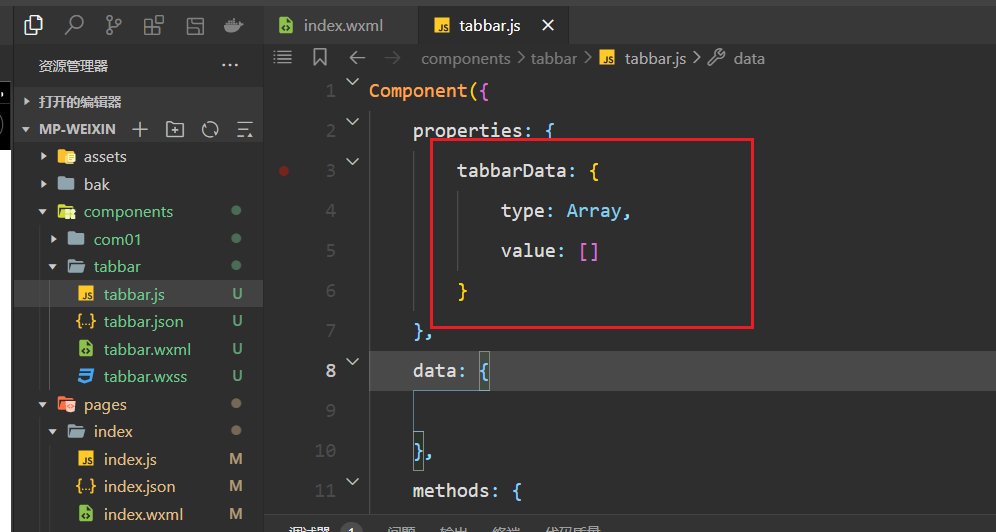
在tabbar组件中,接收之,如下:
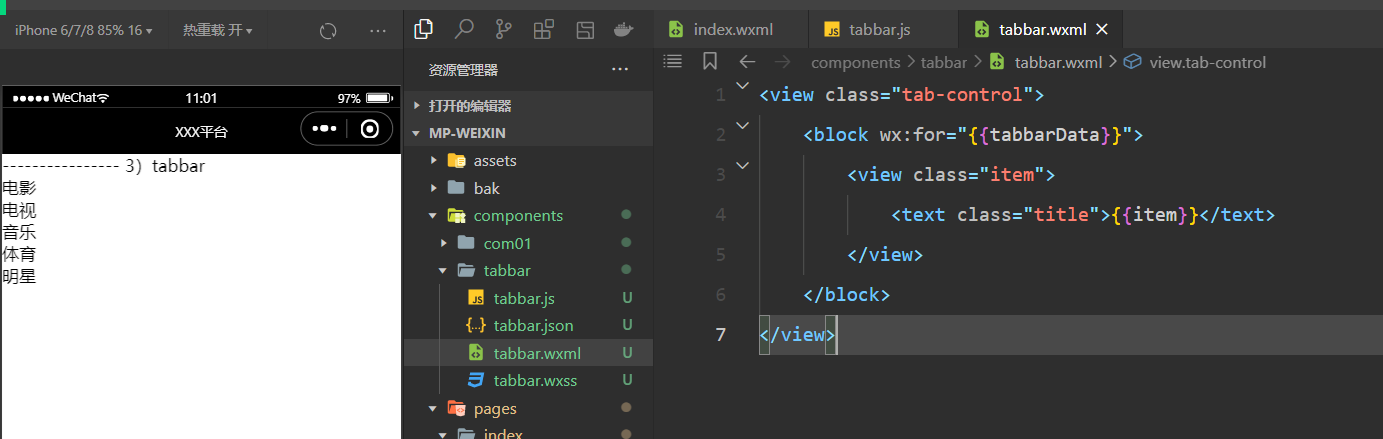
在tabbar.wxml中使用之,如下:
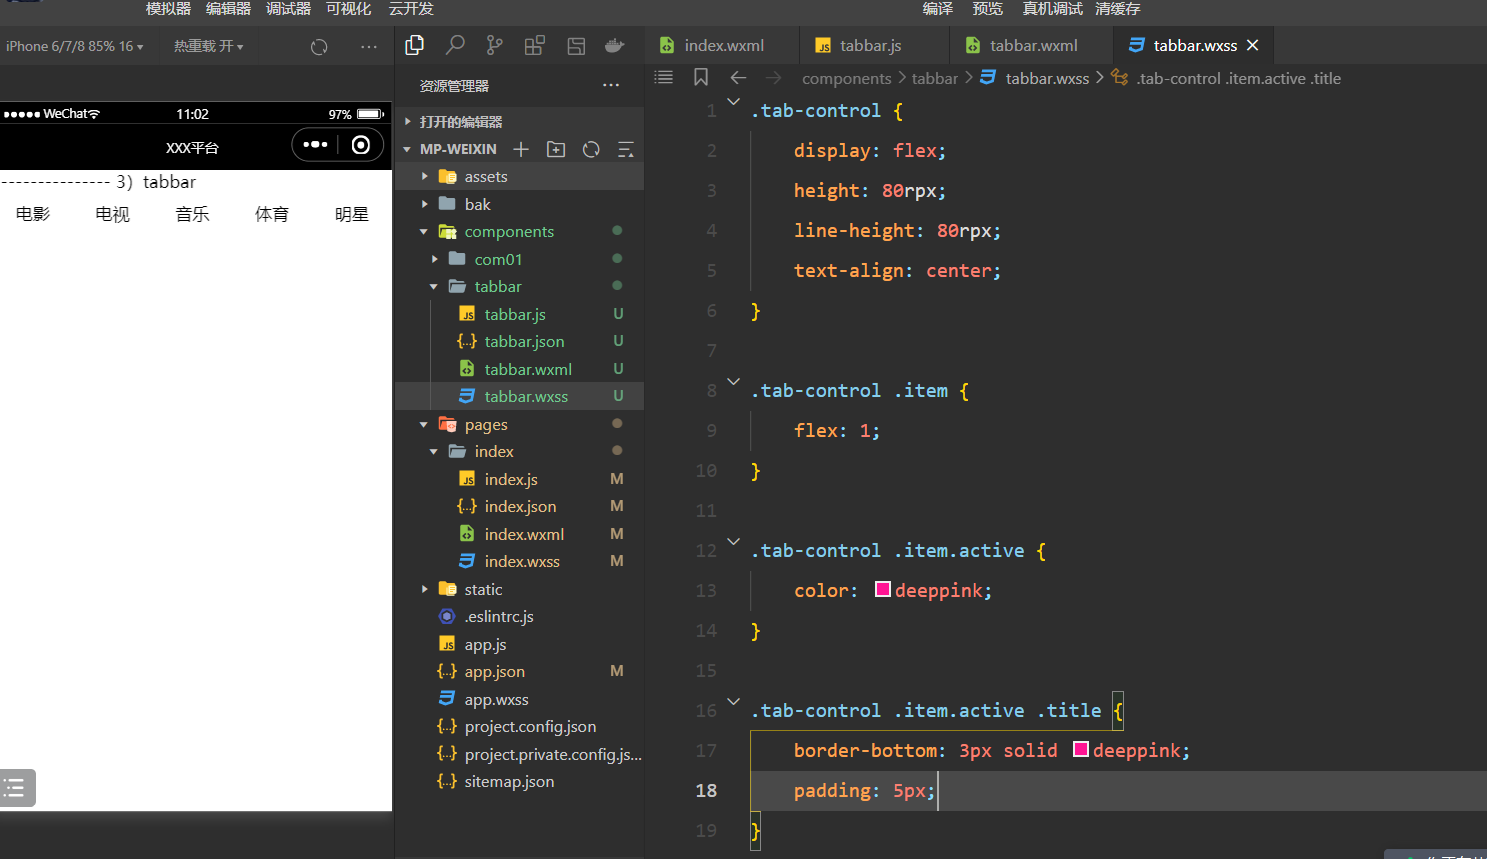
书写样式,如下:
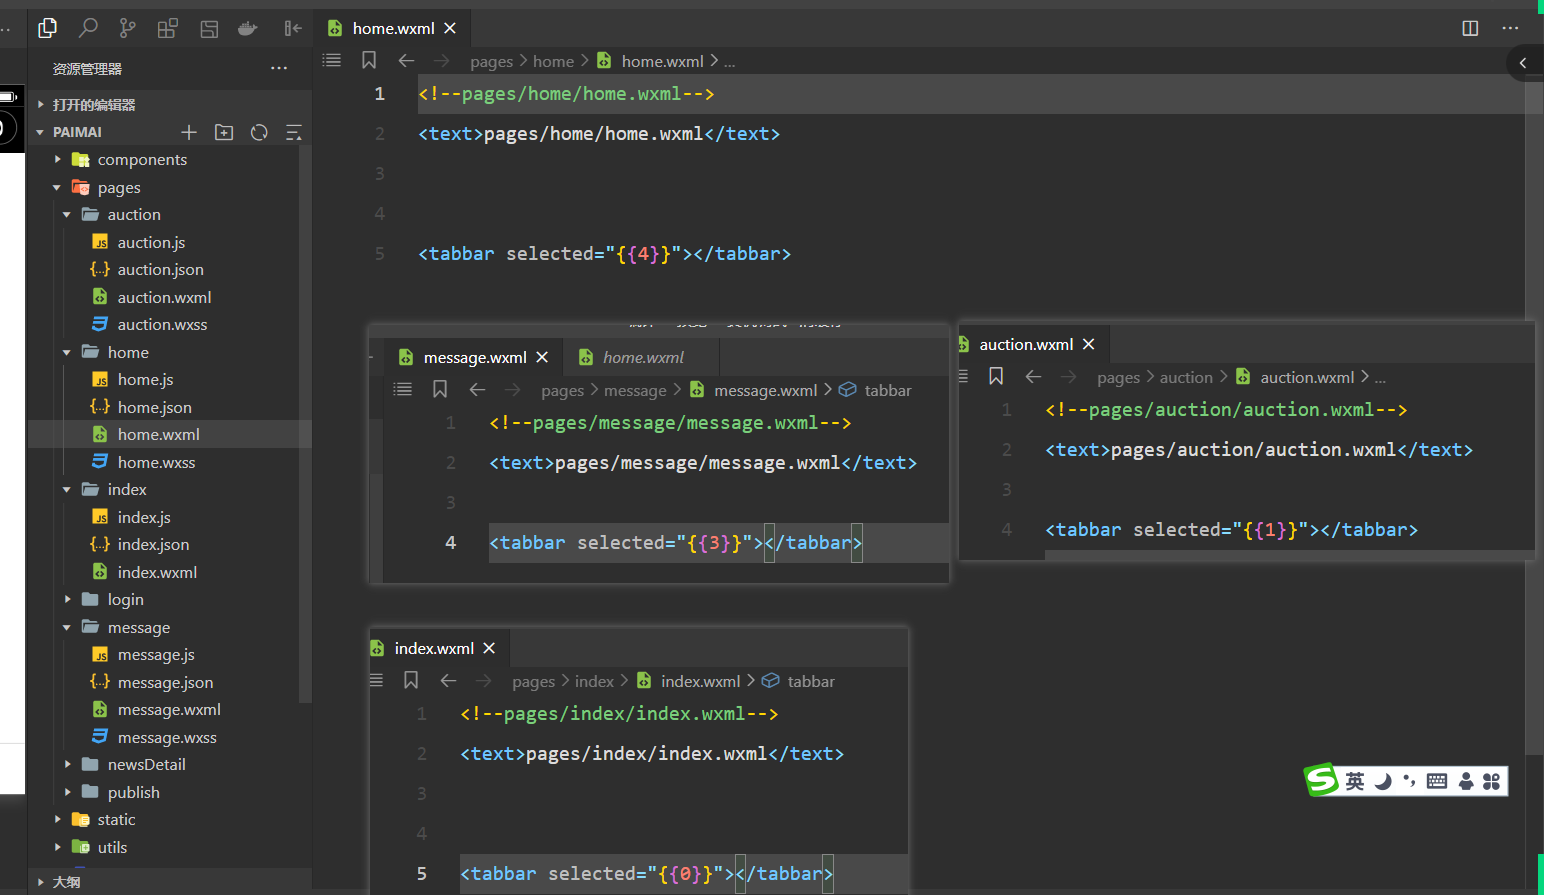
在子中定义让哪个元素选中,如下:

在子中就可以使用此状态,如下:

绑定点击事件,如下:
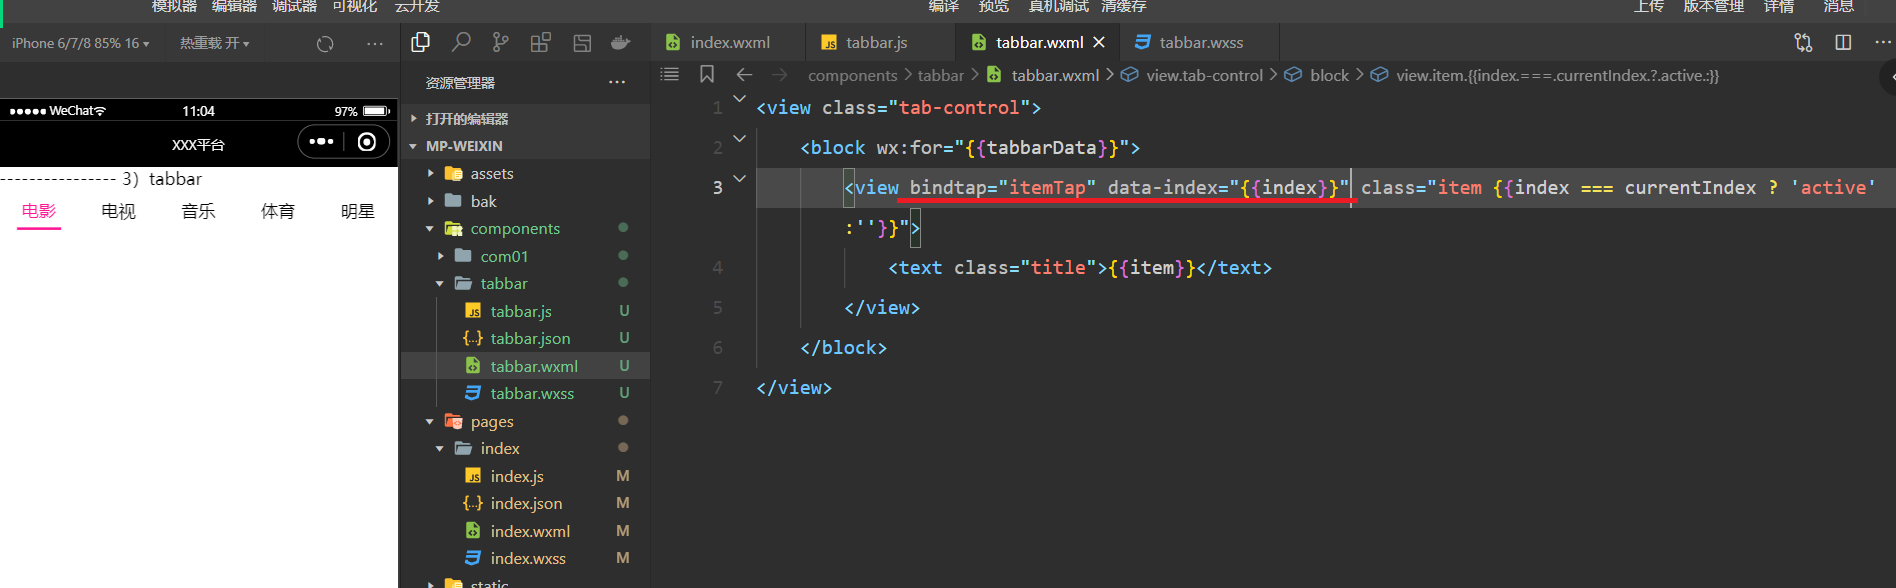
实现方法,如下:
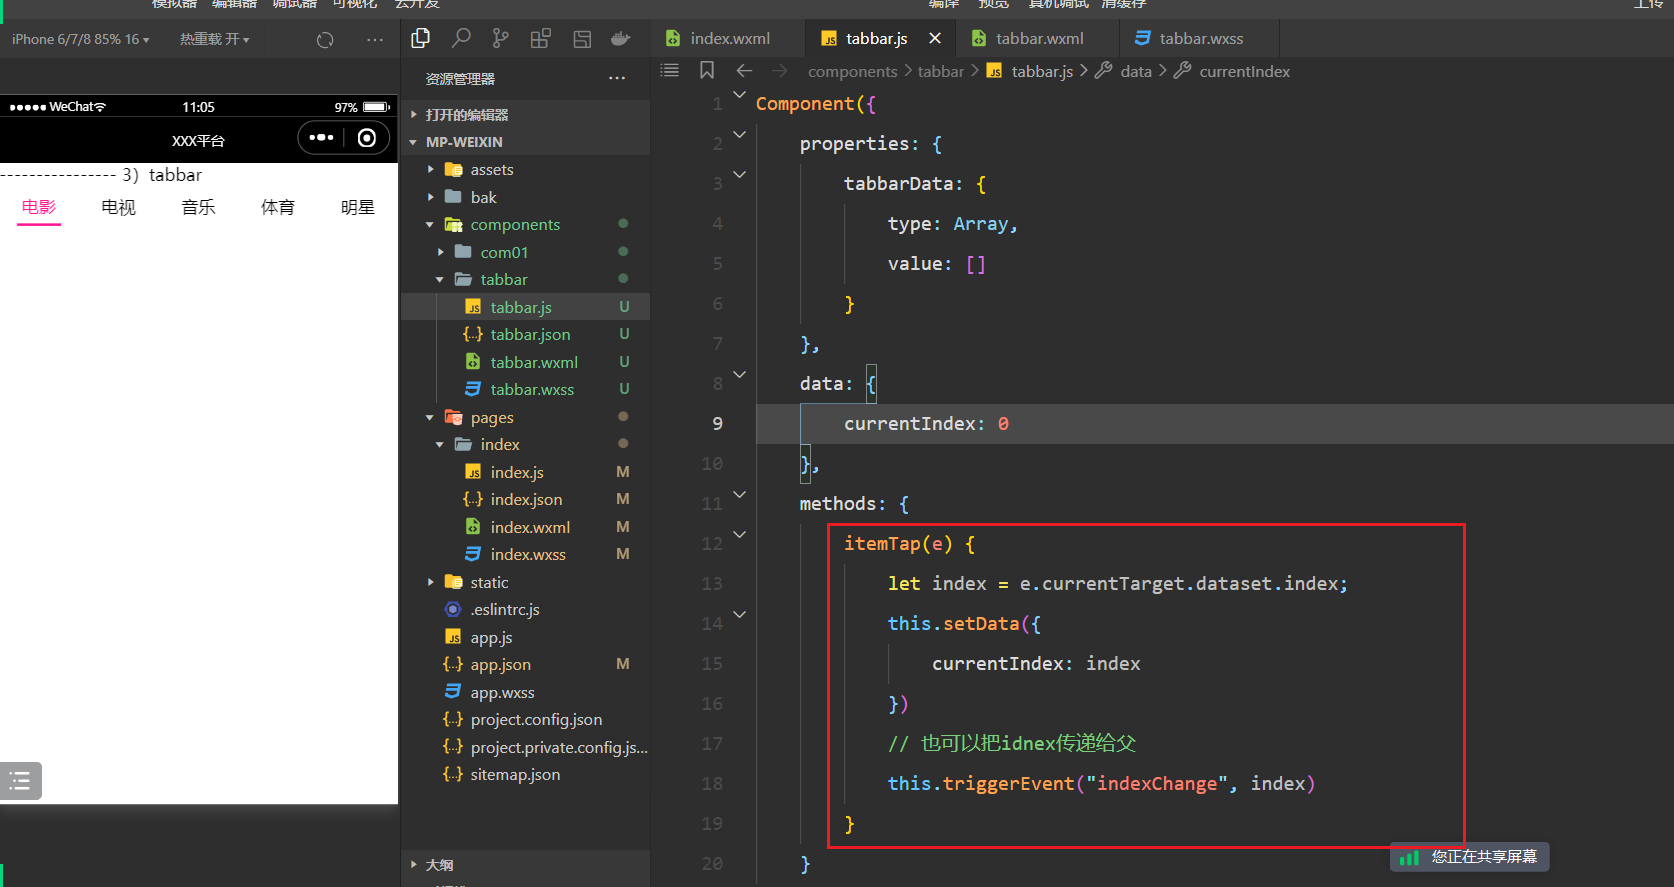
如果传递给父,如下:
八,ajax请求
1,wx.request发送ajax请求
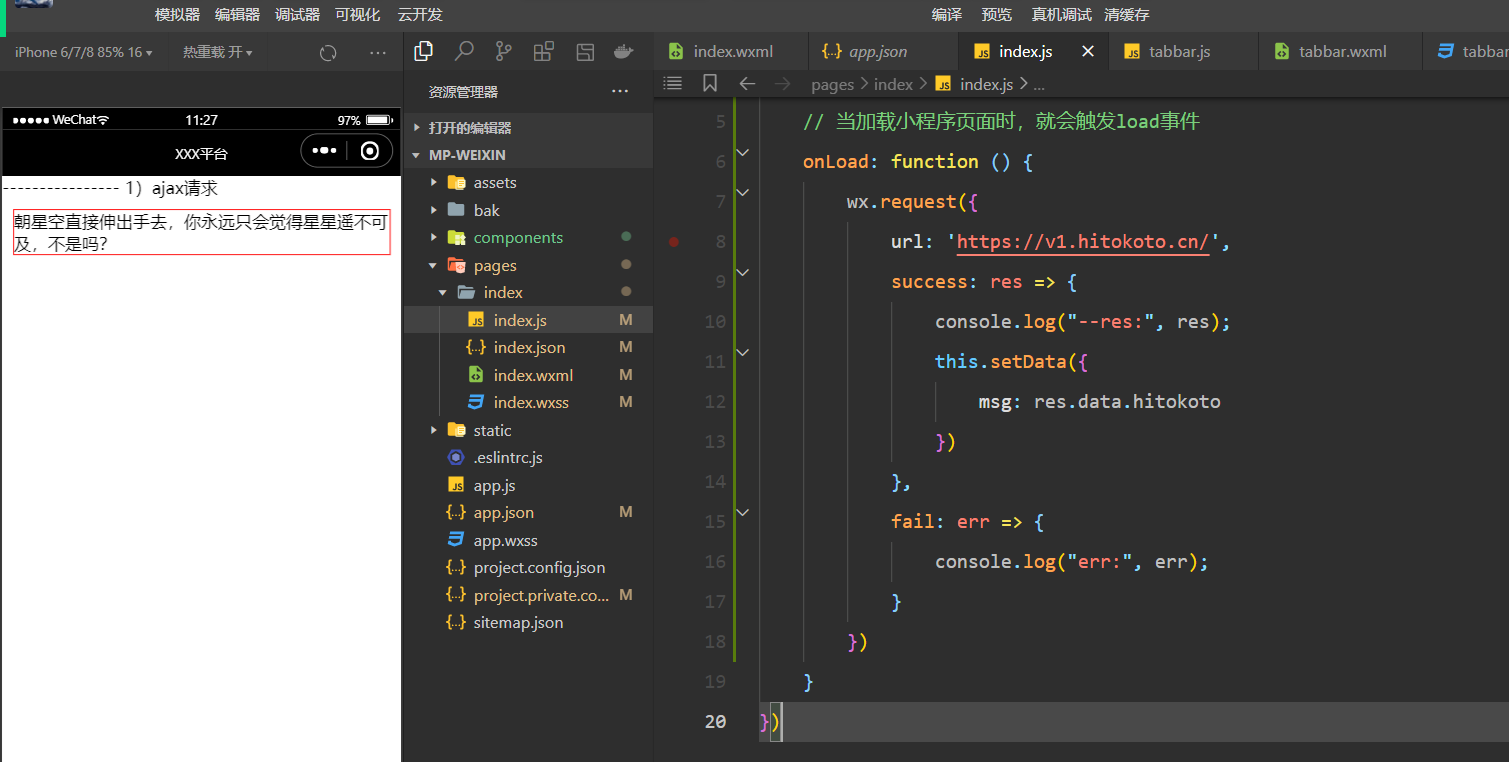
在load事件中,发ajax请求,如下:
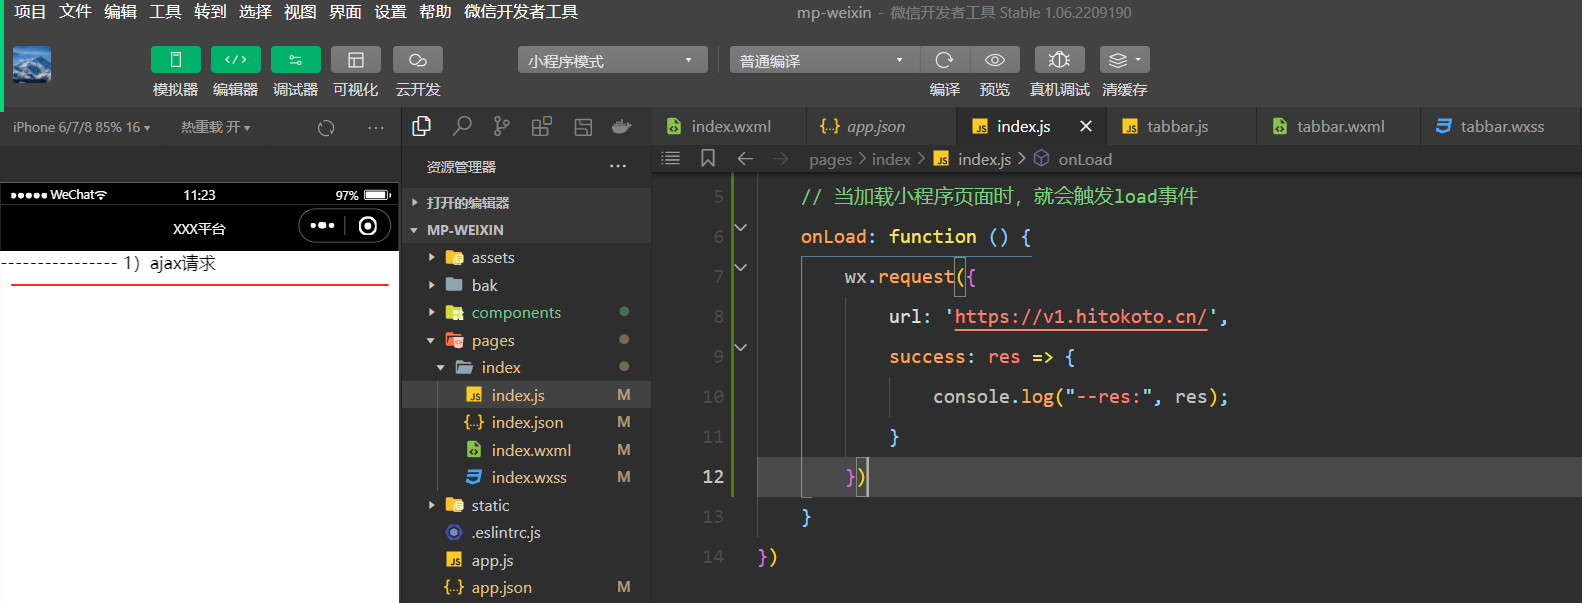
报错了,如下 :

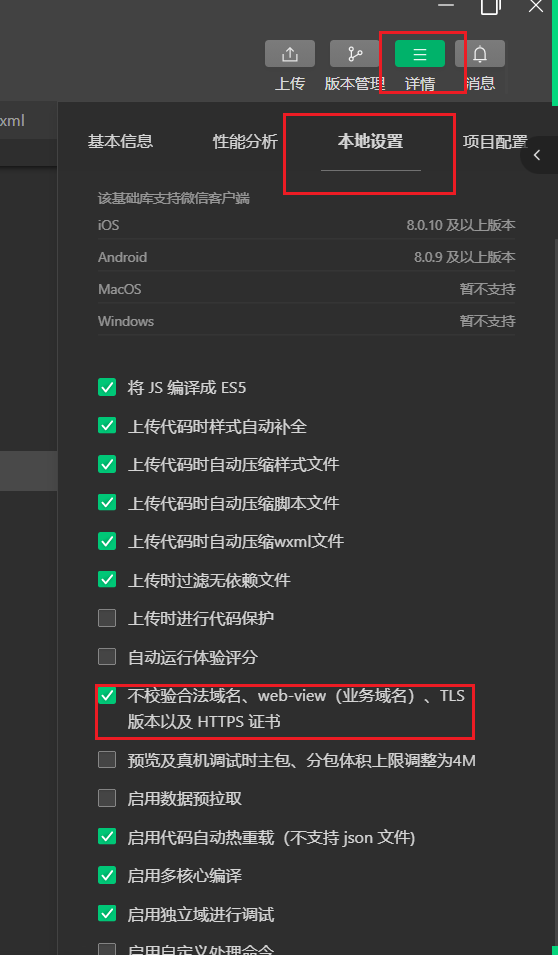
需要去配置,如下 :
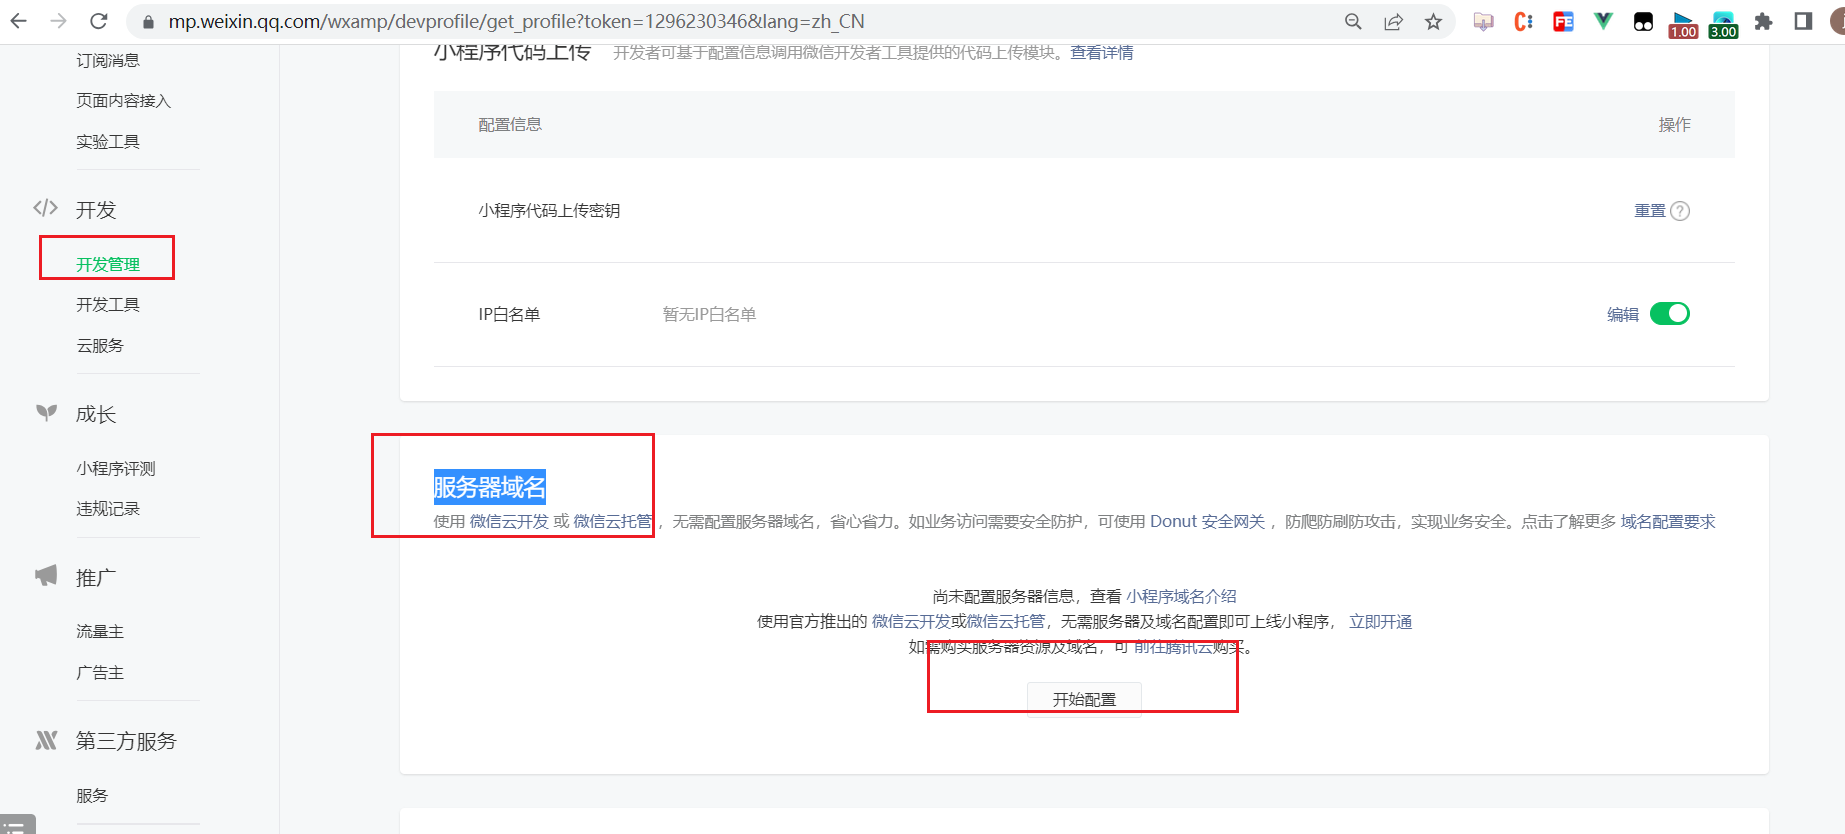
目前我们是配置不了,在公司中都是后端配置的。在开发时可以设置不校验,如下:
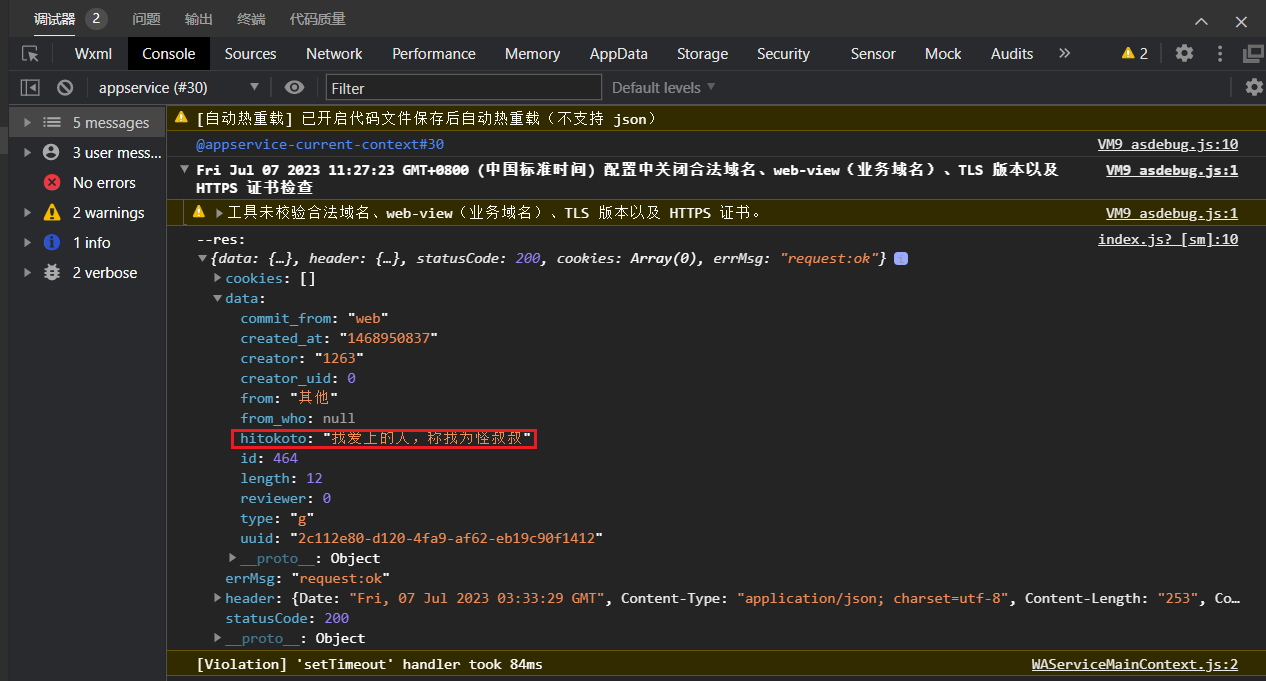
再次测试之,如下:
给状态赋值,如下:
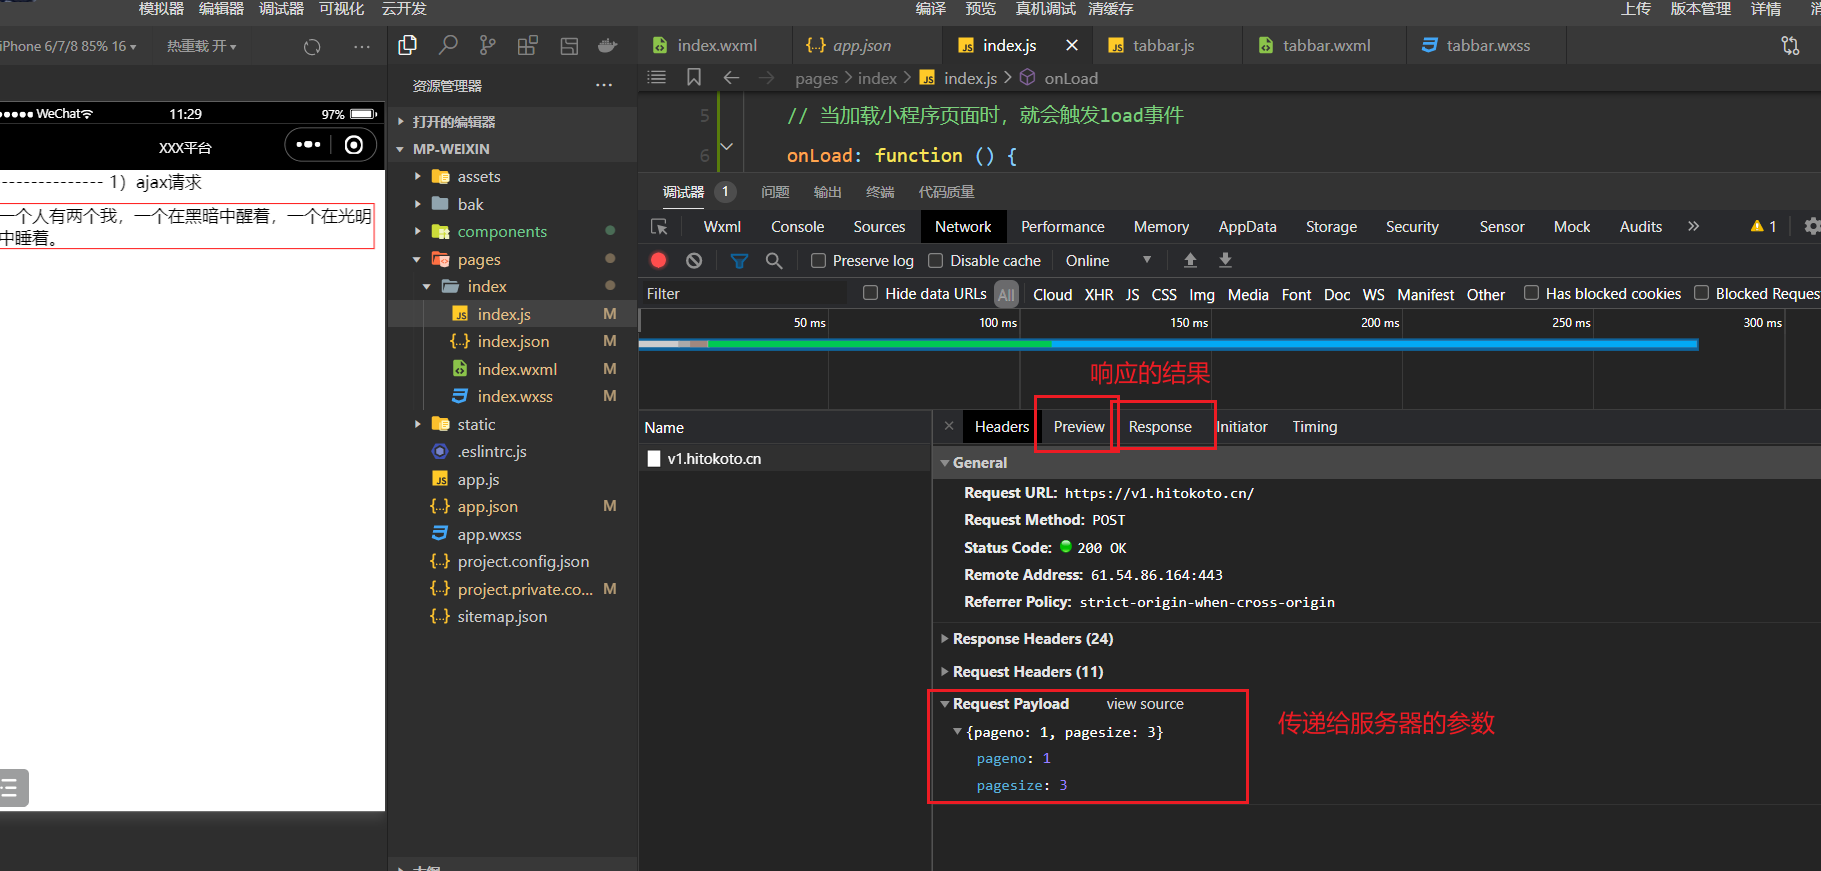
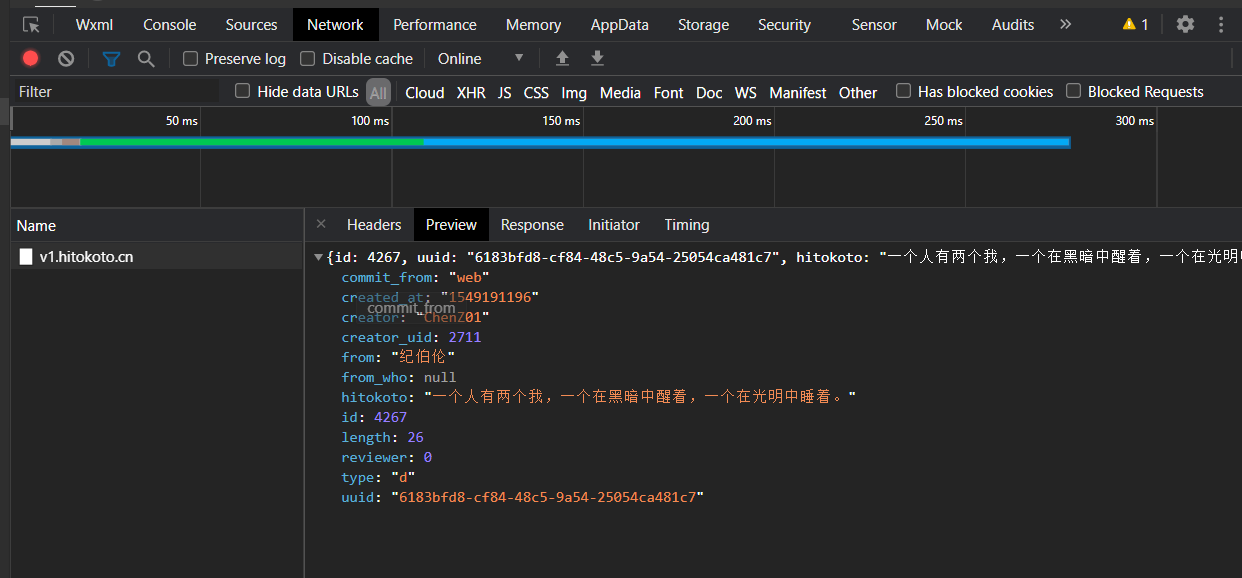
发post请求,并传递参数,如下:
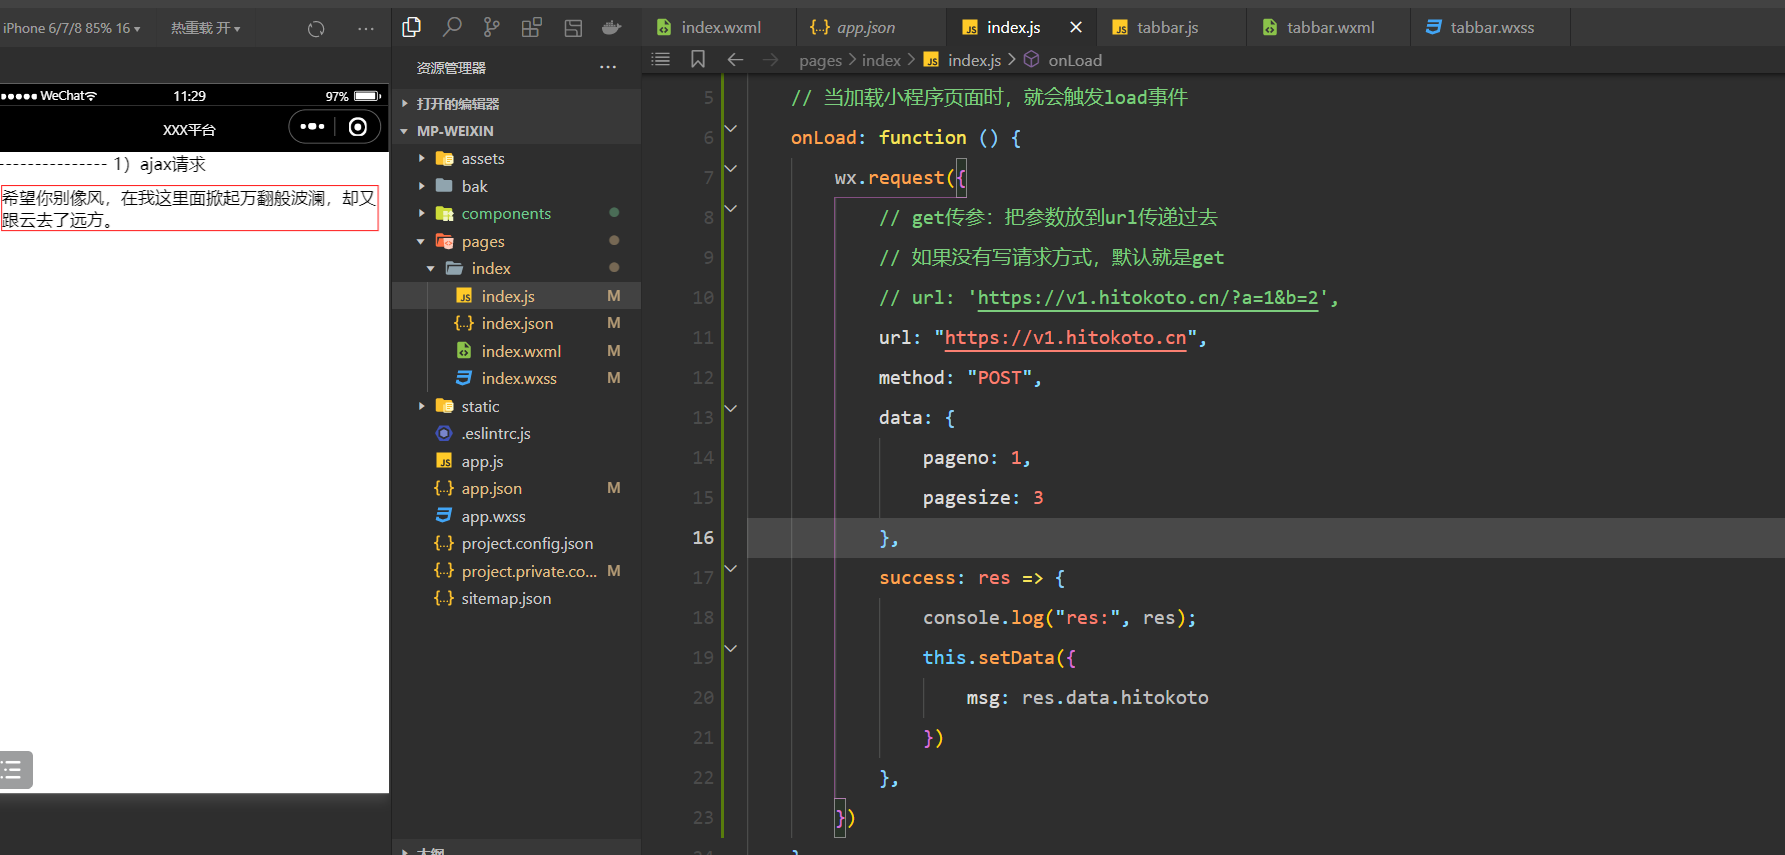
分析网络,如下:
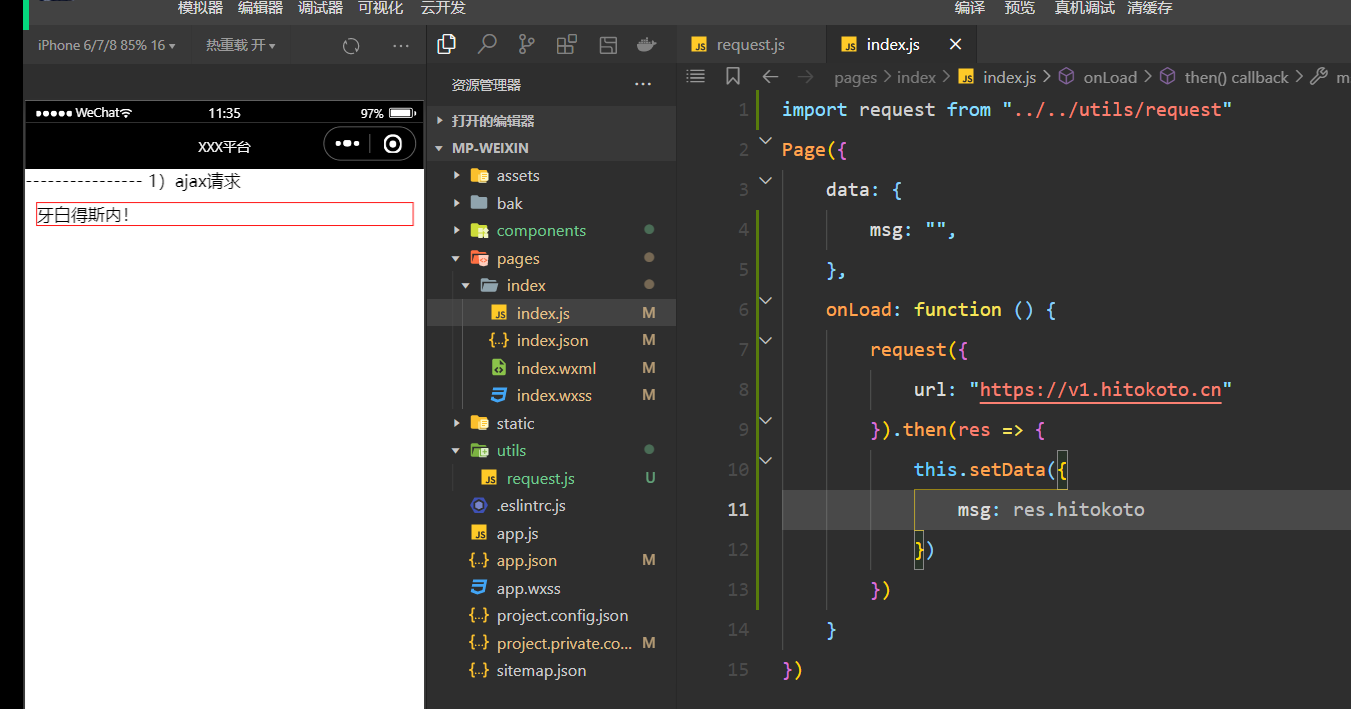
2,二次封装
对wx.request进行二次封装,如下:
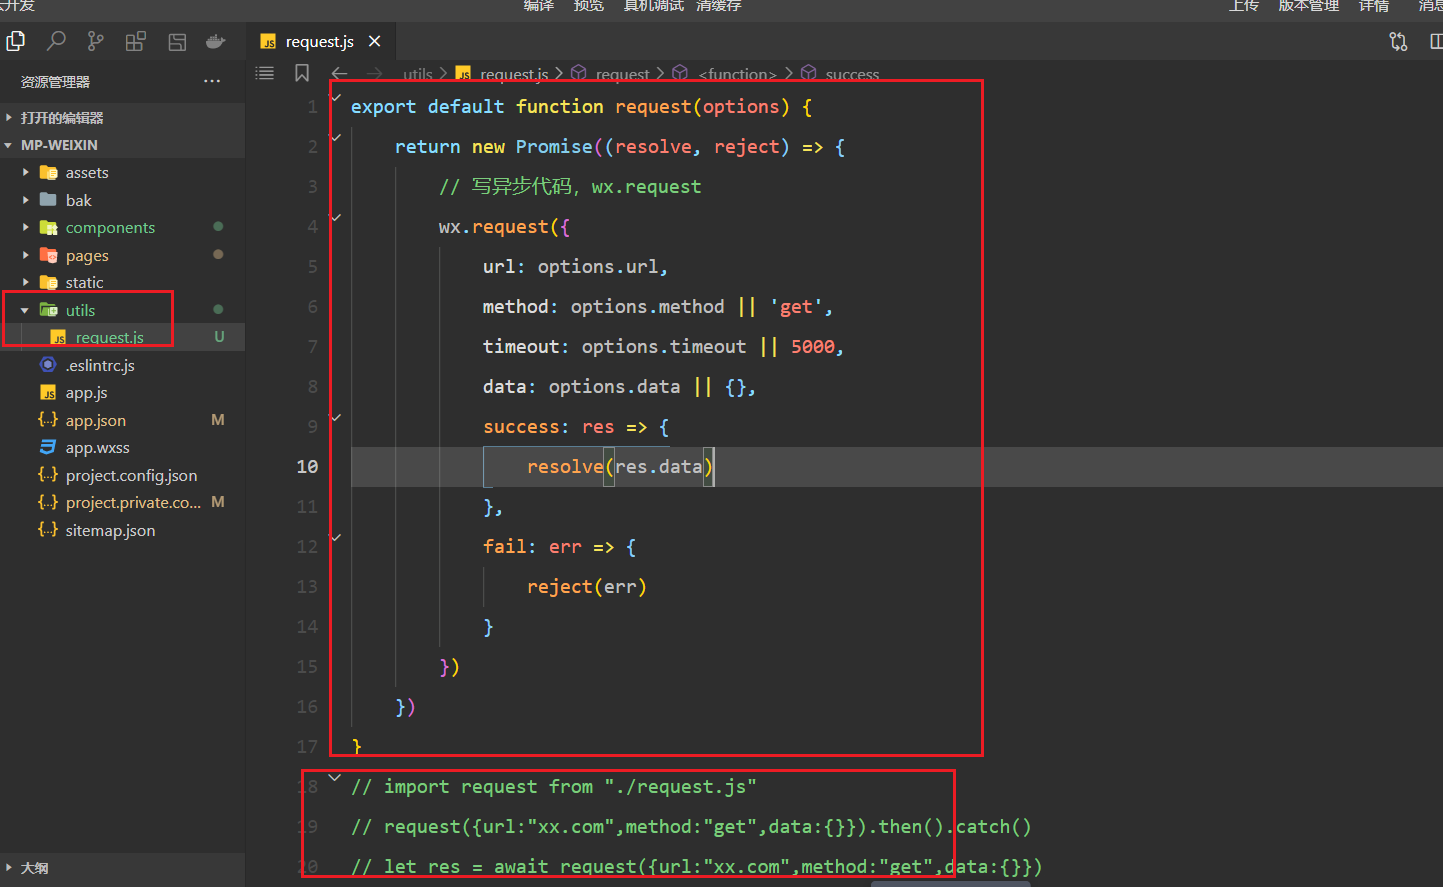
使用之,如下:
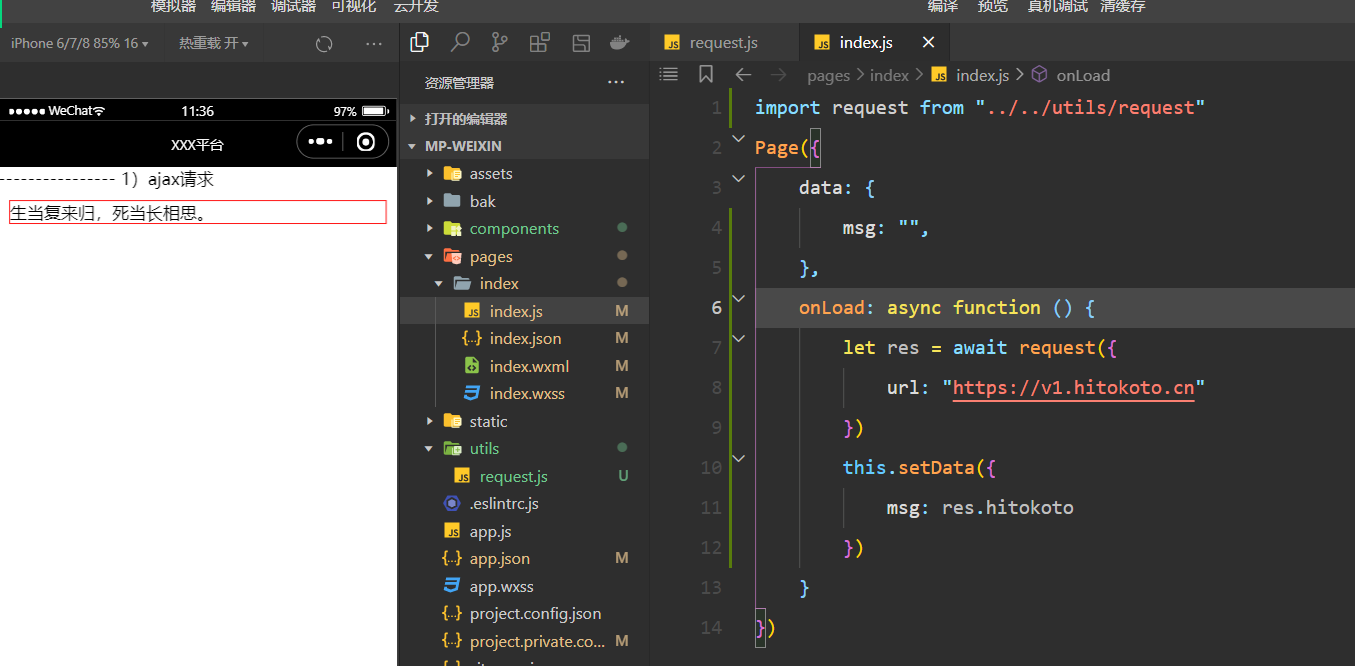
也可以使用async+await,如下:
九,一些API的使用
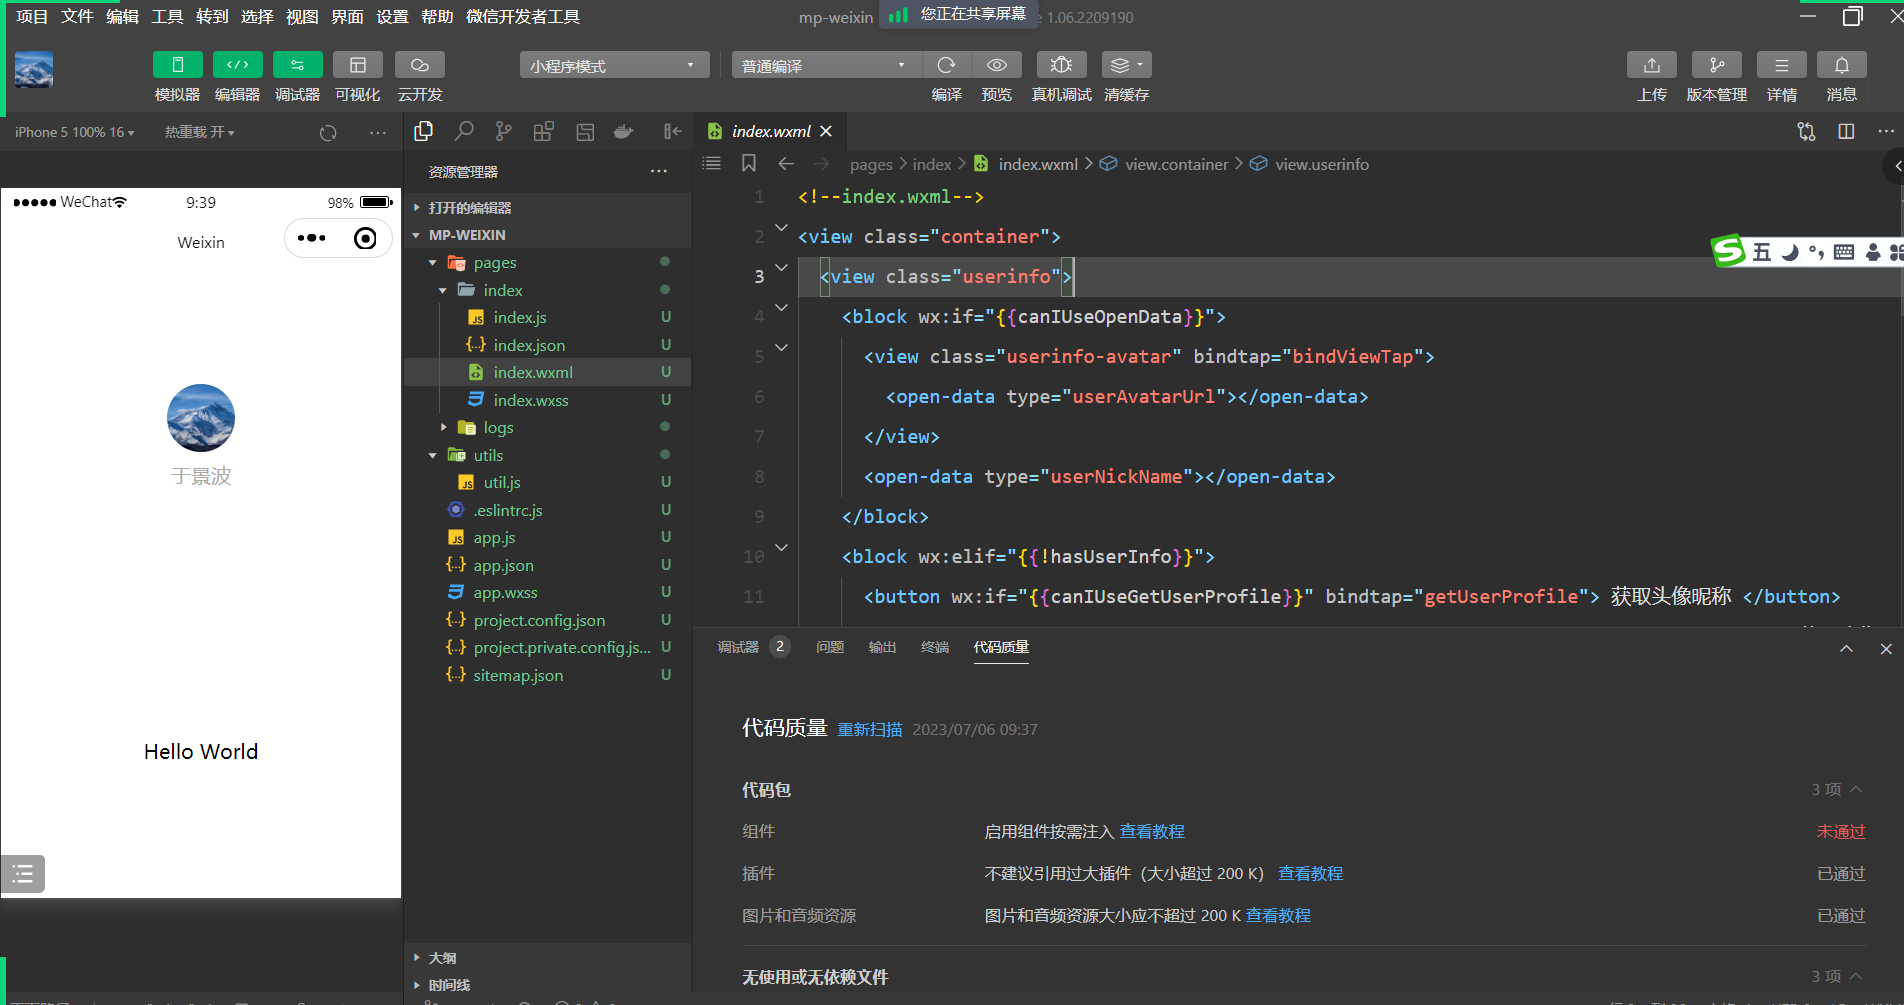
1,获取用户信息和获取位置信息
结构:
<view>---------------- 1)获取用户信息</view>

<view class="container">
    <view class="userinfo">
        <block wx:if="{{!hasUserInfo}}">
            <button wx:if="{{canIUseGetUserProfile}}" bindtap="getUserProfile"> 获取头像昵称 </button>
            <button wx:else open-type="getUserInfo" bindgetuserinfo="getUserInfo"> 获取头像昵称 </button>
        </block>
        <block wx:else>
            <image bindtap="bindViewTap" class="userinfo-avatar" src="{{userInfo.avatarUrl}}" mode="cover"></image>
            <text class="userinfo-nickname">{{userInfo.nickName}}</text>
        </block>
    </view>
</view>

<view class="page">
    <view bindtap="getLocalPath">{{localPath}}</view>
</view>
逻辑:
Page({
    data: {
        name: "",
        path: "/static/images/icon/balancepay_icon_show.png",
        localPath: "选择位置",
        userInfo: {},
        hasUserInfo: false
    },
    getUserInfo(e) {
        var _this = this
        wx.showModal({
            title: '温馨提示',
            content: '亲,授权微信登录后才能正常使用小程序功能',
            success(res) {
                console.log(res)
                //如果用户点击了确定按钮
                if (res.confirm) {
                    wx.getUserProfile({
                        desc: '获取你的昵称、头像、地区及性别',
                        success: res => {
                            _this.setData({
                                userInfo: res.userInfo,
                                hasUserInfo: true
                            })
                            console.log(res);
                            console.log(1);
                        },
                        fail: res => {
                            console.log(res)
                            //拒绝授权
                            wx.showToast({
                                title: '您拒绝了请求,不能正常使用小程序',
                                icon: 'error',
                                duration: 2000
                            });
                            return;
                        }
                    });
                } else if (res.cancel) {
                    //如果用户点击了取消按钮
                    wx.showToast({
                        title: '您拒绝了请求,不能正常使用小程序',
                        icon: 'error',
                        duration: 2000
                    });
                    return;
                }
            }
        })
    },
    getLocalPath() {
        wx.chooseLocation({
            success: (res) => {
                console.log("res:", res);
                this.setData({
                    localPath: res.address
                })
            }
        })
    }
})
2,其它弹窗相关API
结构:
<view>---------------- 1)小程序中的一些api</view>
<view class="page">
    <button type="primary" size="mini" bindtap="toastFn">Toast</button>
    <button type="primary" size="mini" bindtap="modalFn">Modal</button>
    <button type="primary" size="mini" bindtap="actionSheetFn">ActionSheet</button>
    <button type="primary" size="mini" bindtap="getLocationFn">getLocation</button>
    <button type="primary" size="mini" bindtap="getSystemInfoFn">getSystemInfo</button>
</view>
样式:
.page {
    border: 1px solid red;
    margin: 10px 10px;
}
逻辑:
Page({
    data: {

    },
    toastFn() {
        // wx.showToast({
        //     title: '成功',
        //     icon: "loading",
        //     duration: 2000,
        //     // 防止触摸穿透
        //     mask: true
        // })
        wx.showLoading({
            title: "加载中..."
        })
        setTimeout(() => {
            wx.hideLoading()
        }, 2000)
    },
    modalFn() {
        wx.showModal({
            title: "提示",
            content: "这是一个弹窗内容",
            success(res) {
                if (res.confirm) {
                    console.log("用户点击了确定");
                } else {
                    console.log("用户点击了取消");
                }
            }
        })
    },
    actionSheetFn() {
        wx.showActionSheet({
            itemList: ["A", "B", "C", "D", "E", "F"],
            success(res) {
                // console.log(res);
            },
            fail(res) {
                console.log("res:", res);
            }
        })
    },
    getLocationFn() {
        wx.getLocation({
            success(res) {
                console.log(res);
            }
        })
    },
    getSystemInfoFn() {
        wx.getSystemInfo({
            success: (res) => {
                console.log(res);
            },
        })
    }
})
十,小程序中的路由
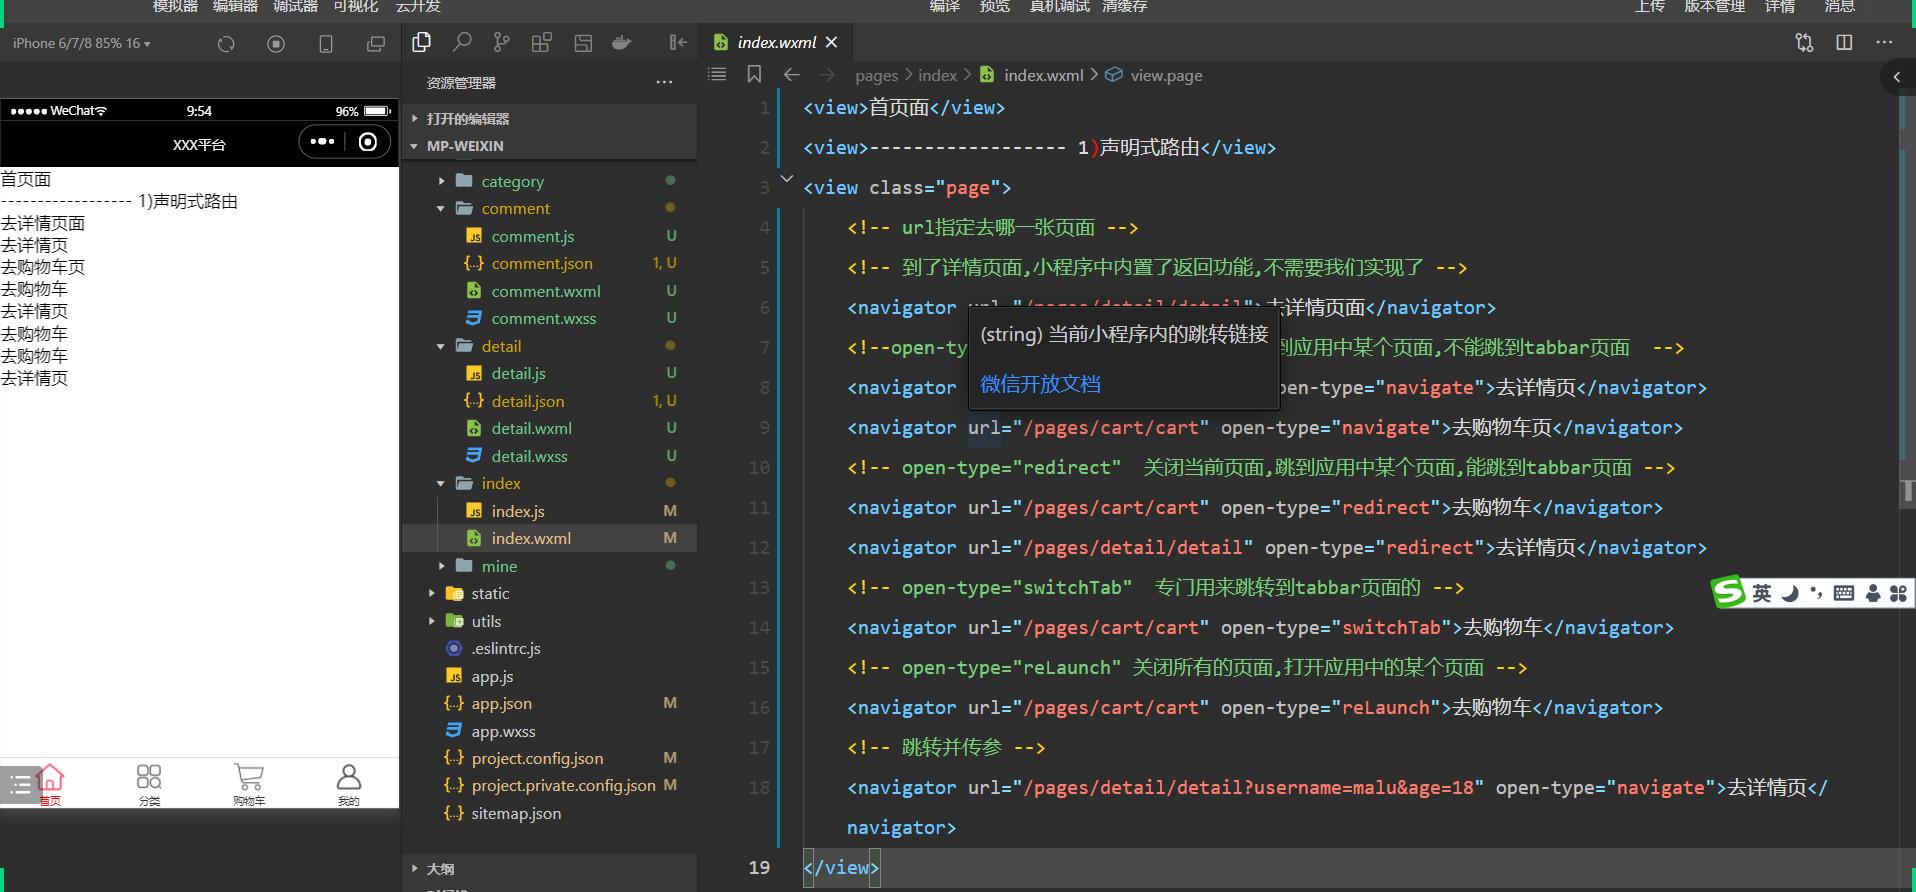
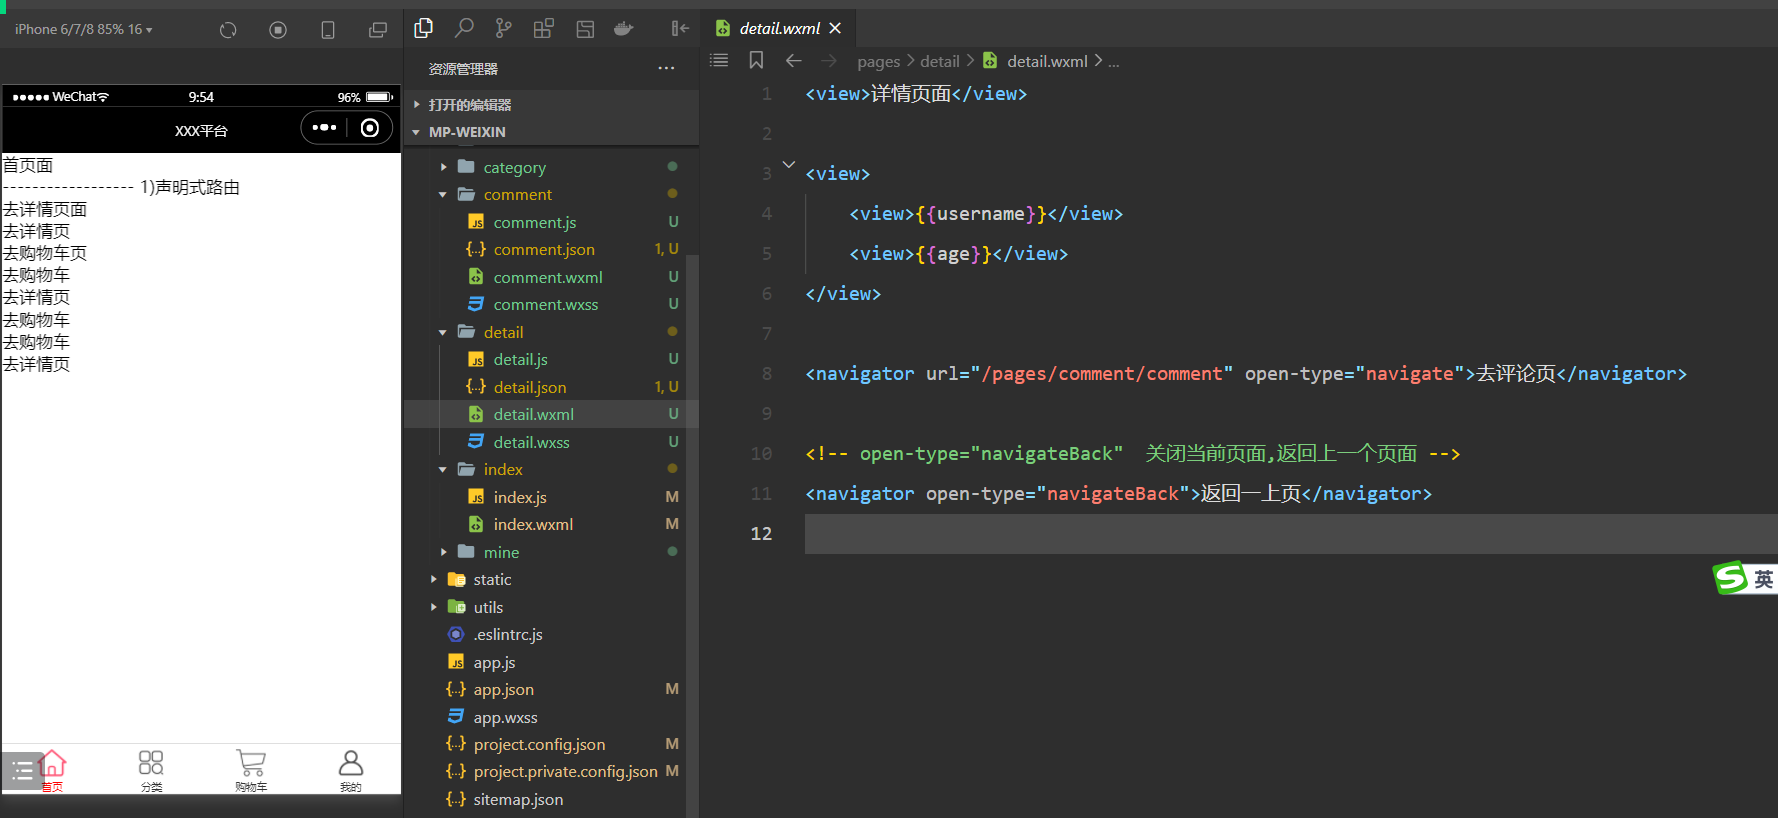
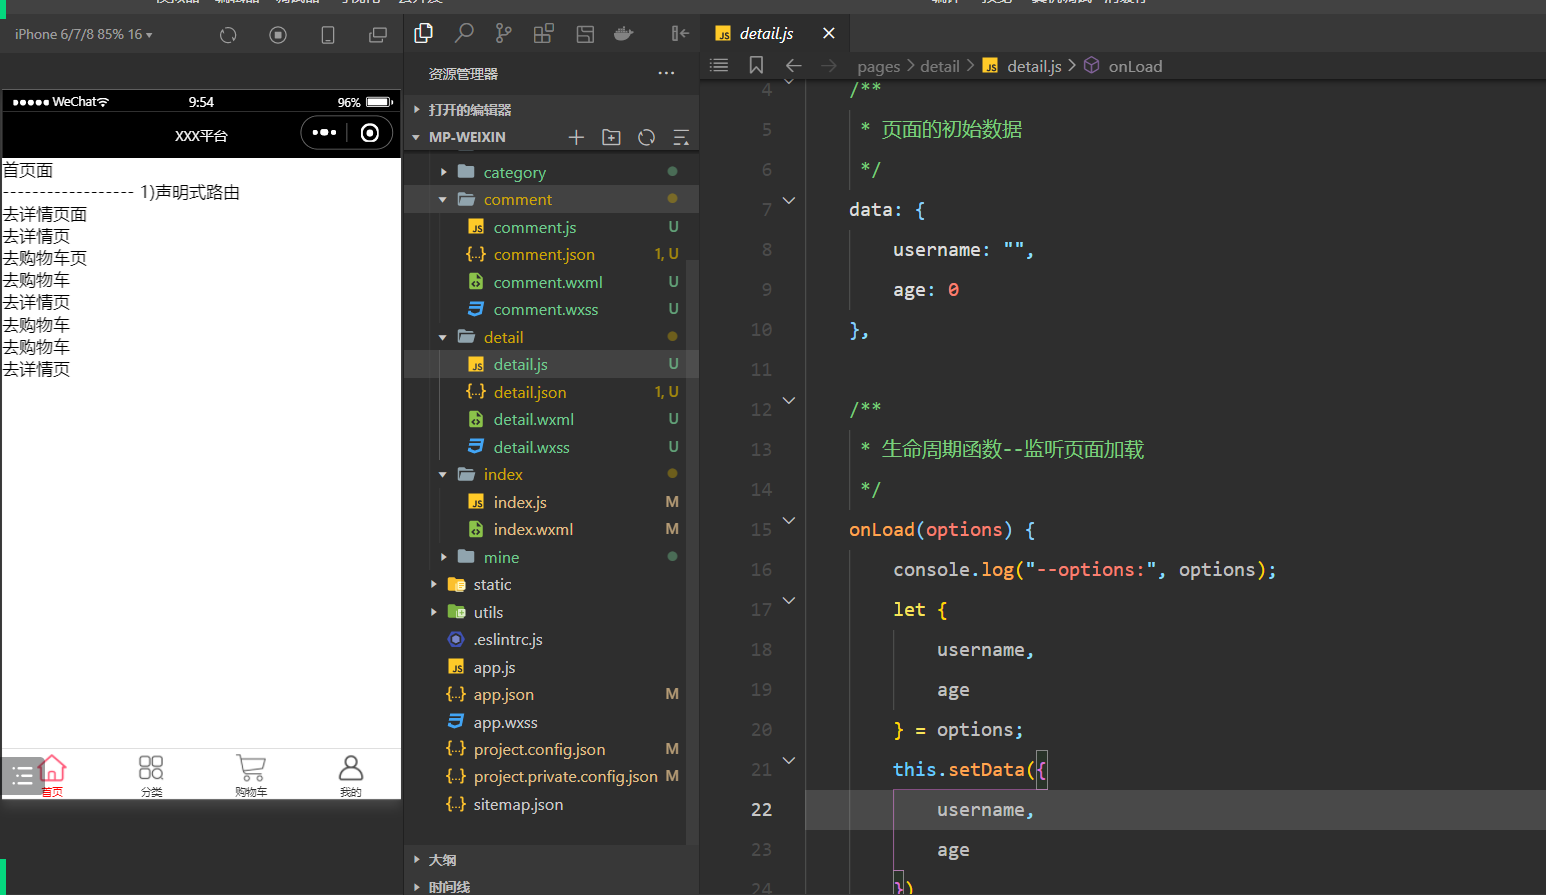
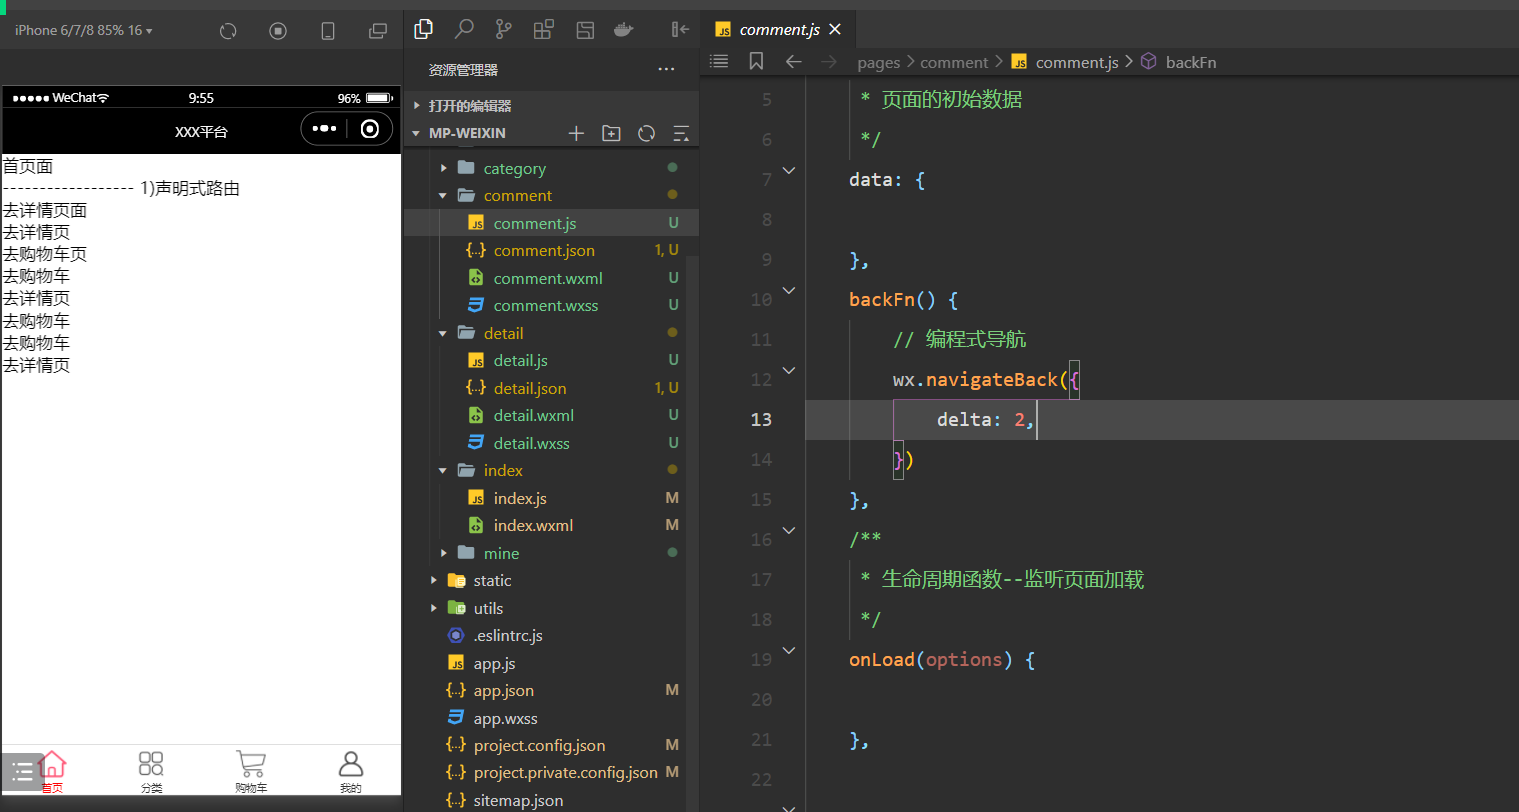
1,小程序路由
小程序中的路由跳转也是分两类的:
- 声明式路由 router-link navigator
- 编程式路由 $router.push .go .back .forword .replace 利用一些api实现跳转
准备几张页面,如下:


十二,项目
1,登录
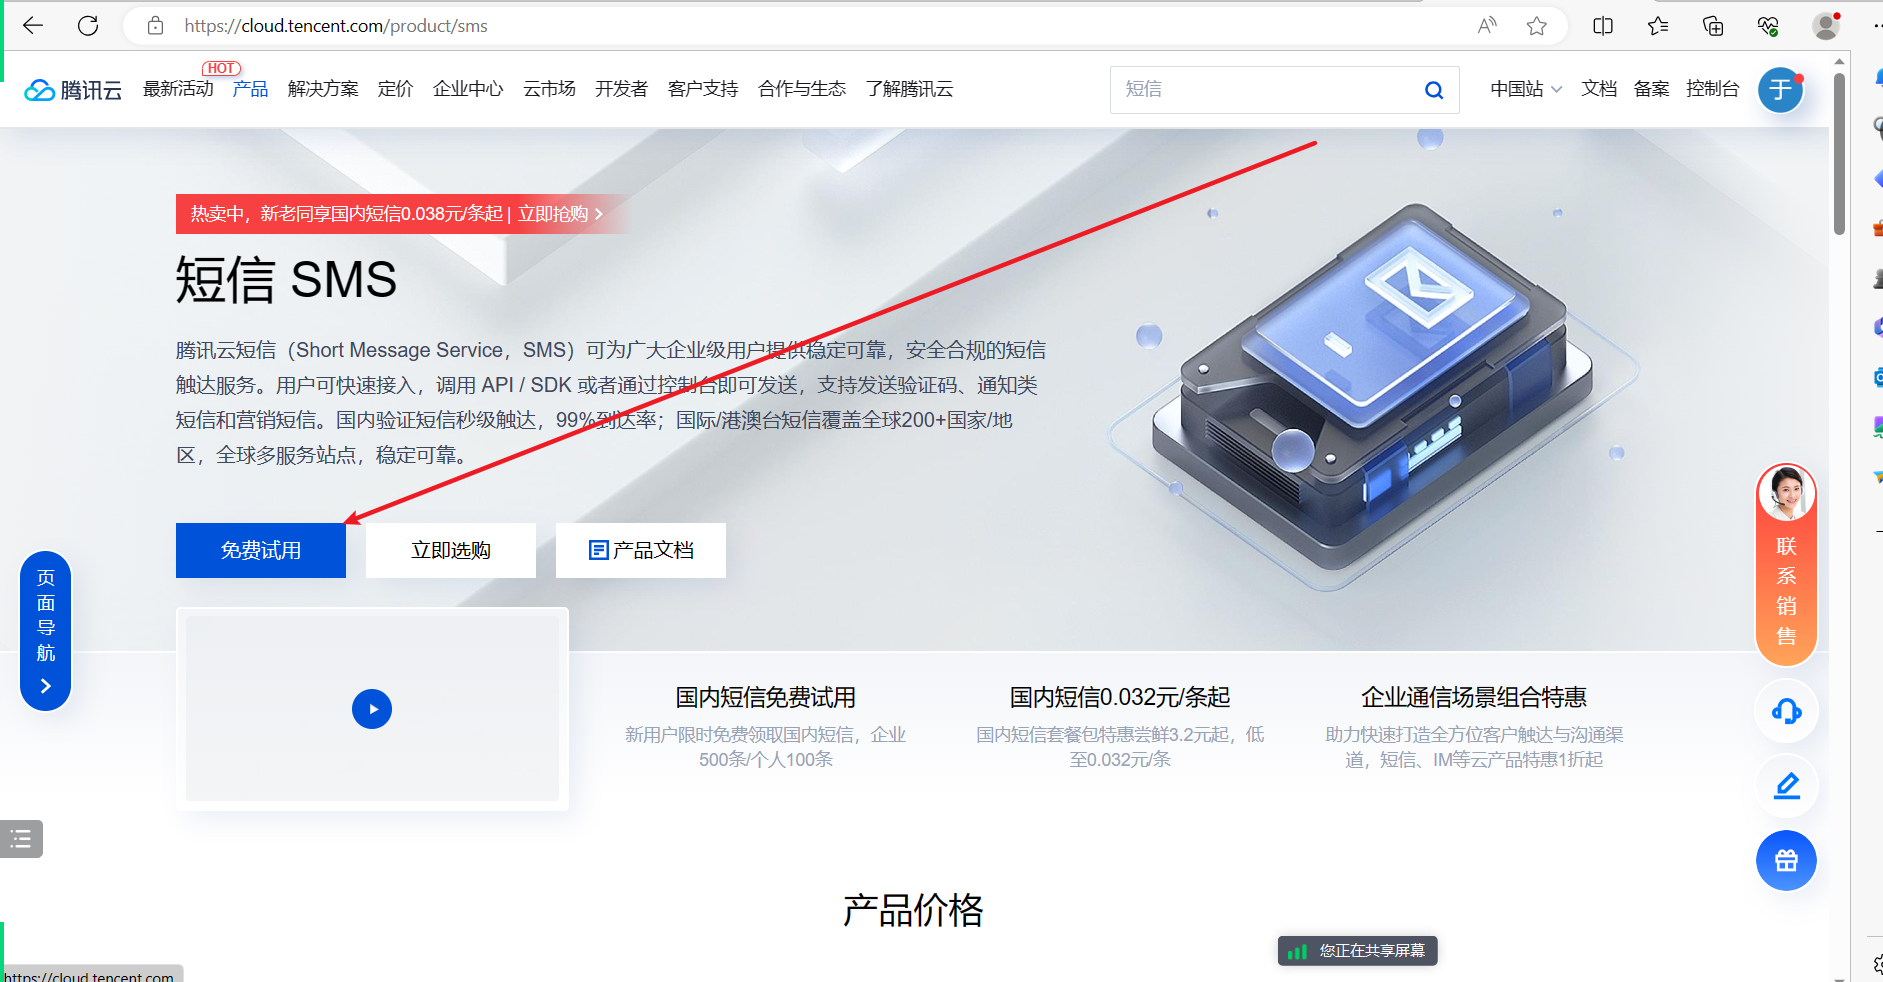
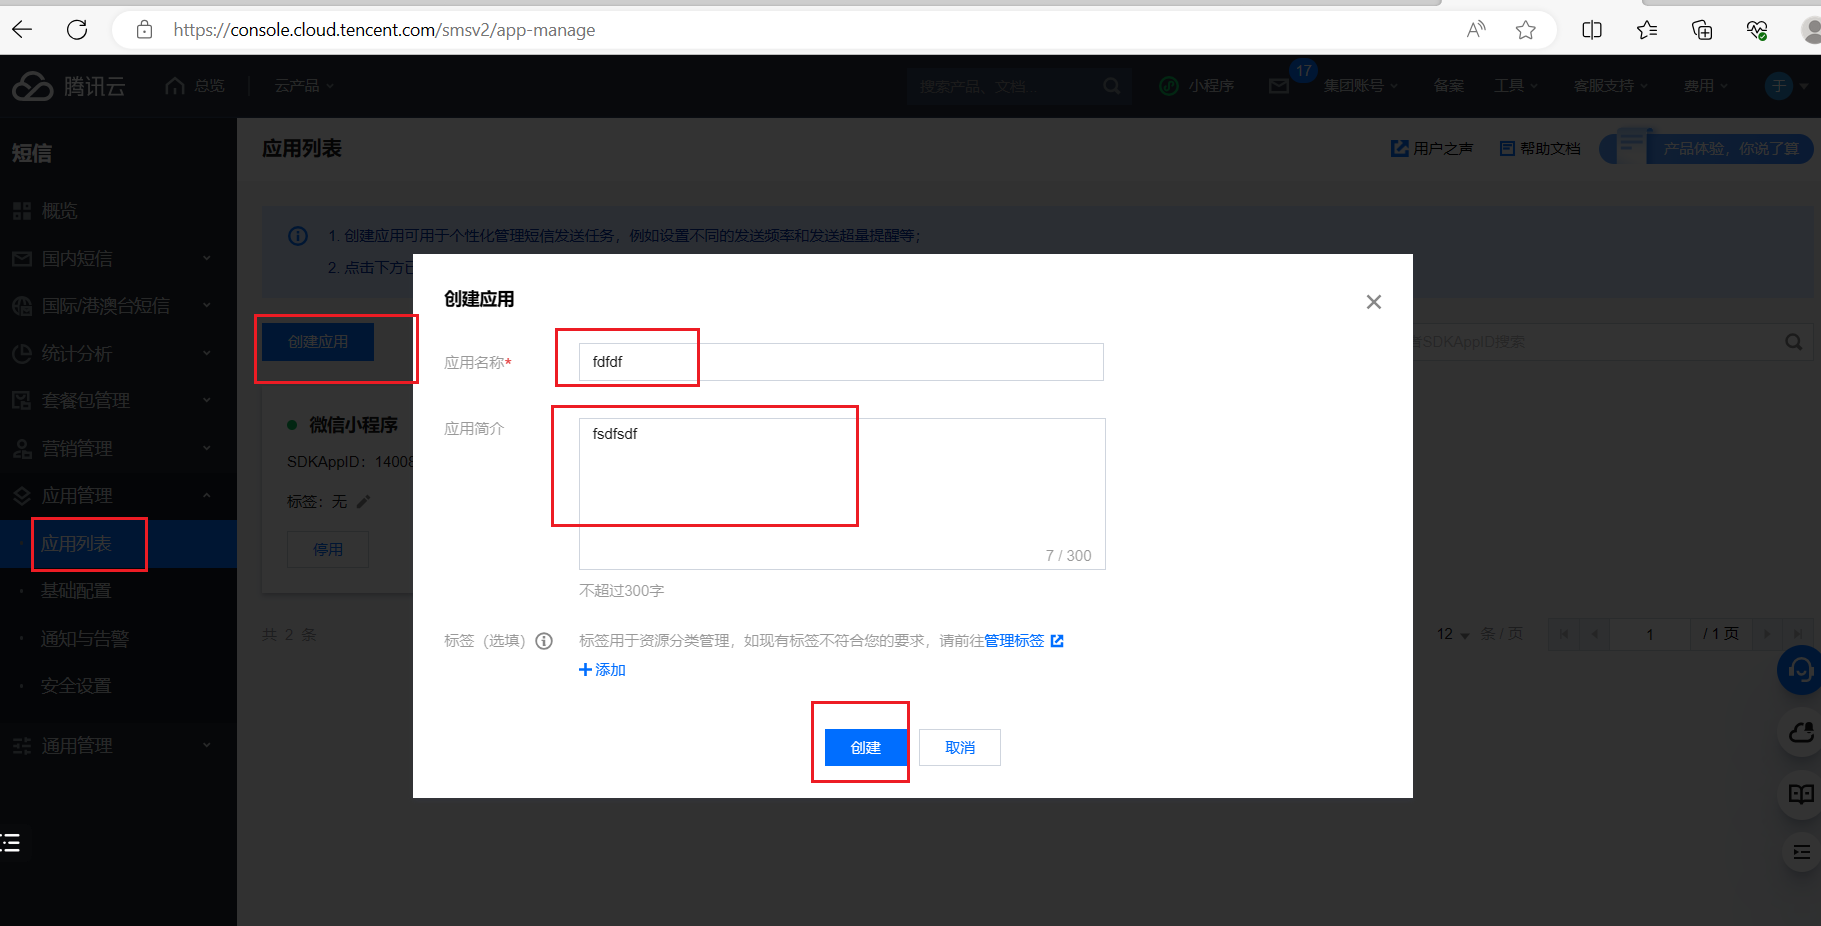
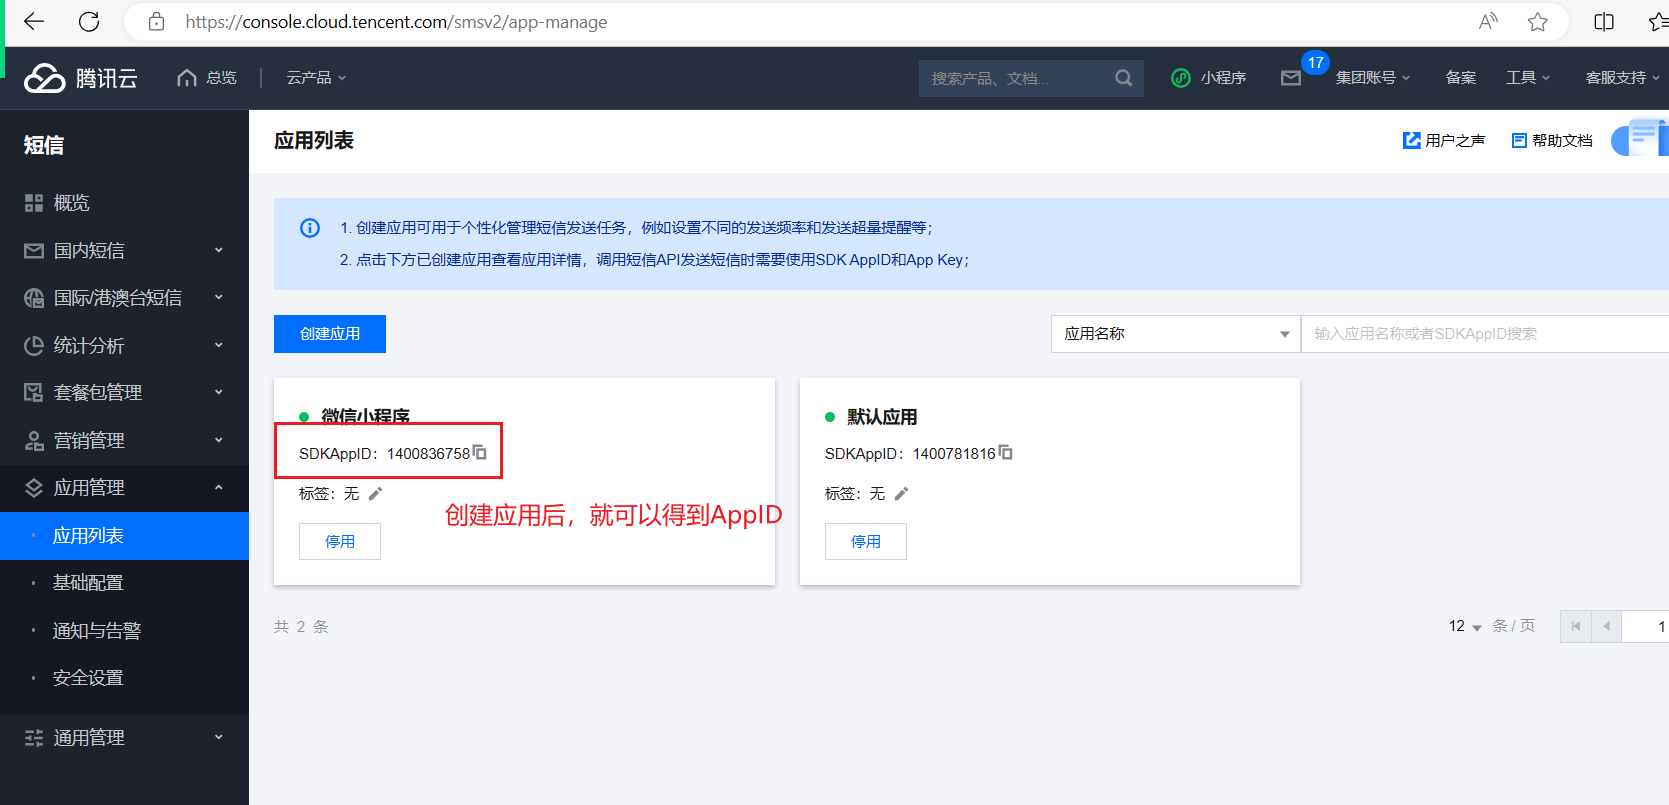
购买短信服务,流程如下:
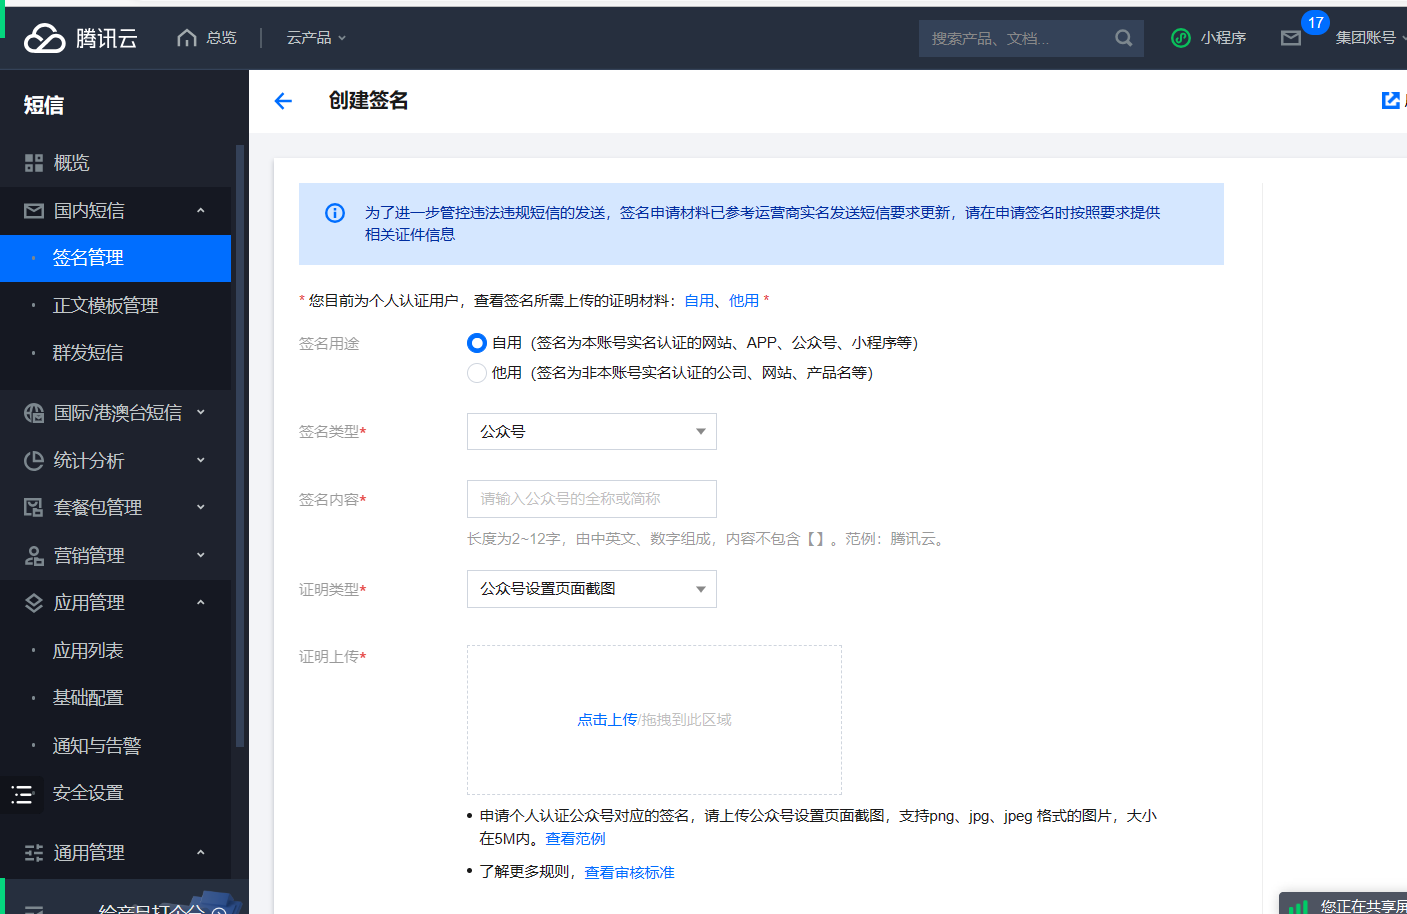
下一步,需要申请签名,如下:

然后,申请模板,如下:
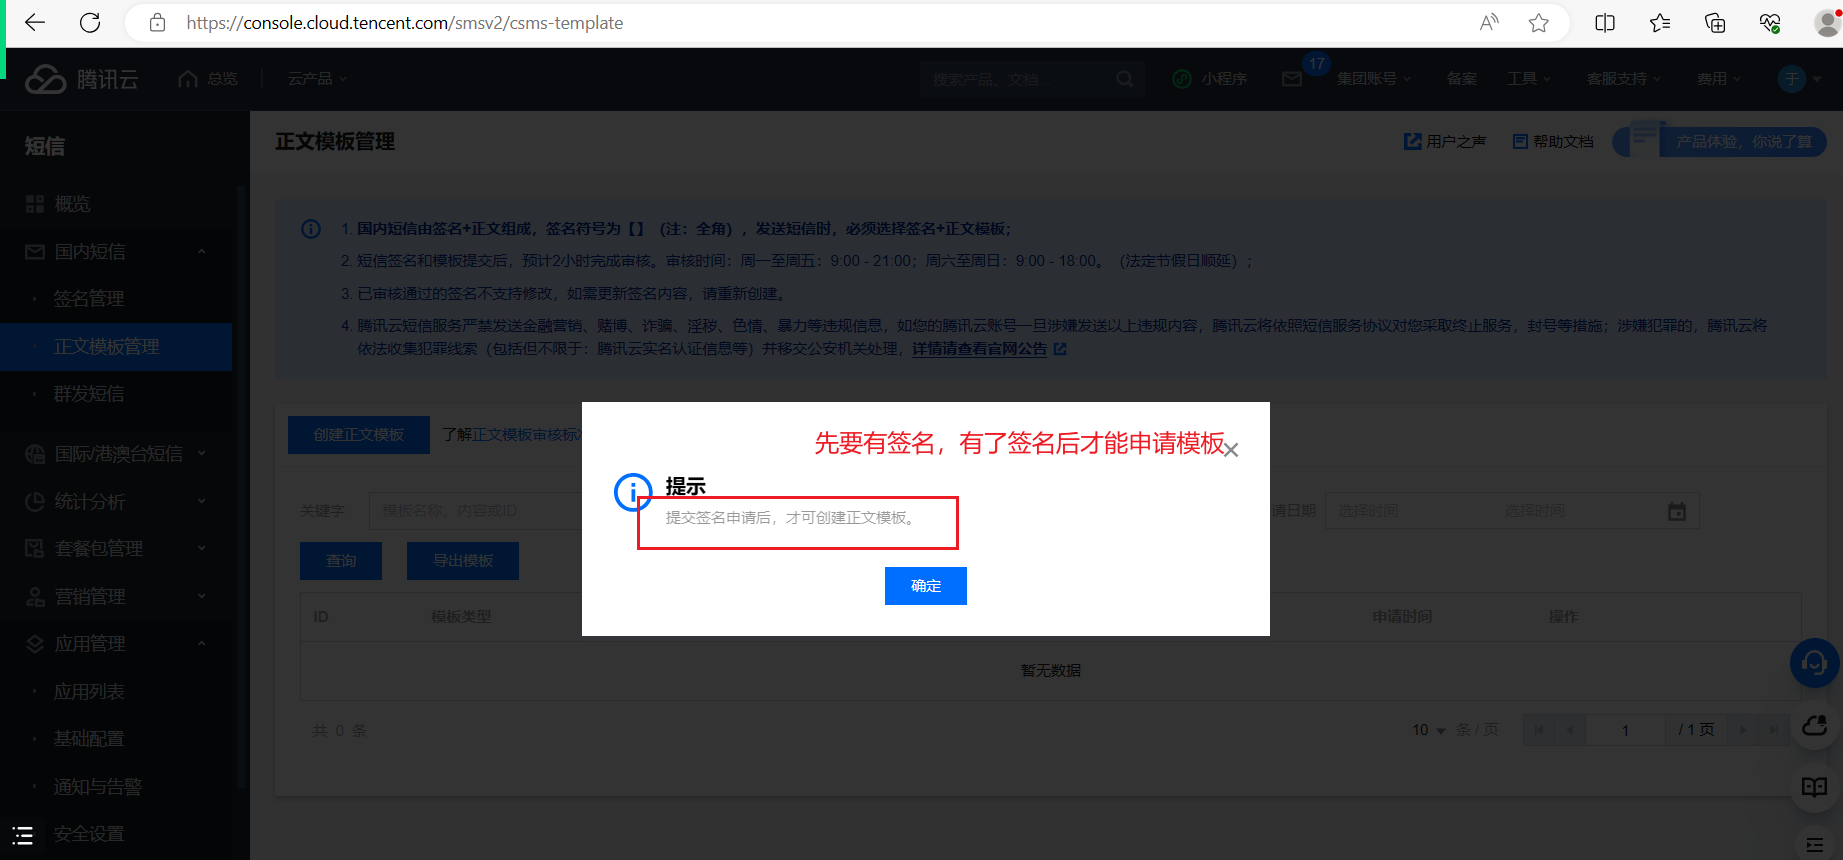
有了签名和模板,我们通过后端代码就可以发短信了。谁把签名申请下来了,说一下。短信功能这一步先放一下。
等待大家,把签名搞下来再说。
app.js
App({
    // 当小程序初始化完成时, 会触发 onLaunch( 全局只触发一次)
    onLaunch() {
        let userInfo = wx.getStorageSync('userInfo');
        if (userInfo) {
            this.globalData.userInfo = userInfo;
        }
    },
    // 这里存储全局的数据,现在在存储用户信息
    globalData: {
        userInfo: null, // {token:"xxx",phone:"567876"}
    },
    initUsereInFo(res, localInfo) {
        let info = {
            token: res.token,
            phone: res.phone,
            nickName: localInfo.nickName,
            avatarUrl: localInfo.avatarUrl
        }
        // 在内存了
        this.globalData.userInfo = info;

        // 可以把用户信息存储到本地
        wx.setStorageSync("userInfo", info);
    },
    delUserInfo: function () {
        this.globalData.userInfo = null;
        wx.removeStorageSync("userInfo")
    }
})
auth.wxml
<view class="logo">
<image src="/static/images/icon/logo_icon_show.png"></image>
<text>茶生活交流交易社区</text>
</view>
<view class="form">
<view class="row-group">
<text>手机</text>
<input maxlength="11" value="{{phone}}" placeholder="请输入手机号码" placeholder-class="txt" bindinput="bindPhoneInput" />
</view>
<view class="row-group">
<text>验证码</text>
<input maxlength="4" placeholder="请输写验证骊" placeholder-class="txt" value="{{code}}" bindinput="bindCodeInput" />
<view class="code" bindtap="onClickCheckCode">获取验证码</view>
</view>
<view>
<button class="submit" bindtap="onClickSubmit">登录 | 注册</button>
</view>
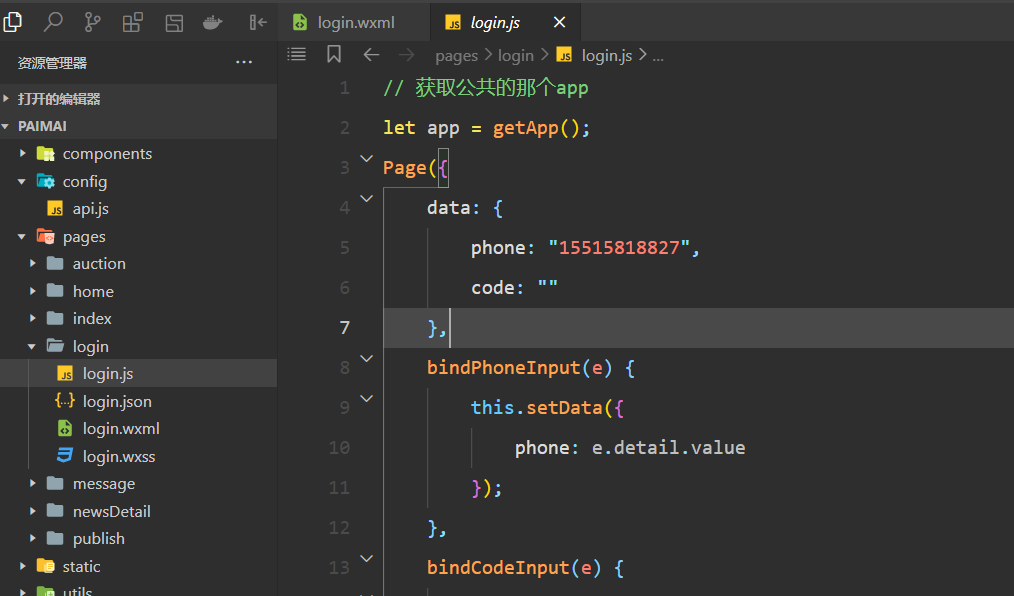
</view>auth.js
// 获取公共的那个app
let app = getApp();
Page({
    data: {
        phone: "15515818827",
        code: ""
    },
    bindPhoneInput(e) {
        this.setData({
            phone: e.detail.value
        });
    },
    bindCodeInput(e) {
        this.setData({
            code: e.detail.value
        });
    },
    // 获取验证码
    onClickCheckCode() {
        if (this.data.phone.trim().length == 0) {
            wx.showToast({
                title: '请填写手机号码',
                icon: 'none'
            })
            return
        }
        var reg = /^(1[3|4|5|6|7|8|9])\d{9}$/;
        if (!reg.test(this.data.phone)) {
            wx.showToast({
                title: '手机格式错误',
                icon: 'none'
            })
            return
        }
        wx.request({
            // url: 'http://127.0.0.1:8000/api/message/',
            // url: 'https://59l020c612.goho.co/api/message/',
            url: 'http://hknps.888u.ml:8080/api/message/',
            data: {
                phone: this.data.phone
            },
            dataType: 'json',
            success: function (res) {
                console.log("验证码:", res);
                // 开始倒计时...  去网上copy~
                if (res.data.status) {
                    wx.showToast({
                        title: res.data.message,
                        icon: 'none'
                    });
                } else {
                    wx.showToast({
                        title: res.data.message,
                        icon: 'none'
                    });
                }
            }
        })
    },
    // 点击登录
    onClickSubmit() {
        wx.request({
            // url: "http://127.0.0.1:8000/api/login/",
            // url: "https://59l020c612.goho.co/api/login/",
            url: "http://hknps.888u.ml:8080/api/login/",
            data: {
                phone: this.data.phone,
                code: this.data.code
            },
            method: 'POST',
            dataType: 'json',
            success: (res) => {
                // console.log("--res:", res);
                if (res.data.status) {
                    // 登录成功  data:{data:{token:"fsdafadsfasdf",phone:"56787654567"}}
                    // 获取用户信息
                    // ...
                    wx.getUserProfile({
                        desc: '获取你的昵称、头像、地区及性别',
                        success: res1 => {
                            app.initUsereInFo(res.data.data, res1.userInfo)

                            // 跳转会上一级页面
                            wx.navigateBack({})
                        },
                        fail: res => {
                            console.log(res)
                            //拒绝授权
                            wx.showToast({
                                title: '您拒绝了请求,不能正常使用小程序',
                                icon: 'error',
                                duration: 2000
                            });
                            return;
                        }
                    });
                    // app.initUsereInFo(res.data.data)
                } else {
                    // 登录失败
                    wx.showToast({
                        title: "登录失败",
                        icon: 'none'
                    });
                }
            }
        })
    }
})
home.wxml
<view class="container">
    <view class="top-view">
        <view class="user">
            <view class="row">
                <image class="avatar" wx:if="{{userInfo}}" src="{{userInfo.avatarUrl}}"></image>
                <image class="avatar" wx:else="{{userInfo}}" src="/static/images/auction/hh.png"></image>
                <view class="name" wx:if="{{userInfo}}">
                    <view bindtap="onClickLogout" bindtap="onClickLogout">{{userInfo.nickName}}</view>
                </view>
                <view class="name" wx:else="{{userInfo}}">
                    <navigator url="/pages/auth/auth">登录</navigator>
                    |
                    <navigator url="/pages/auth/auth">注册</navigator>
                </view>
            </view>
            <view class="site">查看个人主页</view>
        </view>
        <view class="numbers">
            <view class="row">
                <text>0</text>
                <text>关注</text>
            </view>
            <view class="row">
                <text>0</text>
                <text>粉丝</text>
            </view>
            <view class="row">
                <text>0</text>
                <text>赞与收藏</text>
            </view>
            <view class="row">
                <text>0</text>
                <text>好友动态</text>
            </view>
        </view>
    </view>

    <view class="middle-view">
        <navigator class="item" url="/pages/order/order">
            <image src="/static/images/icon/transaction_order1_icon_show.png"></image>
            <text>未支付</text>
        </navigator>
        <navigator class="item" url="/pages/order/order">
            <image src="/static/images/icon/transaction_order2_icon_show.png"></image>
            <text>待收货</text>
        </navigator>
        <navigator class="item" url="/pages/order/order">
            <image src="/static/images/icon/transaction_order3_icon_show.png"></image>
            <text>已完成</text>
        </navigator>
        <navigator class="item" url="/pages/order/order">
            <image src="/static/images/icon/transaction_order5_icon_show.png"></image>
            <text>逾期未支付</text>
        </navigator>
    </view>

    <view class="function-view">
        <view class="row">
            <view class="left">我的钱包</view>
            <view class="right">
                <text>¥20</text>
                <image class="go-icon" src='/static/images/icon/to_icon_show_small.png'></image>
            </view>
        </view>
        <navigator class="row" url="/pages/myCoupon/myCoupon">
            <view class="left">我的优惠券</view>
            <view class="right">
                <text>暂无课用</text>
                <image class="go-icon" src='/static/images/icon/to_icon_show_small.png'></image>
            </view>
        </navigator>
        <navigator class="row" url="/pages/coupon/coupon">
            <view class="left">领劵中心</view>
            <view class="right">
                <text>你的福利都在这里</text>
                <image class="go-icon" src='/static/images/icon/to_icon_show_small.png'></image>
            </view>
        </navigator>
    </view>

    <view class="contact-view">
        <button open-type="contact">
            <image src="/static/images/icon/wechat_contact_icon_show.png"></image>
        </button>
        <button bindtap="onClickCall">
            <image src="/static/images/icon/phone_contact_icon_show.png"></image>
        </button>
    </view>
</view>
home.js
let app = getApp();
Page({
    data: {
        userInfo: null
    },
    onShow() {
        this.setData({
            userInfo: app.globalData.userInfo
        })
    },
    // 点击昵称实现退出登录
    onClickLogout() {
        app.delUserInfo();
        this.setData({
            userInfo: null
        })
    }
})
2,发布上传图片(demo)
创建对应的页面,如下:

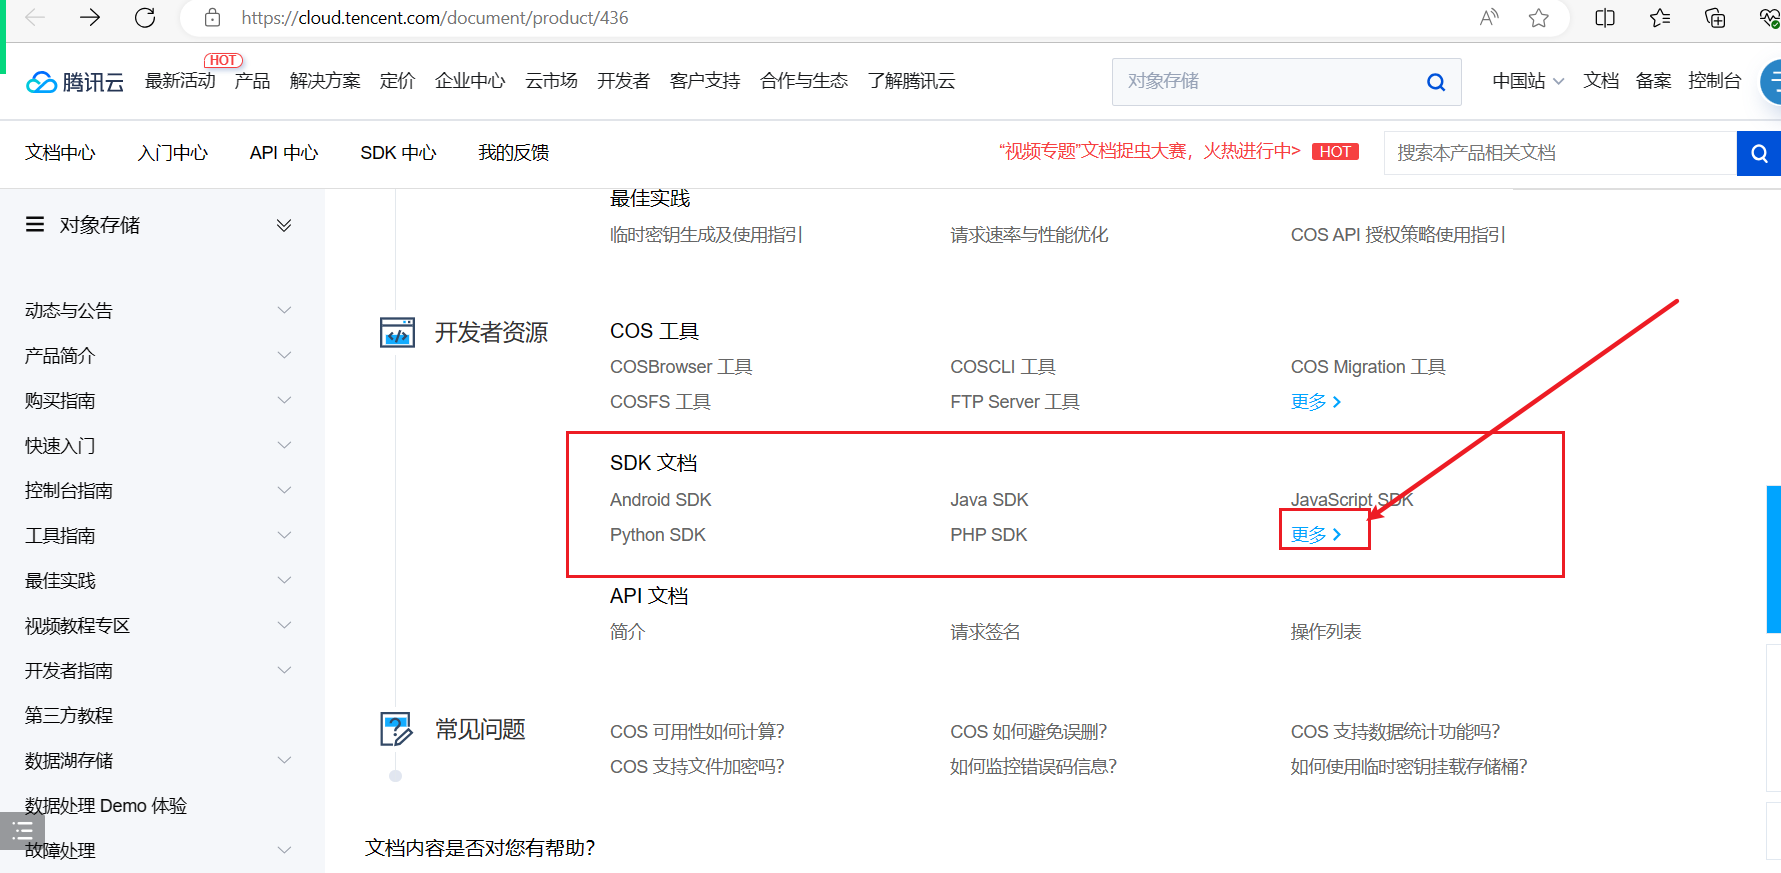
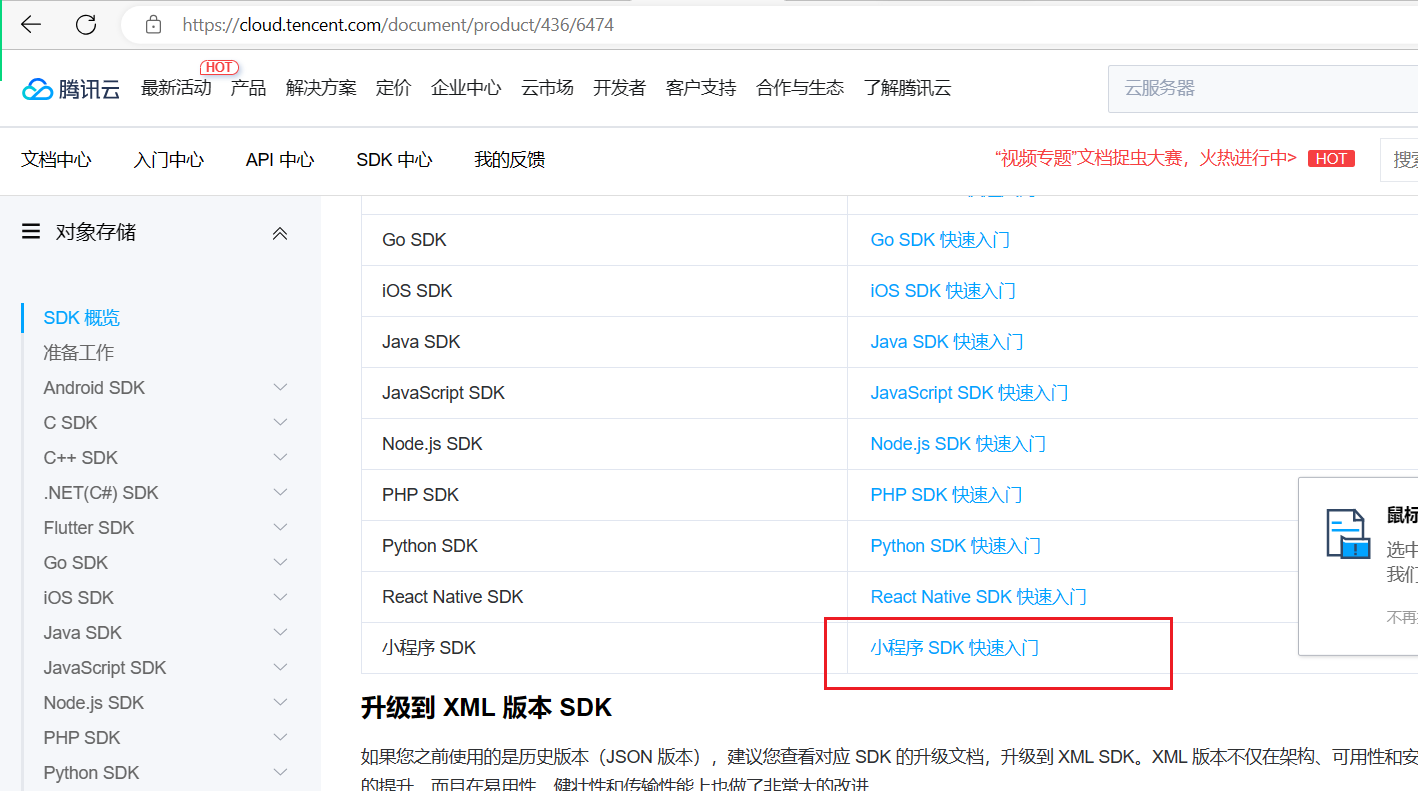
把图片上传到腾讯云,步骤如下:
第一步:打开腾讯云,如下:

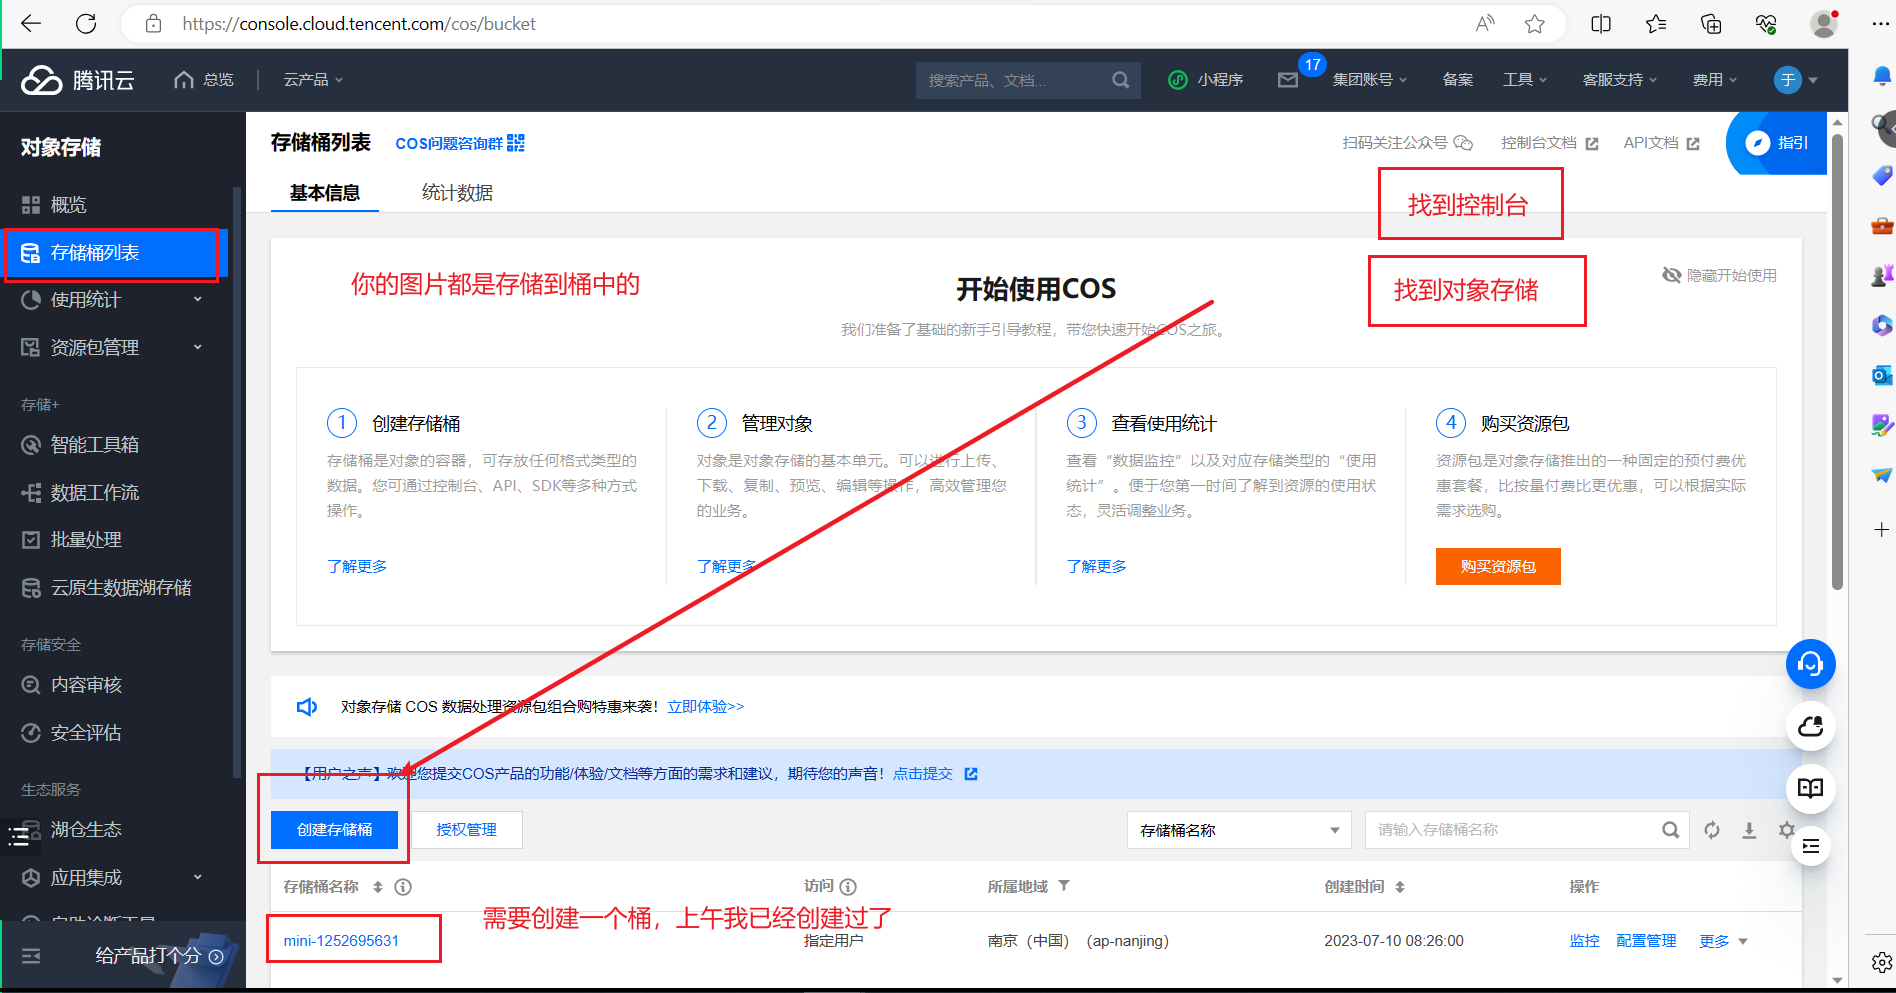
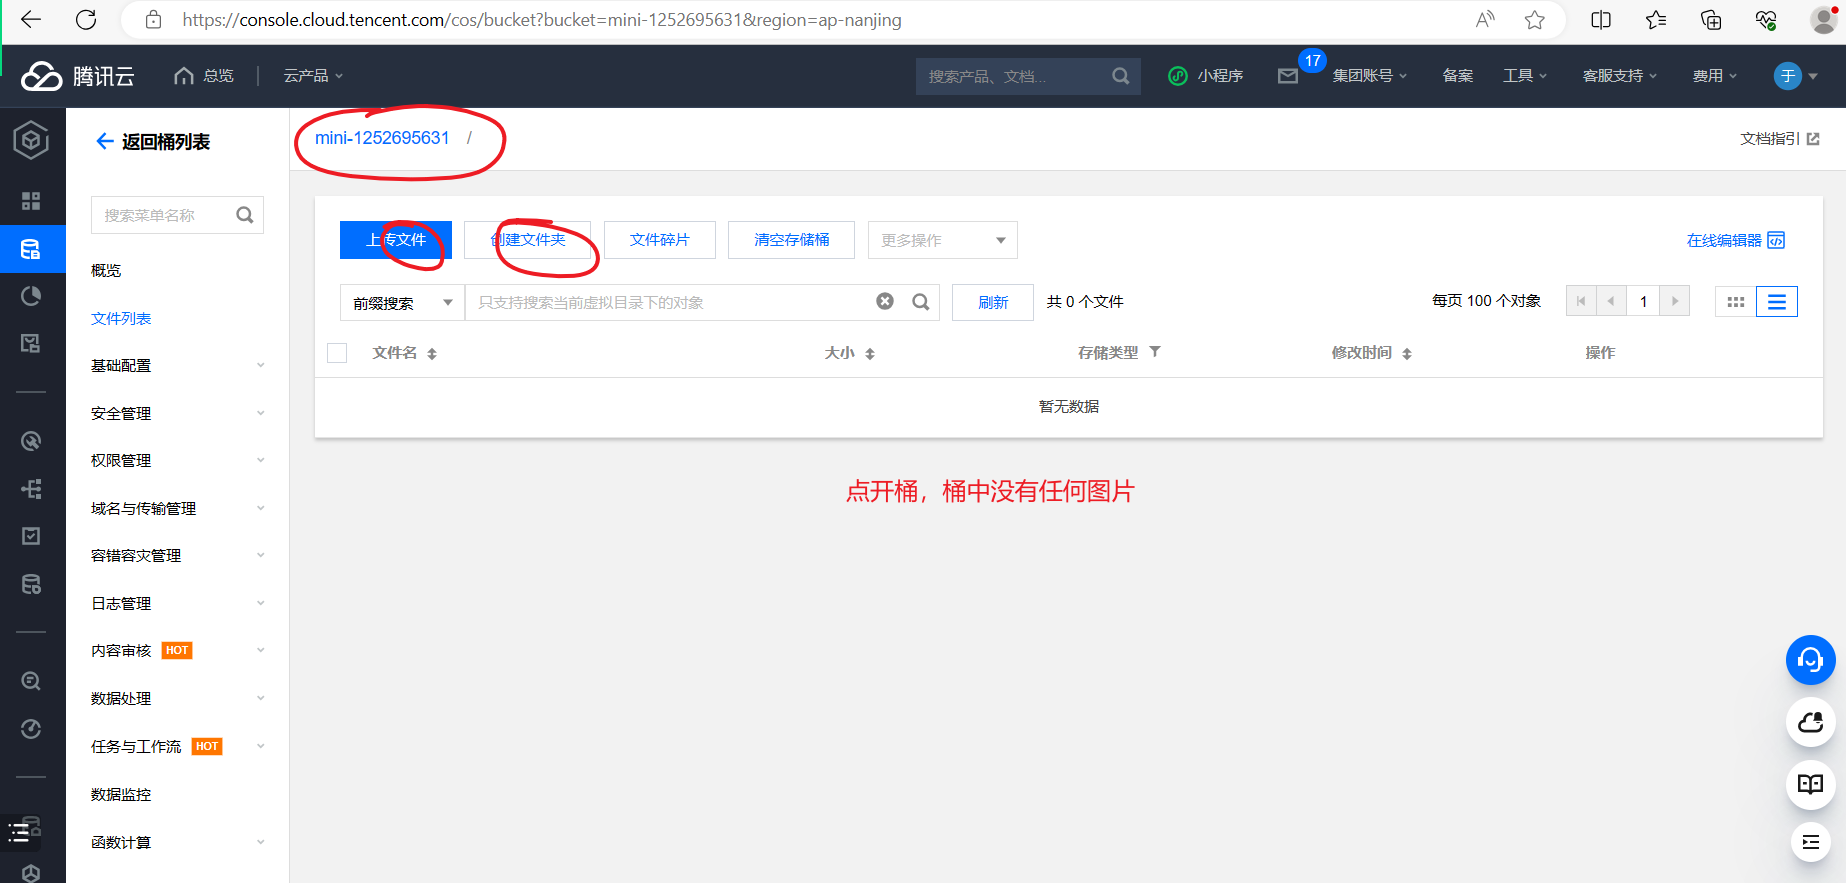
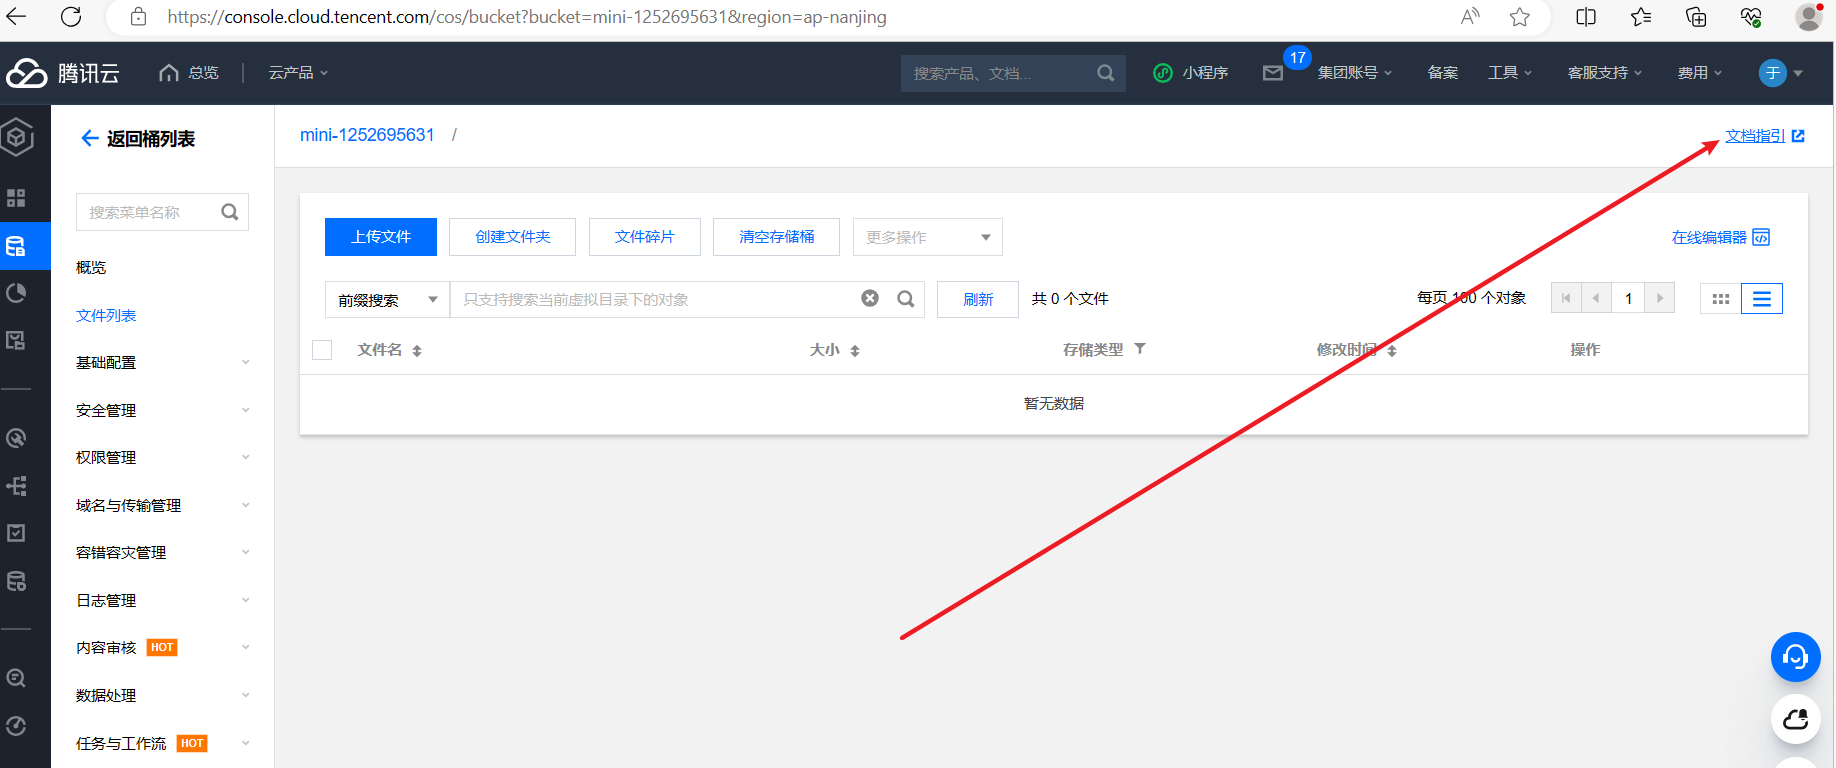
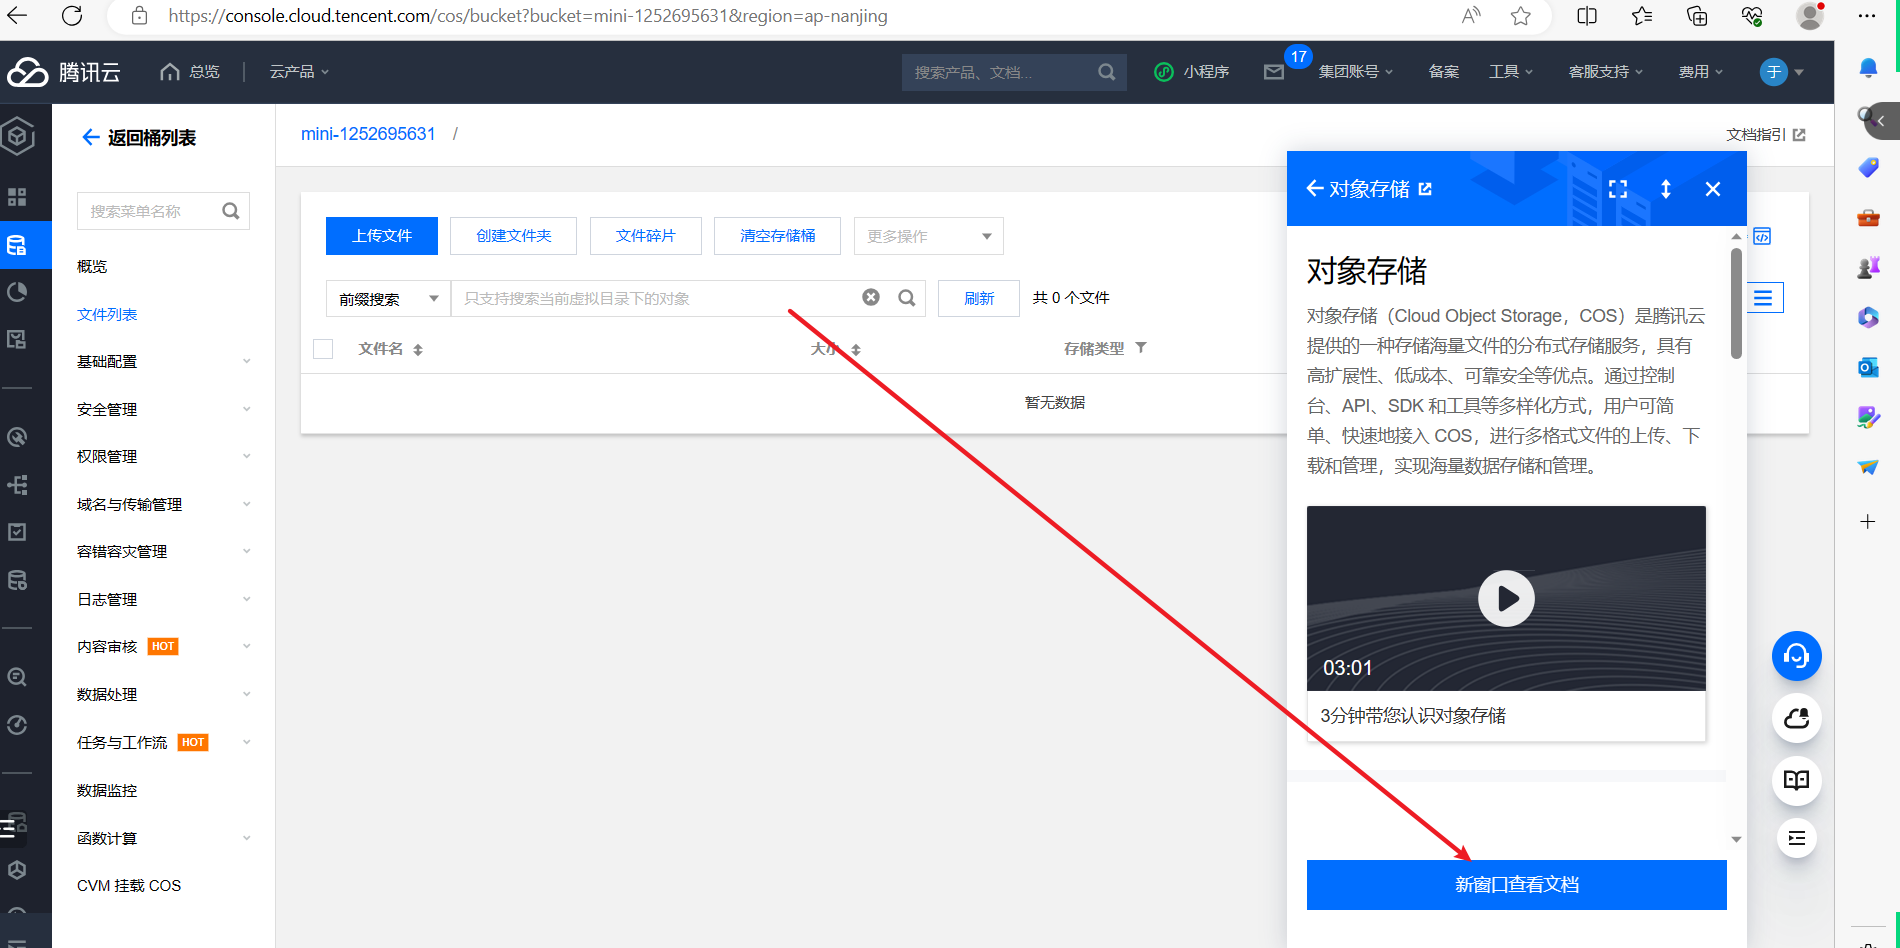
然后开始写代码,把图片,上传到桶中,需要找文档,如下:
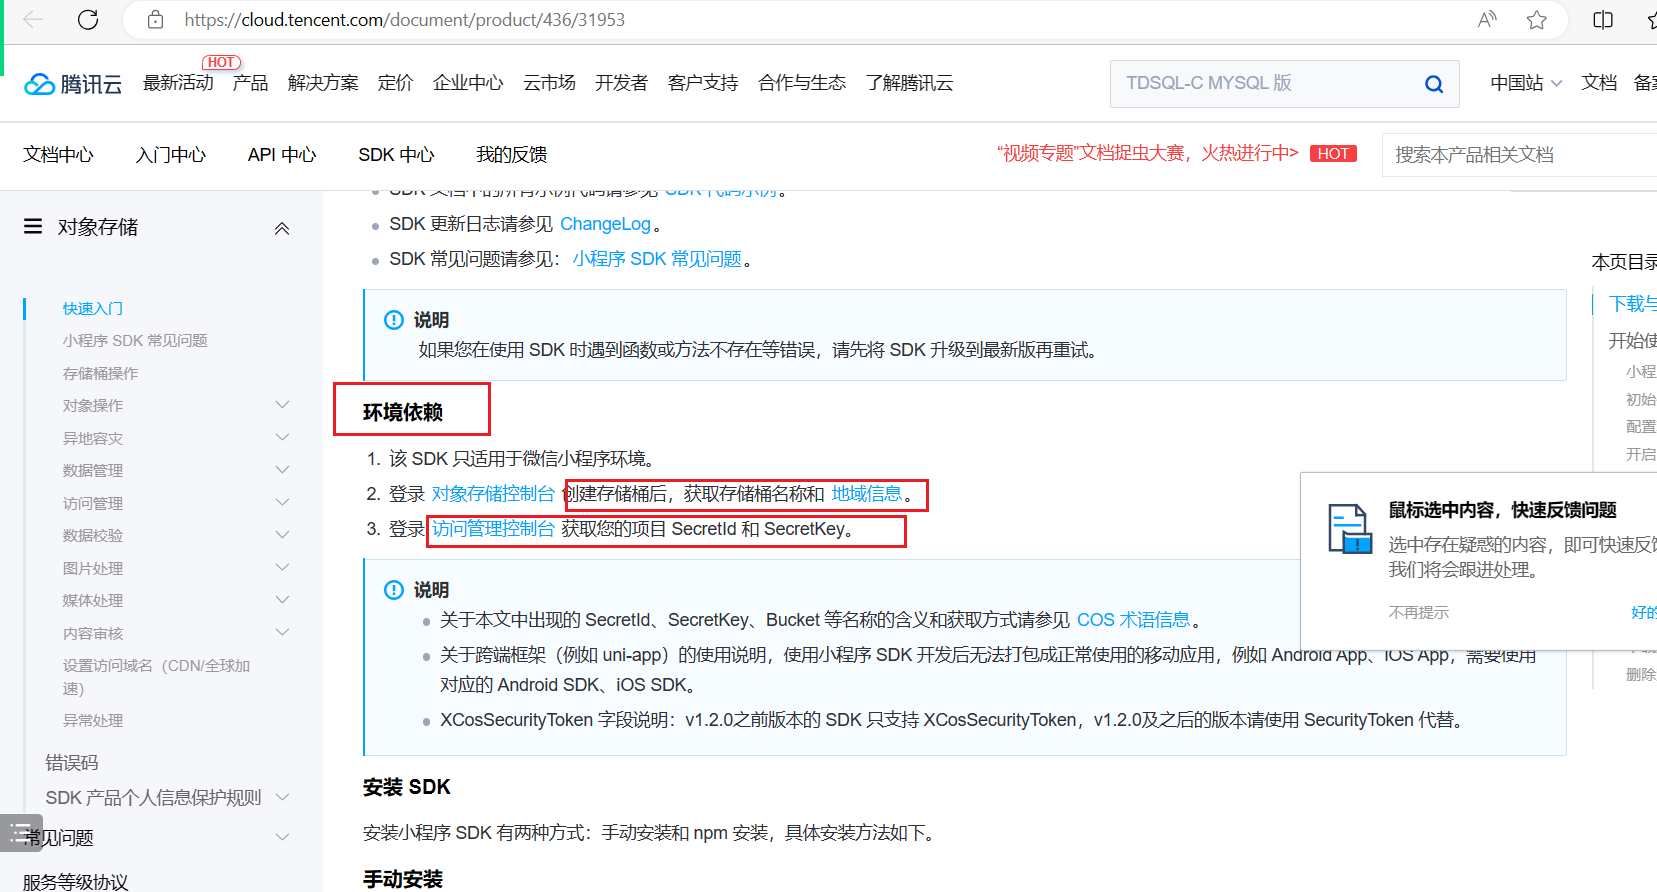
需要准备两个东西,一个叫SecretId和SecretKey,如下:
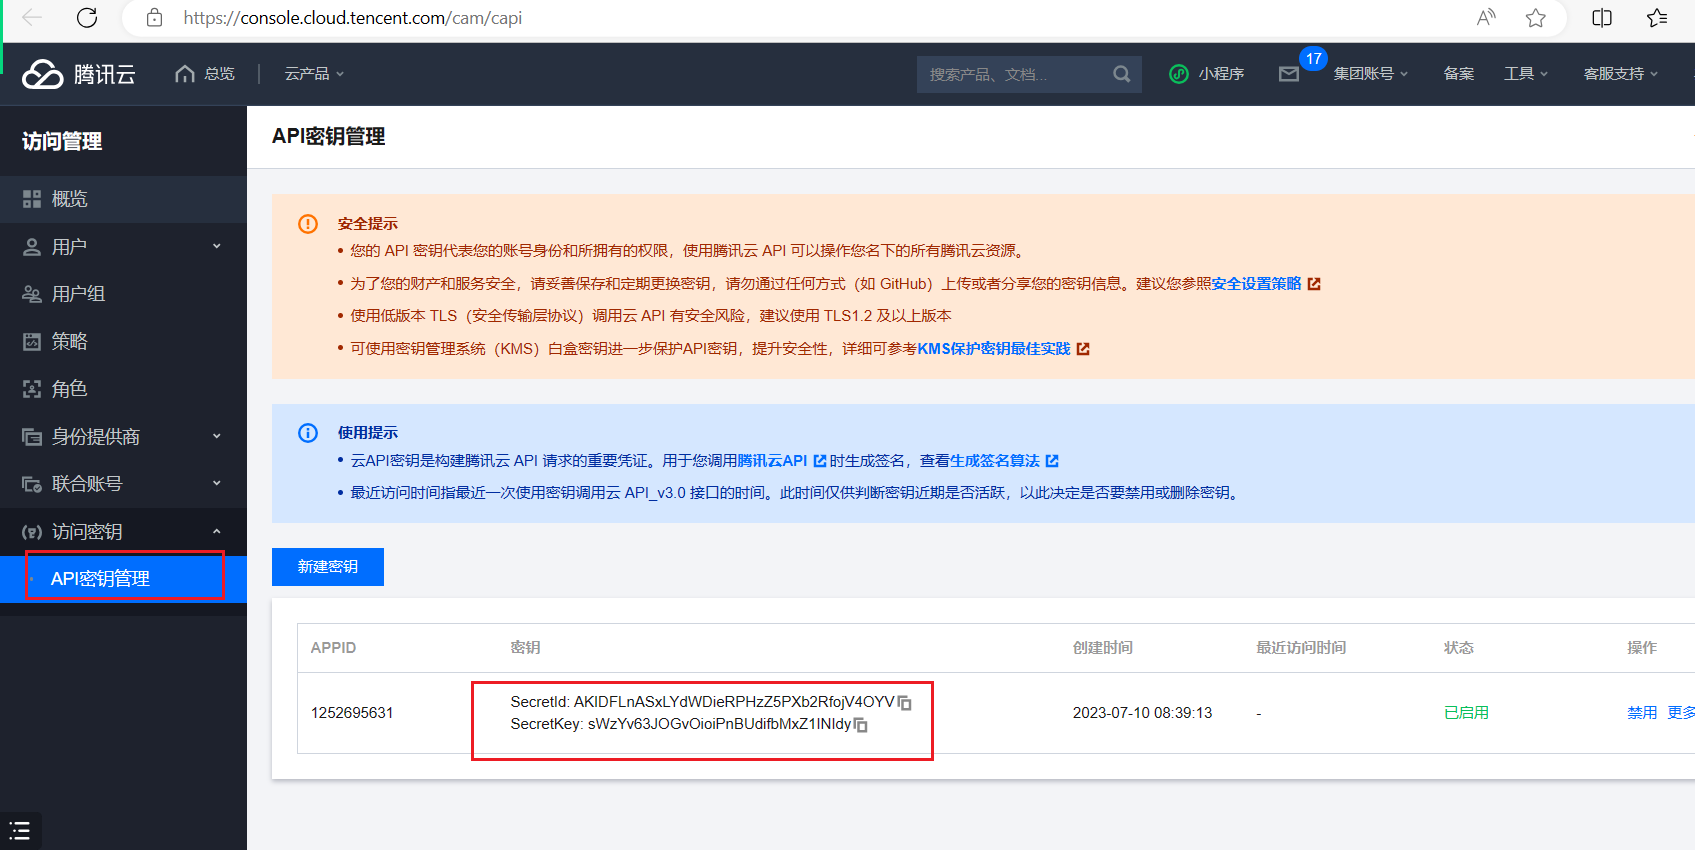
如下:
SecretId:AKIDFLnASxLYdWDieRPHzZ5PXb2RfojV4OYV
SecretKey:sWzYv63JOGvOioiPnBUdifbMxZ1INIdy
参考代码:
<view bindtap="uploadImage">请上传图片</view>

<view class="container">
    <image style="width: 100rpx;height: 100rpx;" wx:for="{{imageList}}" src="{{item}}"></image>
</view>

<!-- 可以把图片上传到你后端代码所在的服务器 -->
<!-- 可以把图片上传到云端:腾讯云 -->
<view bindtap="uploadFile">点击上传</view>let COS = require('../../utils/cos-wx-sdk-v5.js')
Page({
data: {
imageList: [
// "/static/images/tabbar/ic_menu_choice_nor.png"
],
},
uploadImage() {
let that = this;
wx.chooseImage({
count: 9,
sizeType: ['original', 'compressed'],
sourceType: ['album', 'camera'],
success: function (res) {
// 默认图片 + 选择的图片;
that.setData({
imageList: that.data.imageList.concat(res.tempFilePaths)
});
}
});
},
uploadFile() {
var onlineImageList = [];
// var cos = new COS({
// SecretId: 'AKIDFLnASxLYdWDieRPHzZ5PXb2RfojV4OYV',
// SecretKey: 'sWzYv63JOGvOioiPnBUdifbMxZ1INIdy',
// });
var cos = new COS({
getAuthorization: function (options, callback) {
// 服务端 JS 和 PHP 示例:https://github.com/tencentyun/cos-js-sdk-v5/blob/master/server/
// 服务端其他语言参考 COS STS SDK :https://github.com/tencentyun/qcloud-cos-sts-sdk
// STS 详细文档指引看:https://cloud.tencent.com/document/product/436/14048
wx.request({
url: 'http://hknps.888u.ml:8080/api/credential',
data: {
// 可从 options 取需要的参数
},
success: function (result) {
var data = result.data;
var credentials = data.credentials;
callback({
TmpSecretId: credentials.tmpSecretId,
TmpSecretKey: credentials.tmpSecretKey,
XCosSecurityToken: credentials.sessionToken,
ExpiredTime: data.expiredTime,
});
}
});
}
});
for (var index in this.data.imageList) {
var filePath = this.data.imageList[index];
cos.postObject({
Bucket: 'mini-1252695631',
Region: 'ap-nanjing',
Key: index + "uuu.png",
FilePath: filePath,
onProgress: function (info) {
console.log('进度条', JSON.stringify(info));
}
}, function (err, data) {
// data.Location是图片上传成功后,人家返回的地址
onlineImageList.push(data.Location);
console.log(onlineImageList);
});
}
},
onLoad(options) {
},
})3,首页面数据获取(Demo)
创建一个新的项目,如下:
就是一个空的项目,如下:
tabar代码如下:
"tabBar": {
"backgroundColor": "#fafafa",
"borderStyle": "white",
"color": "#666",
"selectedColor": "#b4282d",
"position": "bottom",
"list": [{
"pagePath": "pages/index/index",
"text": "首页"
},
{
"pagePath": "pages/home/home",
"text": "我的"
}
]
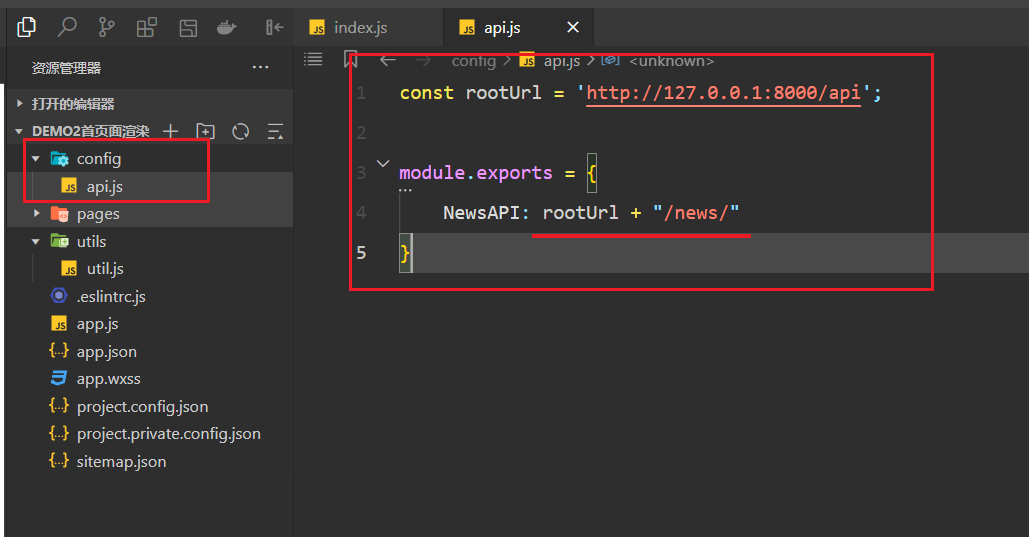
},定义一个配置文件,设置好基本api路径,如下:
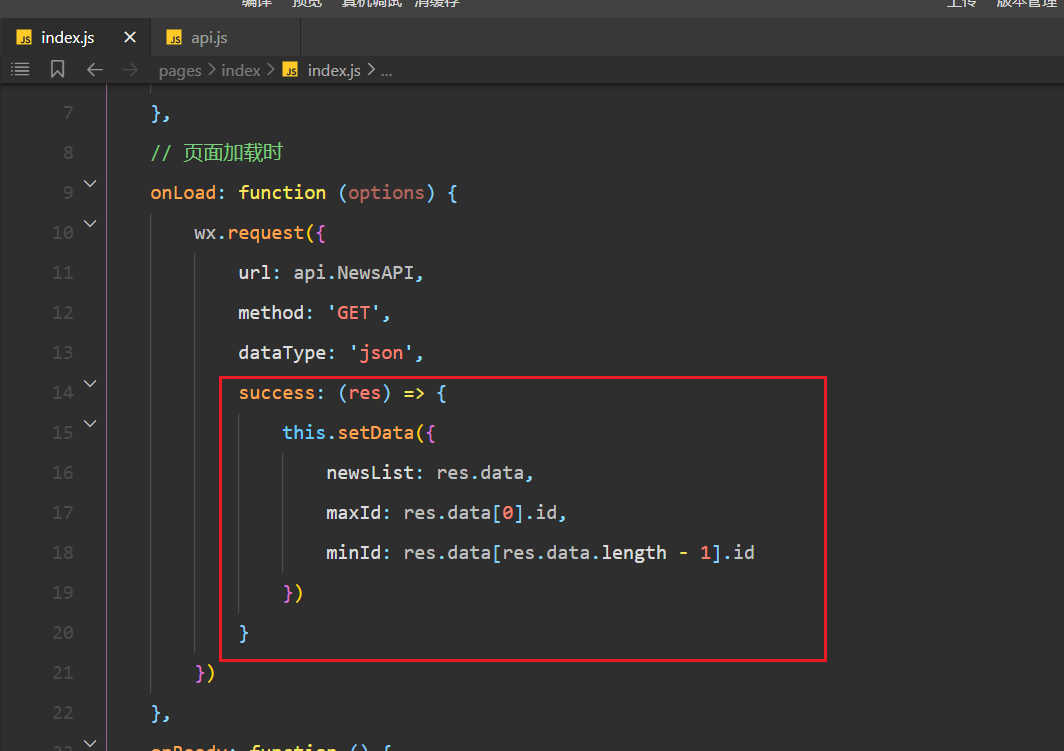
发送请求:
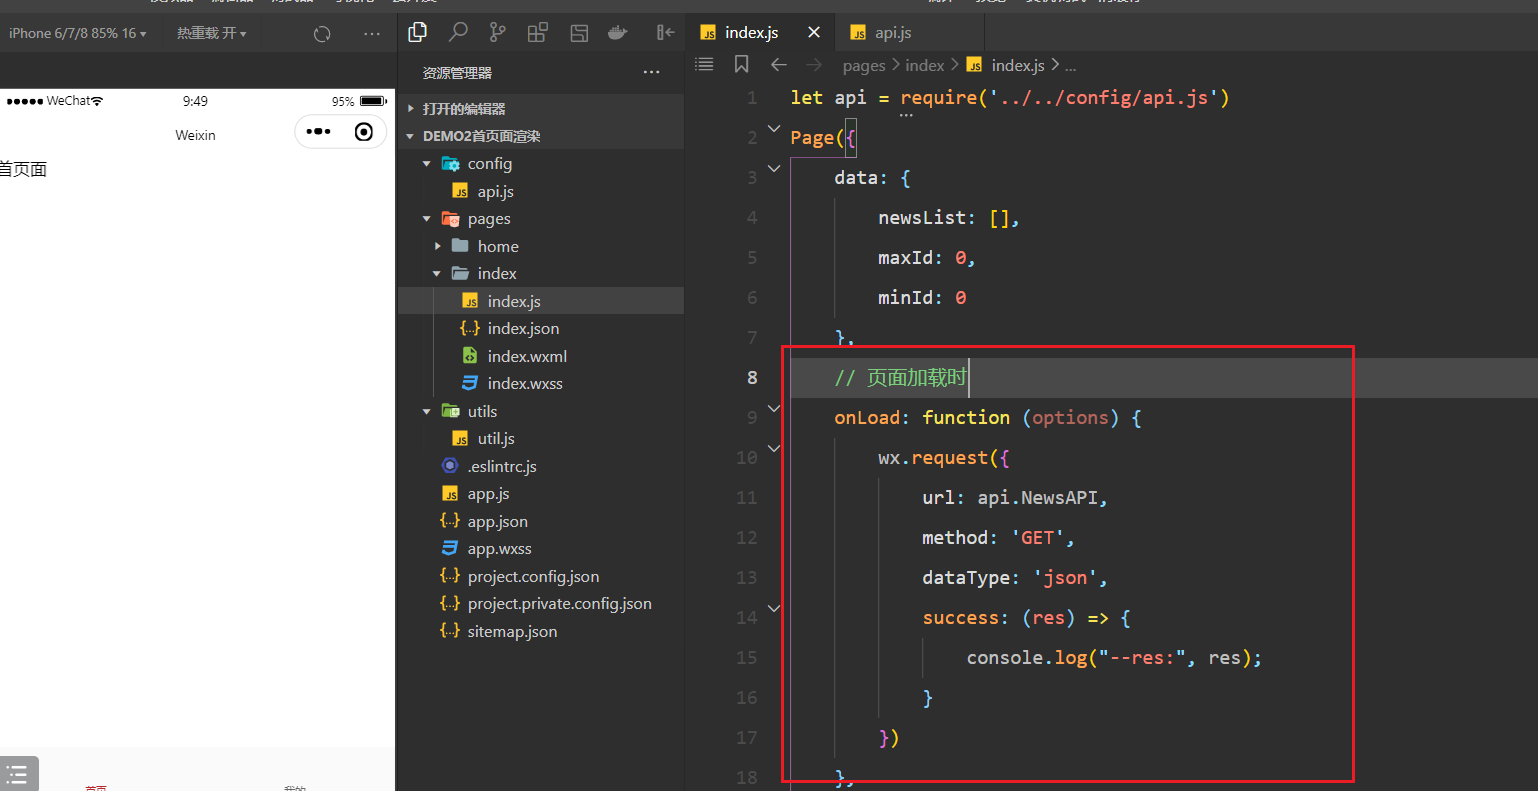
得到结果,如下:
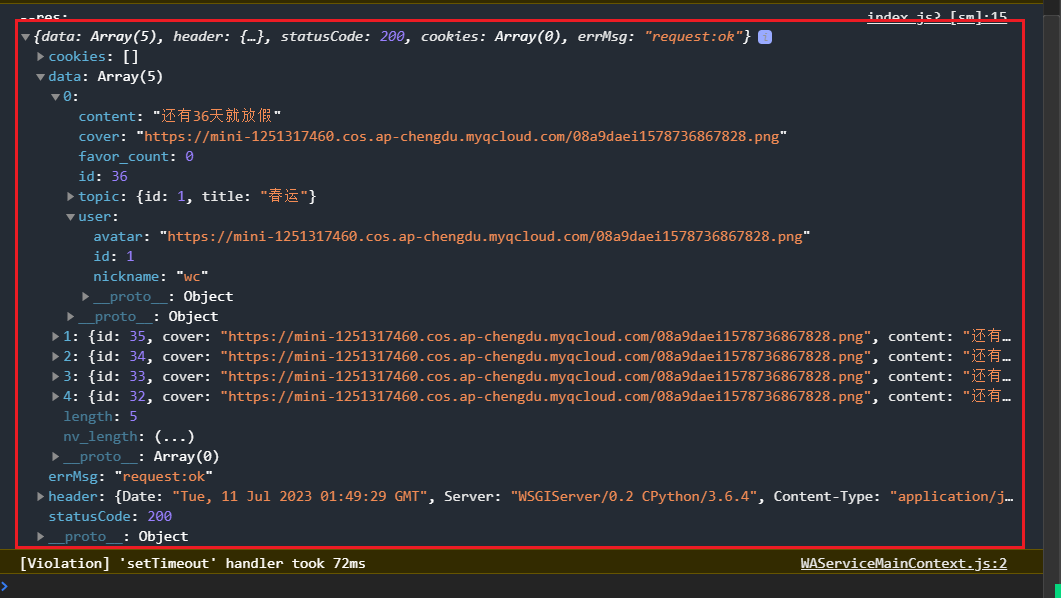
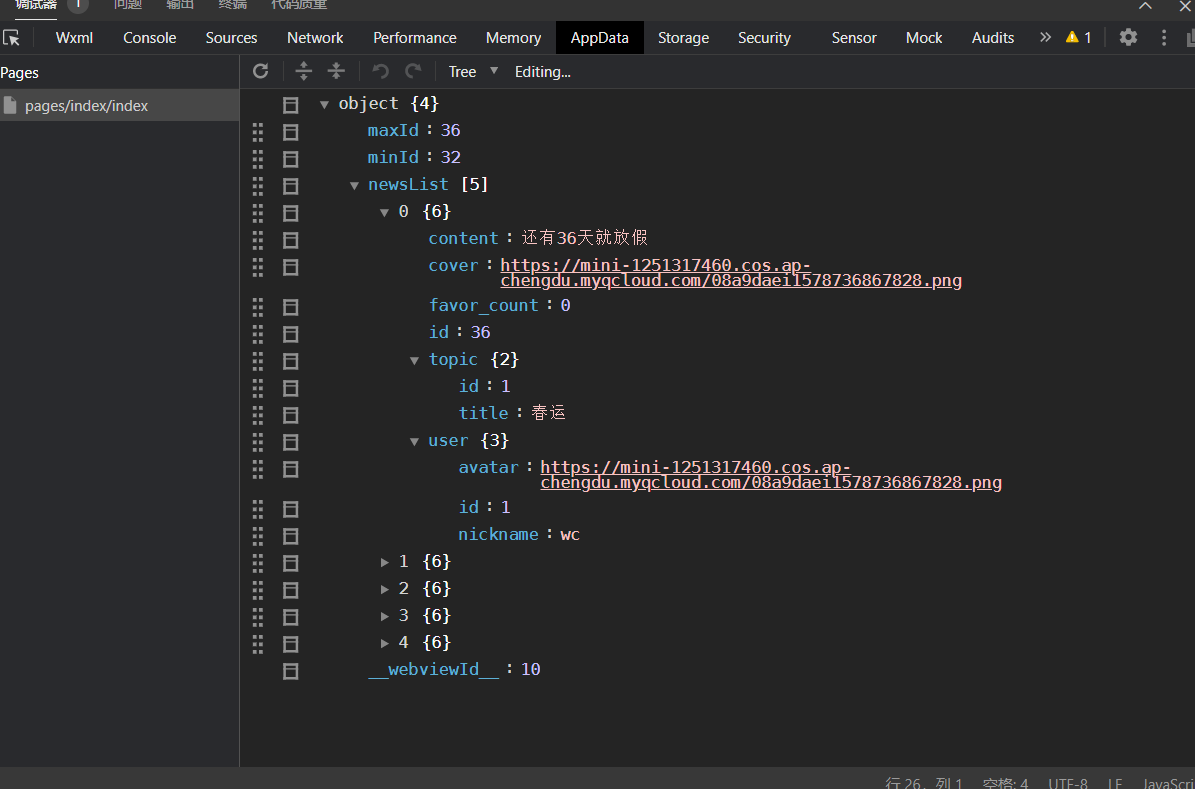
把数据赋值给上面的状态,如下:
查看状态,如下:
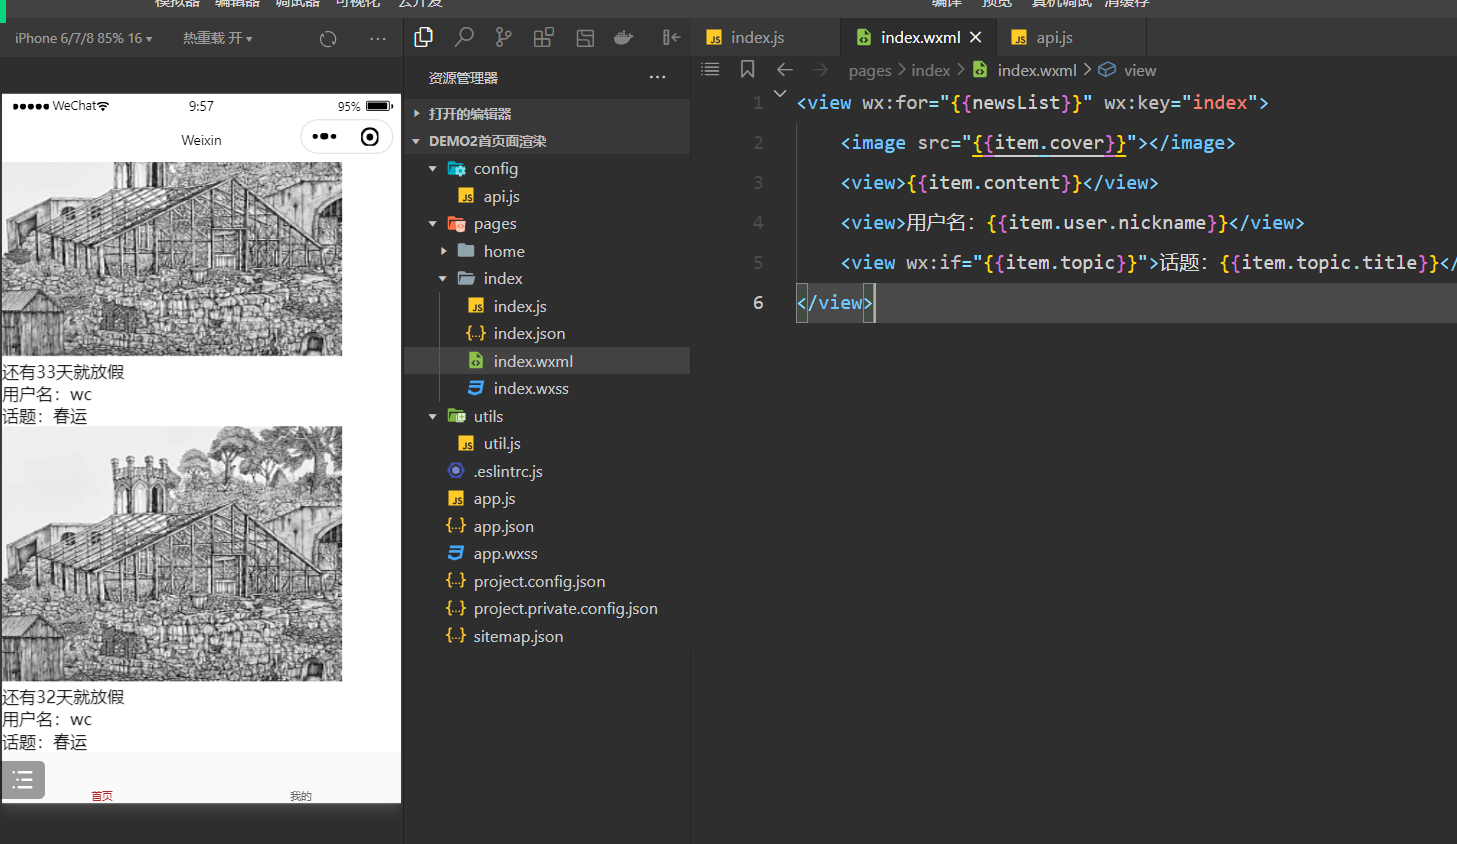
在html中渲染数据,如下:
实现下拉刷新,配置如下:
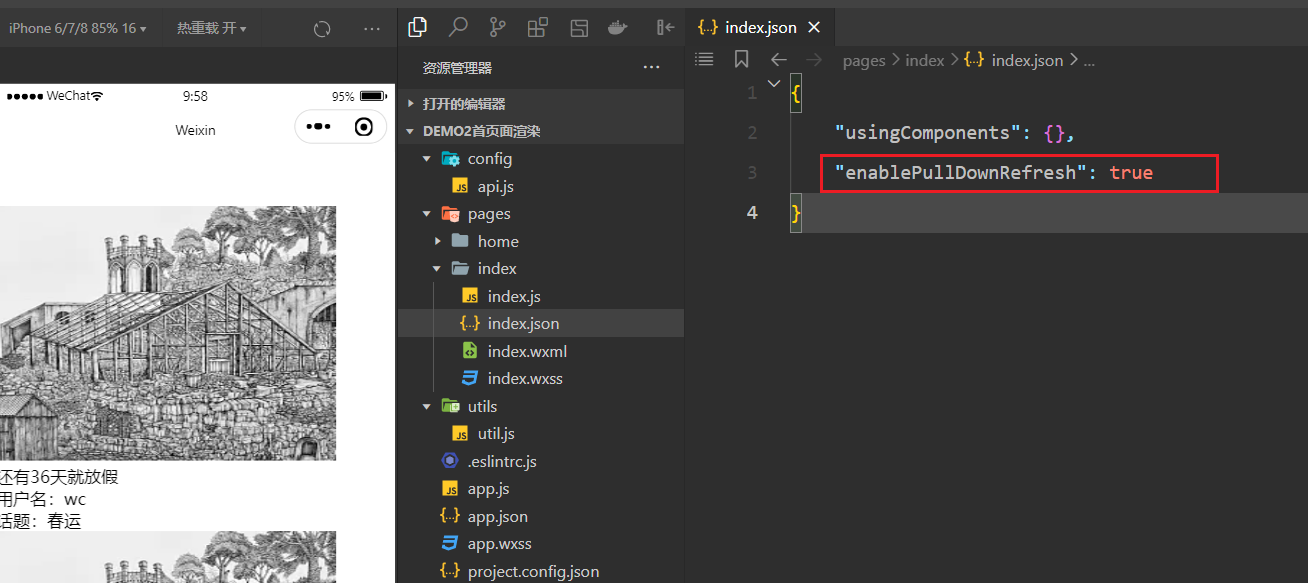
当下载拉,就会触发如下函数,如下:
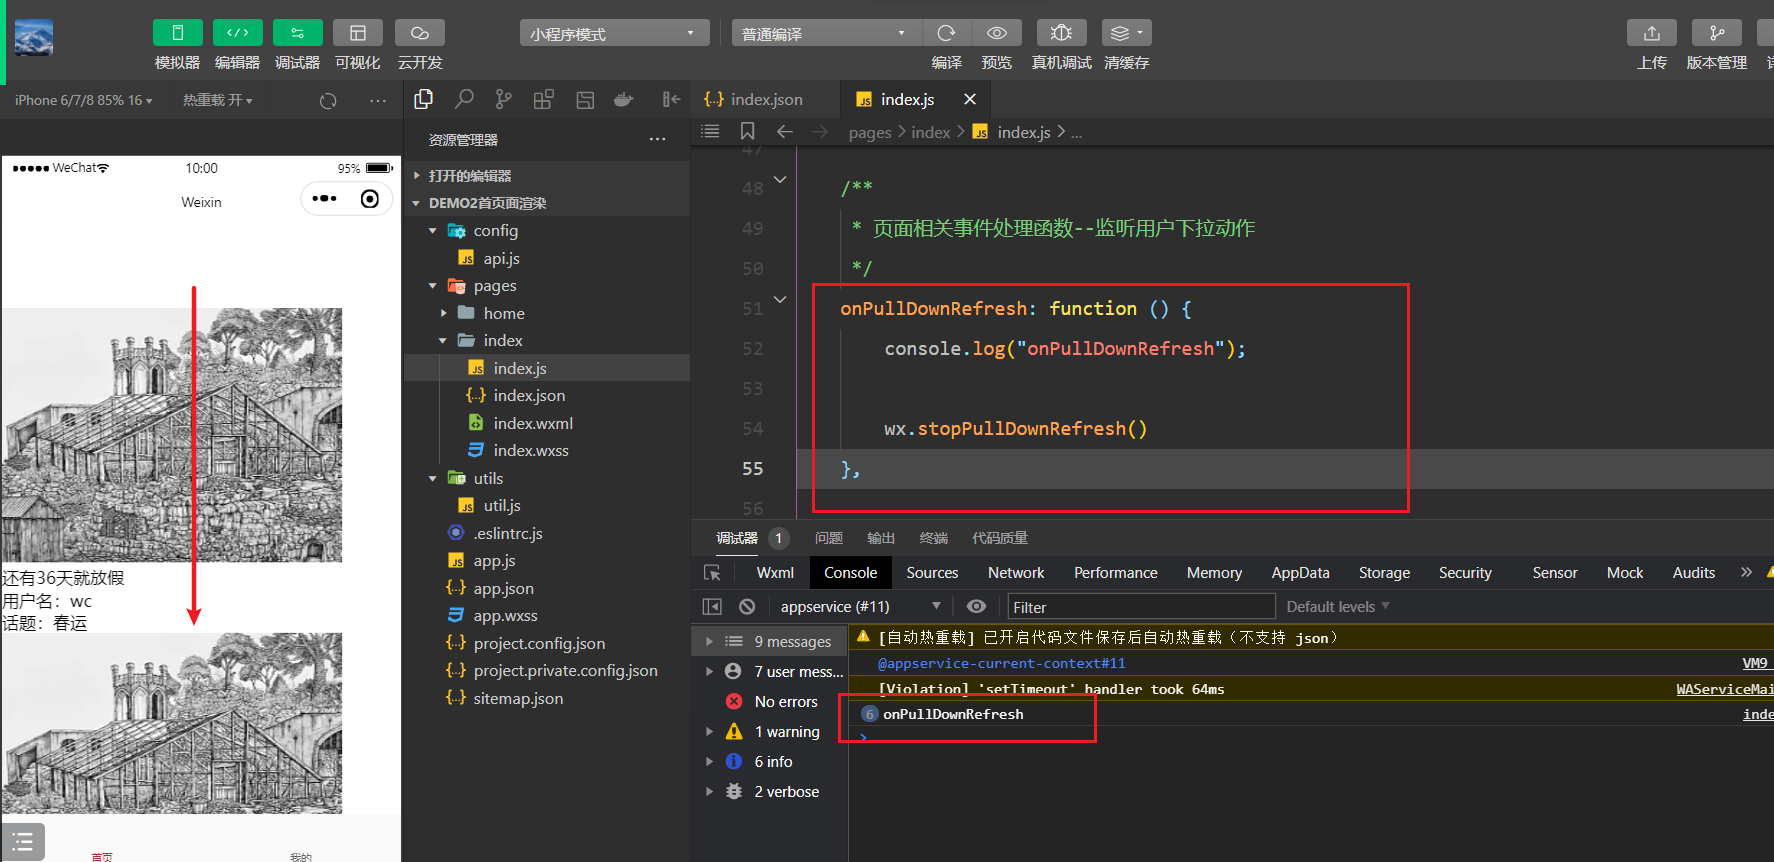
逻辑就可以写在此函数中,如下:
onPullDownRefresh: function () {
        console.log("onPullDownRefresh");

        wx.request({
            url: api.NewsAPI,
            data: {
                max_id: this.data.maxId
            },
            method: 'GET',
            dataType: 'json',
            success: (res) => {
                // console.log("--res:", res);
                if (!res.data.length) {
                    wx.showToast({
                        title: '已是最新数据',
                        icon: 'none'
                    })
                    wx.stopPullDownRefresh()
                    return
                }
                var dataList = res.data.reverse();
                this.setData({
                    newsList: dataList.concat(this.data.newsList),
                    maxId: dataList[0].id
                })
                wx.stopPullDownRefresh()
            }
        })
        wx.stopPullDownRefresh()
    },
效果如下:
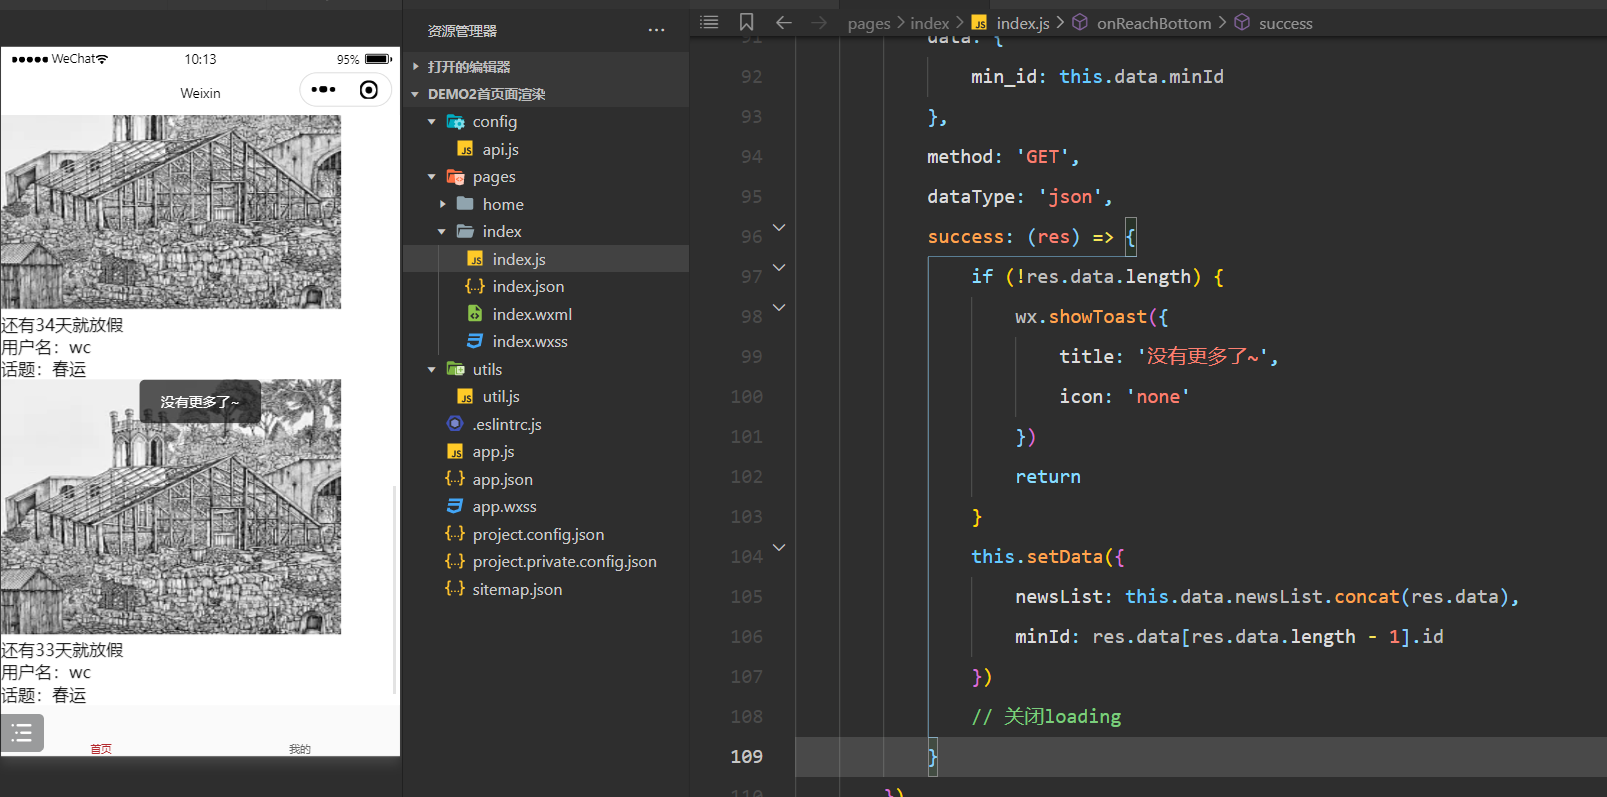
然后上拉加载下一页面,会触发如下函数:
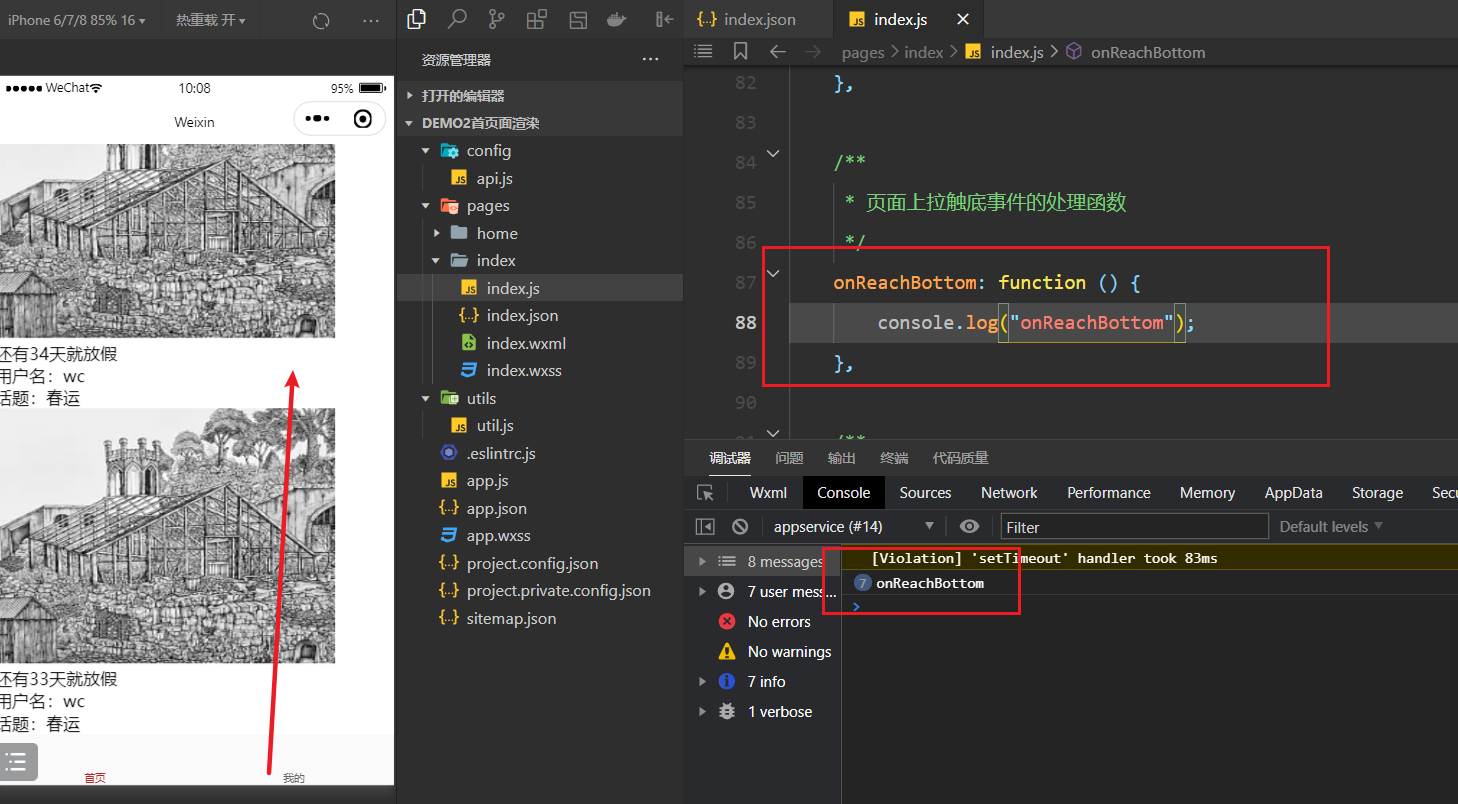
逻辑要写在此函数中,如下:
onReachBottom: function () {
        // 开启一个loading
        wx.request({
            url: api.NewsAPI,
            data: {
                min_id: this.data.minId
            },
            method: 'GET',
            dataType: 'json',
            success: (res) => {
                if (!res.data.length) {
                    wx.showToast({
                        title: '没有更多了~',
                        icon: 'none'
                    })
                    return
                }
                this.setData({
                    newsList: this.data.newsList.concat(res.data),
                    minId: res.data[res.data.length - 1].id
                })
                // 关闭loading
            }
        })
    },
效果如下:
4,详情页面(Demo)部分
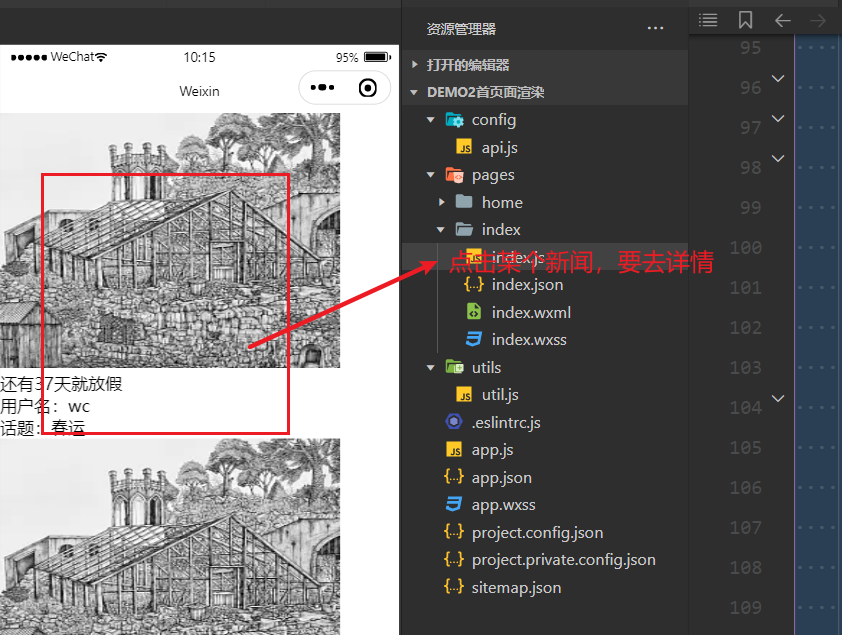
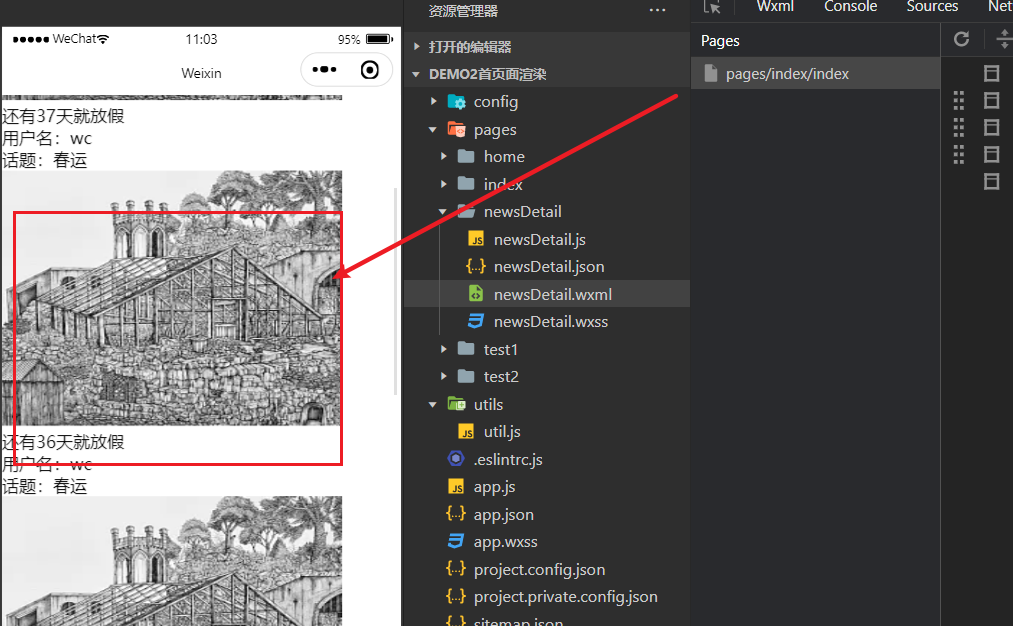
创建详情页面,如下:
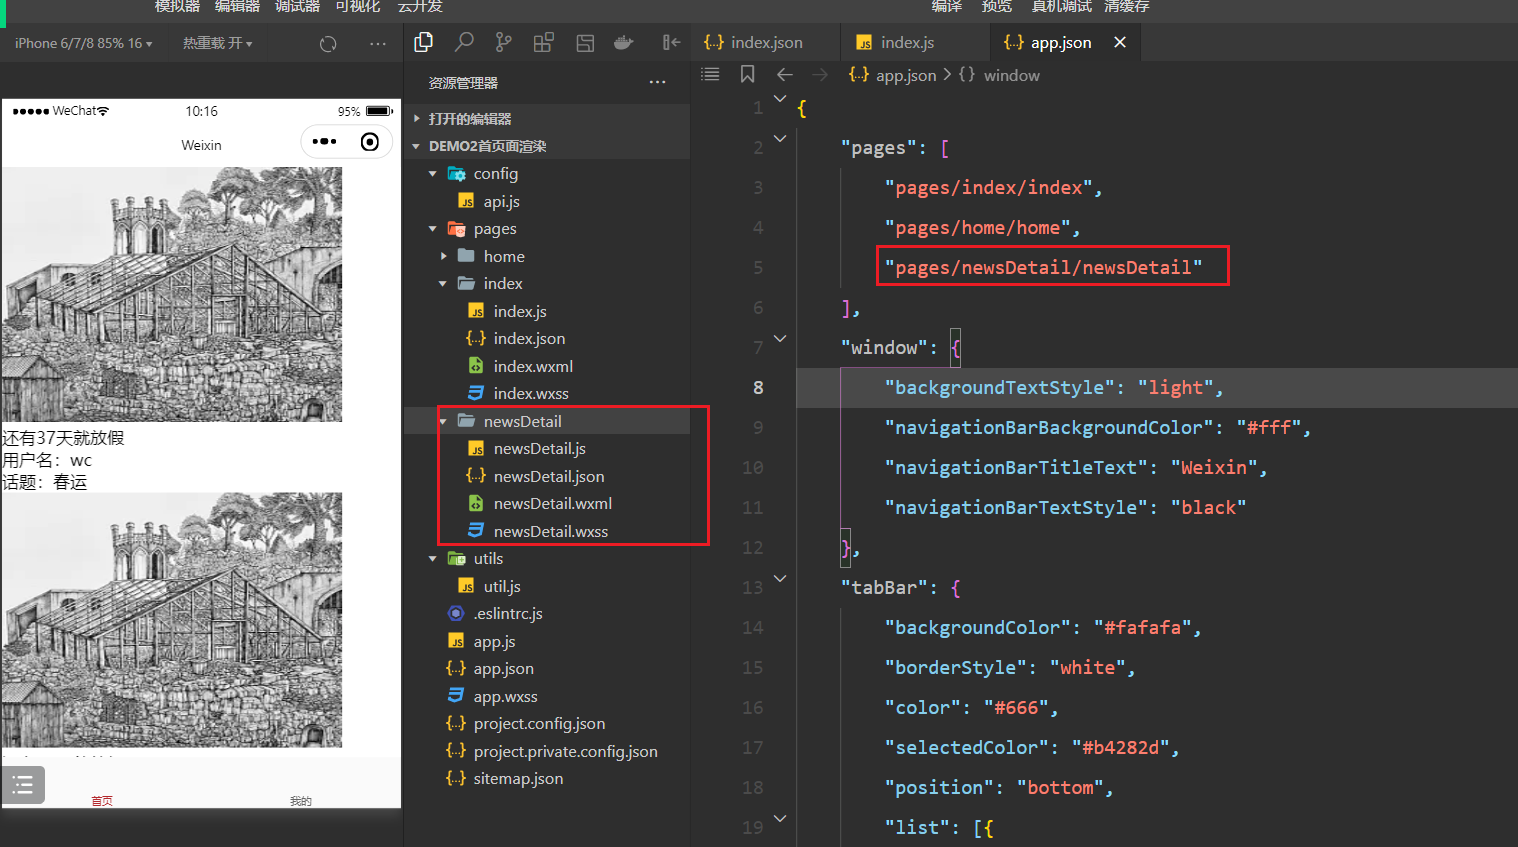
给首页面上的每个新闻绑定点击事件,如下:
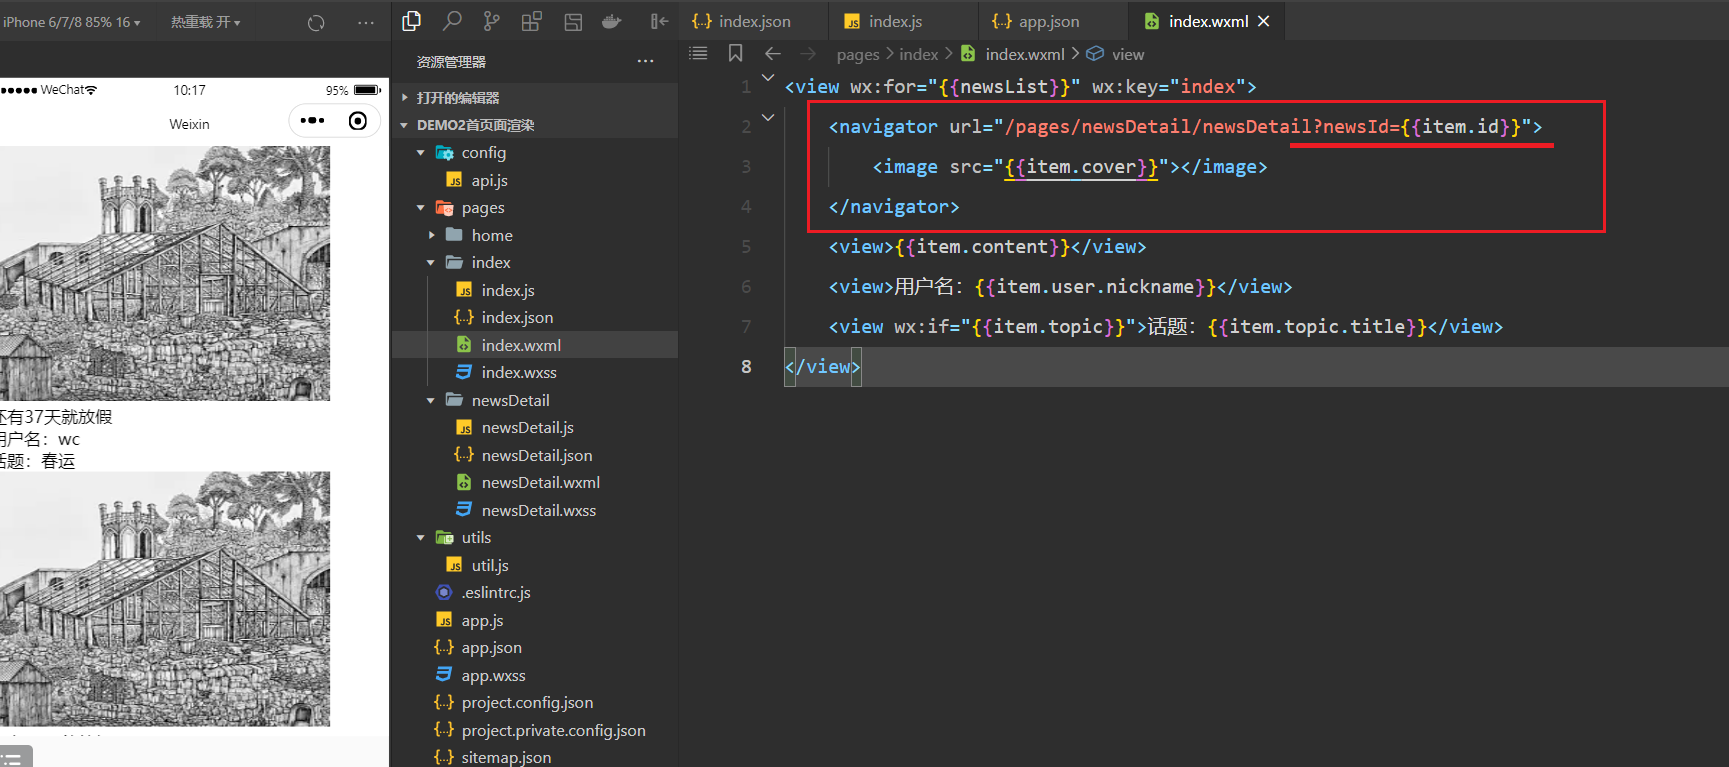
点击就会去详情,如下:
在详情页面就可以得到ID,如下:
根据id获取新闻详情,如下:
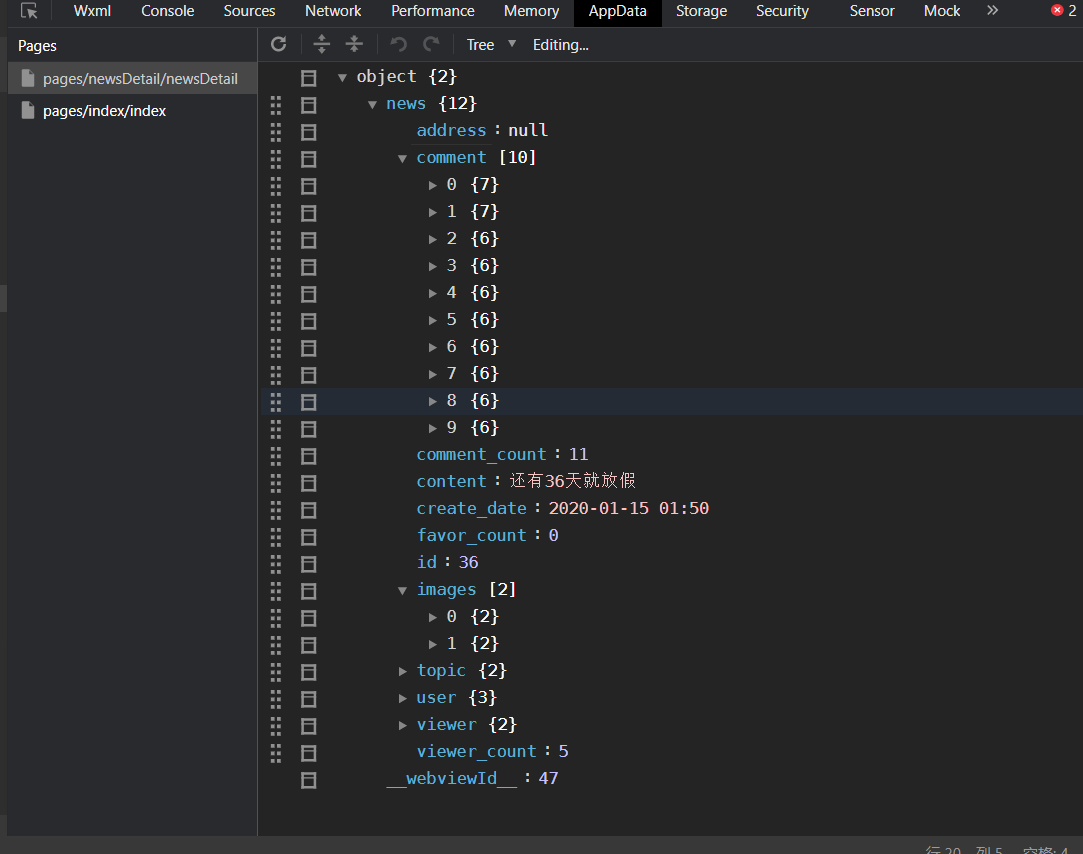
大家都测试第36条的新闻,结果如下:
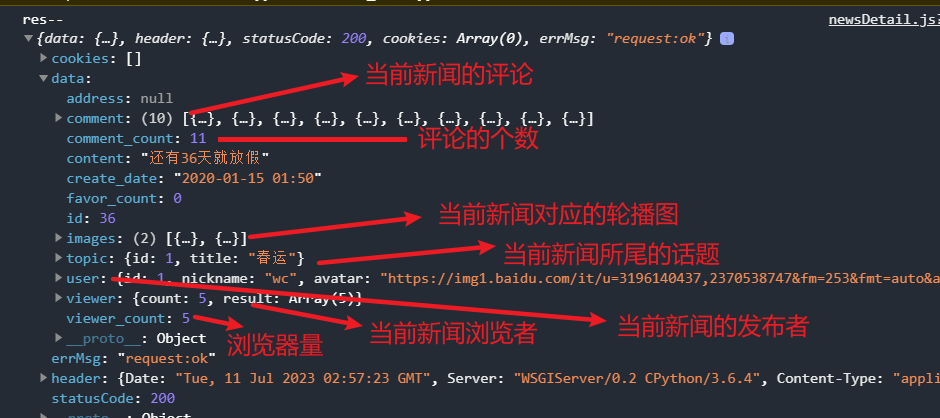
返回的数据如下:
{
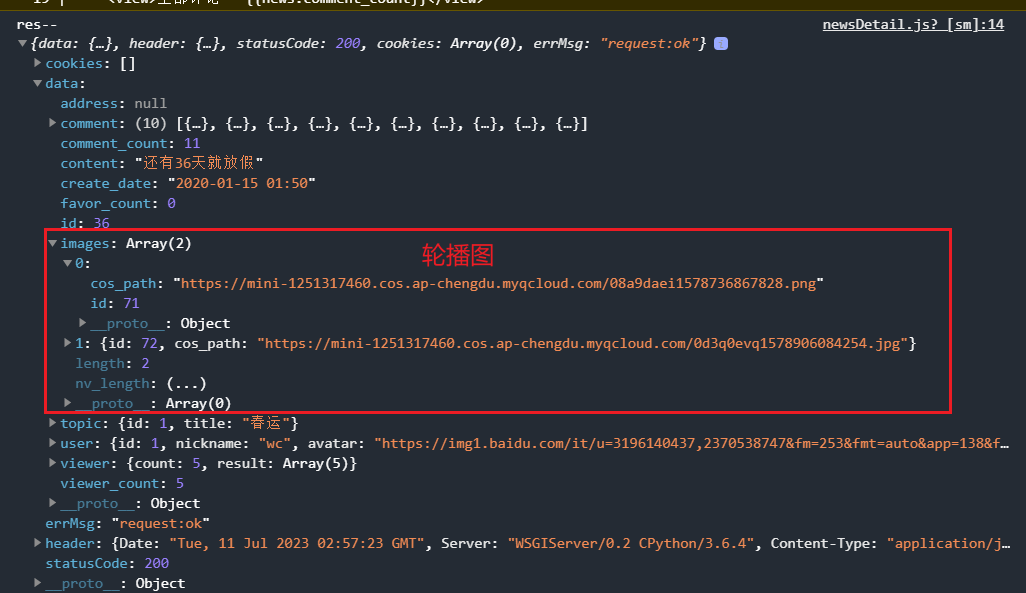
"id": 36,
"images": [
{
"id": 71,
"cos_path": "http://47.94.210.129/malulesson/assets/img/01.ea2fc7f9.png"
},
{
"id": 72,
"cos_path": "http://47.94.210.129/malulesson/assets/img/01.ea2fc7f9.png"
}
],
"create_date": "2020-01-15 01:50",
"user": {
"id": 1,
"nickname": "wc",
"avatar": "https://img1.baidu.com/it/u=3196140437,2370538747&fm=253&fmt=auto&app=138&f=JPEG?w=506&h=500"
},
"topic": {
"id": 1,
"title": "春运"
},
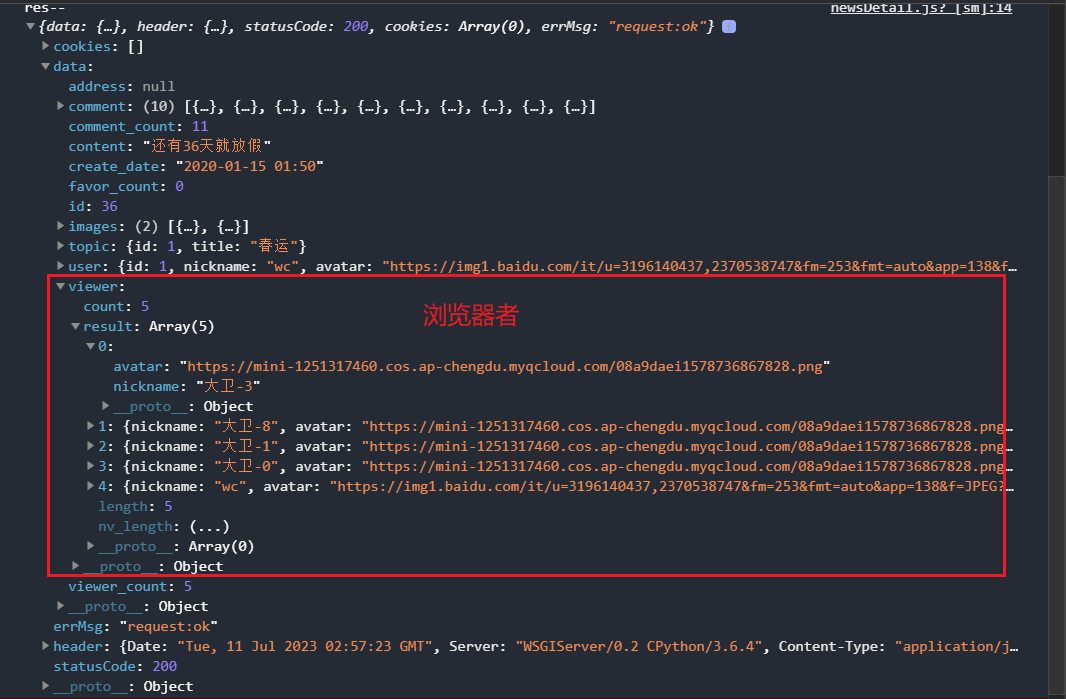
"viewer": {
"count": 5,
"result": [
{
"nickname": "大卫-3",
"avatar": "http://47.94.210.129/malulesson/assets/img/01.ea2fc7f9.png"
},
{
"nickname": "大卫-8",
"avatar": "http://47.94.210.129/malulesson/assets/img/01.ea2fc7f9.png"
},
{
"nickname": "大卫-1",
"avatar": "http://47.94.210.129/malulesson/assets/img/01.ea2fc7f9.png"
},
{
"nickname": "大卫-0",
"avatar": "http://47.94.210.129/malulesson/assets/img/01.ea2fc7f9.png"
},
{
"nickname": "wc",
"avatar": "https://img1.baidu.com/it/u=3196140437,2370538747&fm=253&fmt=auto&app=138&f=JPEG?w=506&h=500"
}
]
},
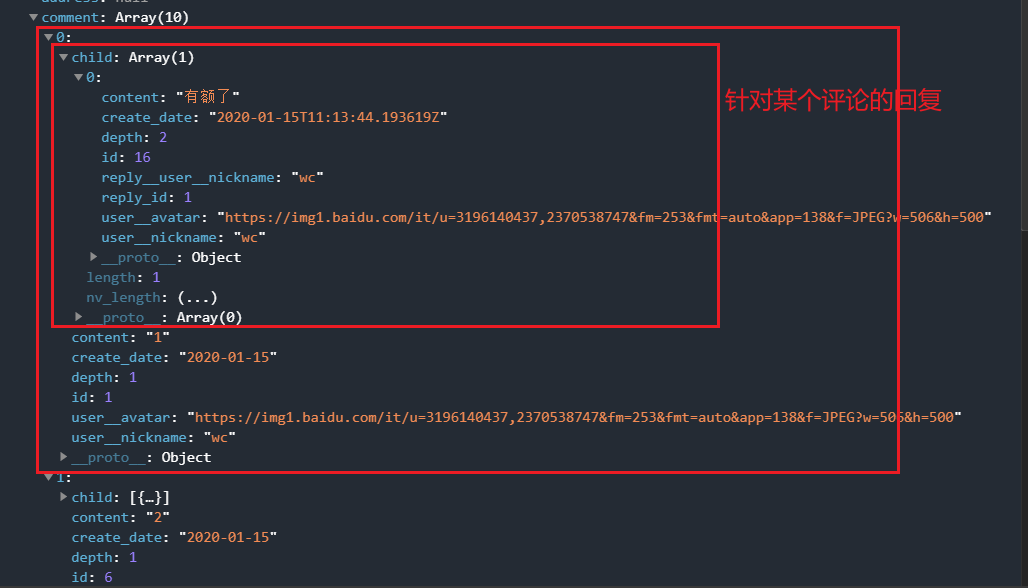
"comment": [
{
"id": 1,
"content": "1",
"depth": 1,
"user__nickname": "wc",
"user__avatar": "https://img1.baidu.com/it/u=3196140437,2370538747&fm=253&fmt=auto&app=138&f=JPEG?w=506&h=500",
"create_date": "2020-01-15",
"child": [
{
"id": 16,
"content": "有额了",
"depth": 2,
"user__nickname": "wc",
"user__avatar": "https://img1.baidu.com/it/u=3196140437,2370538747&fm=253&fmt=auto&app=138&f=JPEG?w=506&h=500",
"create_date": "2020-01-15T11:13:44.193619Z",
"reply_id": 1,
"reply__user__nickname": "wc"
}
]
},
{
"id": 6,
"content": "2",
"depth": 1,
"user__nickname": "大卫-1",
"user__avatar": "http://47.94.210.129/malulesson/assets/img/01.ea2fc7f9.png",
"create_date": "2020-01-15",
"child": [
{
"id": 8,
"content": "2-1",
"depth": 2,
"user__nickname": "大卫-2",
"user__avatar": "http://47.94.210.129/malulesson/assets/img/01.ea2fc7f9.png",
"create_date": "2020-01-15T07:46:35.618243Z",
"reply_id": 6,
"reply__user__nickname": "大卫-1"
}
]
},
{
"id": 7,
"content": "3",
"depth": 1,
"user__nickname": "大卫-2",
"user__avatar": "http://47.94.210.129/malulesson/assets/img/01.ea2fc7f9.png",
"create_date": "2020-01-15"
},
{
"id": 9,
"content": "44444444444444",
"depth": 1,
"user__nickname": "wc",
"user__avatar": "https://img1.baidu.com/it/u=3196140437,2370538747&fm=253&fmt=auto&app=138&f=JPEG?w=506&h=500",
"create_date": "2020-01-15"
},
{
"id": 10,
"content": "555",
"depth": 1,
"user__nickname": "wc",
"user__avatar": "https://img1.baidu.com/it/u=3196140437,2370538747&fm=253&fmt=auto&app=138&f=JPEG?w=506&h=500",
"create_date": "2020-01-15"
},
{
"id": 11,
"content": "666",
"depth": 1,
"user__nickname": "wc",
"user__avatar": "https://img1.baidu.com/it/u=3196140437,2370538747&fm=253&fmt=auto&app=138&f=JPEG?w=506&h=500",
"create_date": "2020-01-15"
},
{
"id": 12,
"content": "777",
"depth": 1,
"user__nickname": "wc",
"user__avatar": "https://img1.baidu.com/it/u=3196140437,2370538747&fm=253&fmt=auto&app=138&f=JPEG?w=506&h=500",
"create_date": "2020-01-15"
},
{
"id": 13,
"content": "888",
"depth": 1,
"user__nickname": "wc",
"user__avatar": "https://img1.baidu.com/it/u=3196140437,2370538747&fm=253&fmt=auto&app=138&f=JPEG?w=506&h=500",
"create_date": "2020-01-15"
},
{
"id": 18,
"content": "sdfsdfsdf",
"depth": 1,
"user__nickname": "wc",
"user__avatar": "https://img1.baidu.com/it/u=3196140437,2370538747&fm=253&fmt=auto&app=138&f=JPEG?w=506&h=500",
"create_date": "2020-01-15"
},
{
"id": 19,
"content": "sdfsdfsdf",
"depth": 1,
"user__nickname": "wc",
"user__avatar": "https://img1.baidu.com/it/u=3196140437,2370538747&fm=253&fmt=auto&app=138&f=JPEG?w=506&h=500",
"create_date": "2020-01-15"
}
],
"content": "还有36天就放假",
"address": null,
"favor_count": 0,
"viewer_count": 5,
"comment_count": 14
}定义状态,如下:
查看状态如下:
写页面渲染数据(不完整),如下:
<view class="container">
    <view style="border:1rpx solid red;">
        <image class="avatar" src="{{news.user.avatar}}"></image>
        {{news.user.nickname}}
        <view>关注</view>
    </view>

    <swiper autoplay="{{true}}" indicator-dots="{{true}}">
        <swiper-item wx:for="{{news.images}}" wx:key="index">
            <image src="{{item.cos_path}}"></image>
        </swiper-item>
    </swiper>
    <view>{{news.content}}</view>
    <view>浏览数量:{{news.viewer_count}}</view>
    <view style="border:1rpx solid red; padding:20rpx;">
        <image class="avatar" wx:for="{{news.viewer.result}}" src="{{item.avatar}}"></image>
    </view>

    <view>全部评论 - {{news.comment_count}}</view>
    <view>
        <view class="parent" wx:for="{{news.comment}}" wx:key="index" wx:for-index="idx">
            <text>{{item.content}}</text>
        </view>
        <view class="child" wx:if="{{item.child}}">
            <view wx:for="{{item.child}}" wx:for-item="node">
                <view>
                    <text>{{node.content}}</text>
                </view>
            </view>
            <view bindtap="getMore" data-root="{{item.id}}" data-idx="{{idx}}">查看更多</view>
        </view>
    </view>
</view>
<view class="buttom-view">
    <view class="comment-area" wx:if="{{isShowCommentModal}}">
        <view class="top">
            <image class="big-avatar" src="{{news.user.avatar}}"></image>
            <text>评论</text>
        </view>
        <textarea fixed="true" placeholder="评论内容..." bindinput="inputComment"></textarea>
        <view class="btn">
            <view class="publish" bindtap="onClickPostComment">发布</view>
        </view>
        <view class="hide">
            <icon type="cancel" size="30" bindtap="onClickCancelCommentModal"></icon>
        </view>
    </view>
    <view class="text-input" wx:else="">
        <image class="big-avatar" src="xxx"></image>
        <!-- 并不是在这里输入内容 -->
        <input type="text" placeholder="说点什么..." bindtap="onClickShowCommentModal" data-nid="{{news.id}}" data-depth="{{1}}" />
    </view>
</view>
样式如下:
/* pages/newsDetail/newsDetail.wxss */
.container {
    padding-bottom: 200rpx;

}

.avatar {
    width: 100rpx;
    height: 100rpx;
    border-radius: 50%;
}

.child {
    margin-left: 40rpx;
    background-color: #ddd;
}


.big-avatar {
    height: 60rpx;
    width: 60rpx;
    border-radius: 50%;
    margin-right: 15rpx;
}

.small-avatar {
    height: 40rpx;
    width: 40rpx;
    border-radius: 50%;
    margin-right: 10rpx;
}


.buttom-view {
    border-top: 1px solid #ddd;
    background-color: white;
    position: fixed;
    bottom: 0;
    right: 0;
    left: 0;
    padding: 40rpx;
}

.buttom-view .text-input {
    display: flex;
    flex-direction: row;
    justify-content: flex-start;
    align-items: center;
}

.buttom-view .text-input input {
    border: 1rpx solid #ddd;
    background-color: #f5f5f5;
    width: 575rpx;
    padding: 10rpx;
    border-radius: 20rpx;
}


.buttom-view .comment-area {
    position: relative;
}

.buttom-view .comment-area .top {
    display: flex;
    flex-direction: row;
    justify-content: flex-start;
    align-items: center;
    padding-bottom: 10rpx;
}

.buttom-view .comment-area .reply {
    margin-left: 30rpx;
    font-size: 25rpx;
    padding: 10rpx;
    display: flex;
    flex-direction: row;
    align-items: center;
    background: #ddd;
    border-radius: 10rpx;
}

.buttom-view .comment-area .reply icon {
    padding: 0 8rpx;
}

.buttom-view .comment-area textarea {
    border: 1rpx solid #ddd;
    width: 628rpx;
    padding: 20rpx;
}

.buttom-view .btn {
    display: flex;
    flex-direction: row;
    justify-content: flex-end;
    padding: 10rpx 0;
}

.buttom-view .btn .publish {
    padding: 10rpx 20rpx;
    background-color: #00c8b6;
    color: white;
    border-radius: 10rpx;
}

.buttom-view .comment-area .hide {
    position: absolute;
    right: 0;
    top: -20rpx;
}
逻辑如下:
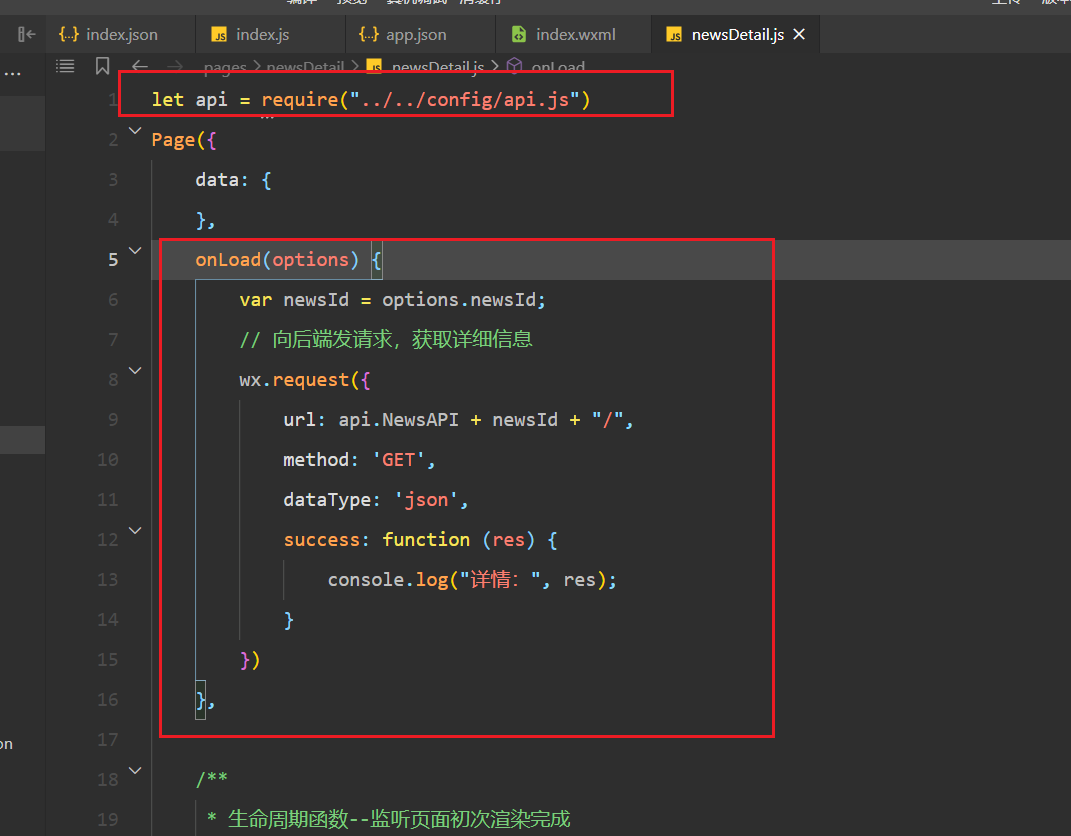
let api = require("../../config/api.js")
Page({
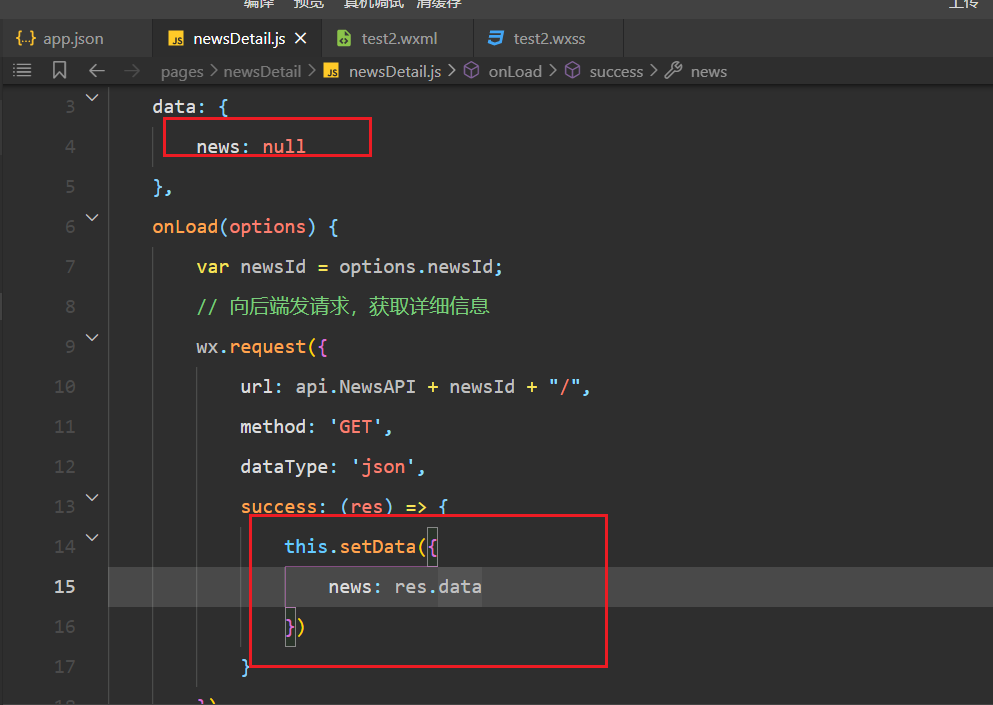
data: {
news: null,
isShowCommentModal: false,
// 评论:{depth:1,content:"xxxx",nid:36}
// 针对某个评论的回复:{depth:2,content:"xxxx",nid:36,cid:1}
reply: {},
},
// 收集内容
inputComment(e) {
this.setData({
['reply.content']: e.detail.value
})
},
// 点击发布
onClickPostComment() {
if (!this.data.reply.content) {
wx.showToast({
title: '评论不能为空',
icon: 'none'
})
return
}
// 发请求,实现评论
wx.request({
url: api.CommentAPI,
data: {
news: this.data.reply.nid,
depth: this.data.reply.depth,
reply: this.data.reply.cid,
content: this.data.reply.content,
},
method: 'POST',
dataType: 'json',
success: (res) => {
console.log("--res:", res);
if (res.statusCode == 201) {
}
}
})
},
onClickCancelCommentModal() {
this.setData({
isShowCommentModal: false,
})
},
onClickShowCommentModal(e) {
this.setData({
isShowCommentModal: true,
reply: e.currentTarget.dataset
})
},
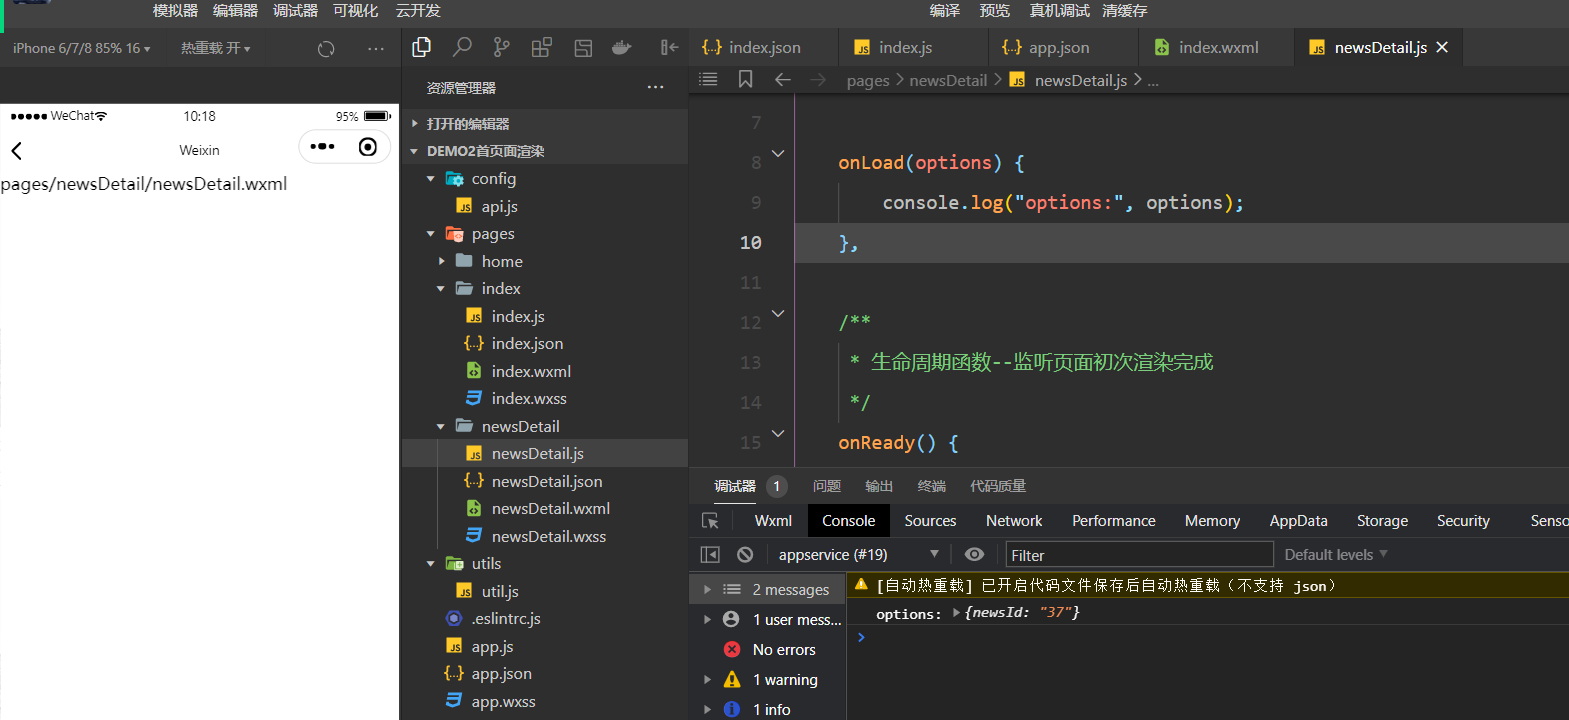
onLoad(options) {
var newsId = options.newsId;
// 向后端发请求,获取详细信息
wx.request({
url: api.NewsAPI + newsId + "/",
method: 'GET',
dataType: 'json',
success: (res) => {
console.log("res--", res);
this.setData({
news: res.data
})
}
})
},
/**
* 生命周期函数--监听页面初次渲染完成
*/
onReady() {
},
/**
* 生命周期函数--监听页面显示
*/
onShow() {
},
/**
* 生命周期函数--监听页面隐藏
*/
onHide() {
},
/**
* 生命周期函数--监听页面卸载
*/
onUnload() {
},
/**
* 页面相关事件处理函数--监听用户下拉动作
*/
onPullDownRefresh() {
},
/**
* 页面上拉触底事件的处理函数
*/
onReachBottom() {
},
/**
* 用户点击右上角分享
*/
onShareAppMessage() {
}
})5,详情页面完善
结构:
<view class="container">
    <view style="border:1rpx solid red;">
        <image class="avatar" src="{{news.user.avatar}}"></image>
        {{news.user.nickname}}
        <view>关注</view>
    </view>

    <swiper autoplay="{{true}}" indicator-dots="{{true}}">
        <swiper-item wx:for="{{news.images}}" wx:key="index">
            <image src="{{item.cos_path}}"></image>
        </swiper-item>
    </swiper>
    <view>{{news.content}}</view>
    <view>浏览数量:{{news.viewer_count}}</view>
    <view style="border:1rpx solid red; padding:20rpx;">
        <image class="avatar" wx:for="{{news.viewer.result}}" src="{{item.avatar}}"></image>
    </view>

    <view>全部评论 - {{news.comment_count}}</view>
    <view>
        <view class="parent" wx:for="{{news.comment}}" wx:key="index" wx:for-index="idx">
            <view>
                <text>{{item.content}}</text>
                <text bindtap="onClickShowCommentModal" data-nickname="{{item.user__nickname}}" data-rootindex="{{idx}}" data-nid="{{news.id}}" data-rid="{{item.id}}" data-cid="{{item.id}}" data-depth="{{item.depth + 1}}">回复</text>
            </view>
            <view>
                <view class="child" wx:if="{{item.child}}">
                    <view wx:for="{{item.child}}" wx:for-item="node">
                        <view>
                            <text>{{node.content}}</text>
                            <text bindtap="onClickShowCommentModal" data-nid="{{news.id}}" data-cid="{{node.id}}" data-nickname="{{node.user__nickname}}" data-depth="{{node.depth + 1}}" data-rid="{{item.id}}" data-rootindex="{{idx}}">回复</text>
                        </view>
                    </view>
                    <view bindtap="getMore" data-root="{{item.id}}" data-idx="{{idx}}">查看更多</view>
                </view>
            </view>
        </view>

    </view>
</view>
<view class="buttom-view">
    <view class="comment-area" wx:if="{{isShowCommentModal}}">
        <view class="top">
            <image class="big-avatar" src="{{news.user.avatar}}"></image>
            <text>评论</text>
            <view class="reply" wx:if="{{reply.cid}}">回复 {{reply.nickname}}
                <icon type="clear" size="15" bindtap="onClickClearReply"></icon>
            </view>
        </view>
        <textarea fixed="true" placeholder="评论内容..." bindinput="inputComment"></textarea>
        <view class="btn">
            <view class="publish" bindtap="onClickPostComment">发布</view>
        </view>
        <view class="hide">
            <icon type="cancel" size="30" bindtap="onClickCancelCommentModal"></icon>
        </view>
    </view>
    <view class="text-input" wx:else="">
        <image class="big-avatar" src="xxx"></image>
        <!-- 并不是在这里输入内容 -->
        <input type="text" placeholder="说点什么..." bindtap="onClickShowCommentModal" data-nid="{{news.id}}" data-depth="{{1}}" />
    </view>
</view>
样式:
/* pages/newsDetail/newsDetail.wxss */
.container {
    padding-bottom: 200rpx;

}

.avatar {
    width: 100rpx;
    height: 100rpx;
    border-radius: 50%;
}

.child {
    margin-left: 40rpx;
    background-color: #ddd;
}


.big-avatar {
    height: 60rpx;
    width: 60rpx;
    border-radius: 50%;
    margin-right: 15rpx;
}

.small-avatar {
    height: 40rpx;
    width: 40rpx;
    border-radius: 50%;
    margin-right: 10rpx;
}


.buttom-view {
    border-top: 1px solid #ddd;
    background-color: white;
    position: fixed;
    bottom: 0;
    right: 0;
    left: 0;
    padding: 40rpx;
}

.buttom-view .text-input {
    display: flex;
    flex-direction: row;
    justify-content: flex-start;
    align-items: center;
}

.buttom-view .text-input input {
    border: 1rpx solid #ddd;
    background-color: #f5f5f5;
    width: 575rpx;
    padding: 10rpx;
    border-radius: 20rpx;
}


.buttom-view .comment-area {
    position: relative;
}

.buttom-view .comment-area .top {
    display: flex;
    flex-direction: row;
    justify-content: flex-start;
    align-items: center;
    padding-bottom: 10rpx;
}

.buttom-view .comment-area .reply {
    margin-left: 30rpx;
    font-size: 25rpx;
    padding: 10rpx;
    display: flex;
    flex-direction: row;
    align-items: center;
    background: #ddd;
    border-radius: 10rpx;
}

.buttom-view .comment-area .reply icon {
    padding: 0 8rpx;
}

.buttom-view .comment-area textarea {
    border: 1rpx solid #ddd;
    width: 628rpx;
    padding: 20rpx;
}

.buttom-view .btn {
    display: flex;
    flex-direction: row;
    justify-content: flex-end;
    padding: 10rpx 0;
}

.buttom-view .btn .publish {
    padding: 10rpx 20rpx;
    background-color: #00c8b6;
    color: white;
    border-radius: 10rpx;
}

.buttom-view .comment-area .hide {
    position: absolute;
    right: 0;
    top: -20rpx;
}
逻辑:
let api = require("../../config/api.js")
Page({
    data: {
        news: null,
        isShowCommentModal: false,
        // 评论:{nid:36,depth:1,content:"xxxx"}
        // 针对某个评论的回复:{depth:2,content:"xxxx",nid:36,cid:1}
        reply: {},
    },
    // 收集内容
    inputComment(e) {
        this.setData({
            ['reply.content']: e.detail.value
        })
    },
    onClickClearReply() {
        this.setData({
            reply: {
                depth: 1,
                nid: this.data.reply.nid
            }
        })
    },
    // 点击发布
    onClickPostComment() {
        if (!this.data.reply.content) {
            wx.showToast({
                title: '评论不能为空',
                icon: 'none'
            })
            return
        }
        // 发请求,实现评论
        wx.request({
            url: api.CommentAPI,
            data: {
                news: this.data.reply.nid,
                depth: this.data.reply.depth,
                content: this.data.reply.content,
                reply: this.data.reply.cid,
                root: this.data.reply.rid,
            },
            method: 'POST',
            dataType: 'json',
            success: (res) => {
                console.log("--res:", res);
                if (res.statusCode == 201) {
                    if (this.data.reply.rootindex === undefined) {
                        let dataList = this.data.news.comment;
                        dataList.unshift(res.data);
                        this.setData({
                            ["news.comment"]: dataList,
                            ["news.comment_count"]: this.data.news.comment_count + 1
                        });
                        this.onClickCancelCommentModal();
                    } else {
                        let childCommentList = this.data.news.comment[this.data.reply.rootindex].child;
                        childCommentList.unshift(res.data);
                        this.setData({
                            ["news.comment[" + this.data.reply.rootindex + "].child"]: childCommentList,
                            ["news.comment_count"]: this.data.news.comment_count + 1
                        })
                        this.onClickCancelCommentModal();
                    }
                }
            }
        })
    },
    onClickCancelCommentModal() {
        this.setData({
            isShowCommentModal: false,
            reply: {}
        })
    },
    onClickShowCommentModal(e) {
        this.setData({
            isShowCommentModal: true,
            reply: e.currentTarget.dataset
        })
    },
    getMore(e) {
        var rootId = e.currentTarget.dataset.root;
        var idx = e.currentTarget.dataset.idx;
        wx.request({
            url: api.CommentAPI,
            data: {
                root: rootId
            },
            method: 'GET',
            dataType: 'json',
            success: (res) => {
                this.setData({
                    ["news.comment[" + idx + "].child"]: res.data,
                })
            }
        })
    },
    onLoad(options) {
        var newsId = options.newsId;
        // 向后端发请求,获取详细信息
        wx.request({
            url: api.NewsAPI + newsId + "/",
            method: 'GET',
            dataType: 'json',
            success: (res) => {
                console.log("res--", res);
                this.setData({
                    news: res.data
                })
            }
        })
    },

    /**
     * 生命周期函数--监听页面初次渲染完成
     */
    onReady() {

    },

    /**
     * 生命周期函数--监听页面显示
     */
    onShow() {

    },

    /**
     * 生命周期函数--监听页面隐藏
     */
    onHide() {

    },

    /**
     * 生命周期函数--监听页面卸载
     */
    onUnload() {

    },

    /**
     * 页面相关事件处理函数--监听用户下拉动作
     */
    onPullDownRefresh() {

    },

    /**
     * 页面上拉触底事件的处理函数
     */
    onReachBottom() {

    },

    /**
     * 用户点击右上角分享
     */
    onShareAppMessage() {

    }
})
效果:

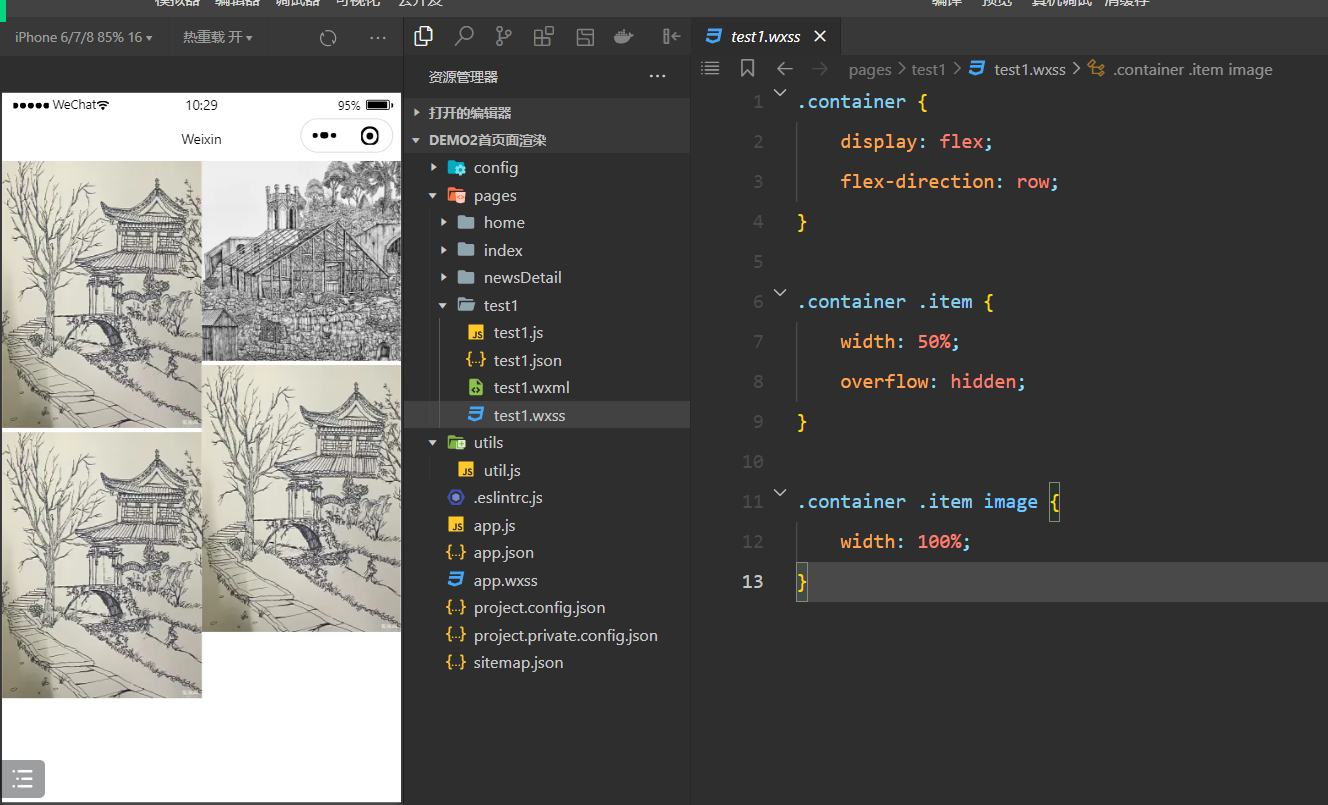
6,瀑布流
在渲染数据之前,补充一个知识点,如下:
<view class='container'>
    <view class="item">
        <image src="https://hbimg.huabanimg.com/762eee0f99f9fbbc458fb70b0b86d0f8090ba45e7fb75-z1bDC7_fw236" mode="widthFix"></image>
        <image src="https://hbimg.huabanimg.com/762eee0f99f9fbbc458fb70b0b86d0f8090ba45e7fb75-z1bDC7_fw236" mode="widthFix"></image>
    </view>
    <view class="item">
        <image src="https://hbimg.huabanimg.com/1143ded46f1808fd460de68bb81d1513d7578d88543aa-cvwFGk_fw236" mode="widthFix"></image>
        <image src="https://hbimg.huabanimg.com/762eee0f99f9fbbc458fb70b0b86d0f8090ba45e7fb75-z1bDC7_fw236" mode="widthFix"></image>
    </view>
</view>.container {
display: flex;
flex-direction: row;
}
.container .item {
width: 50%;
overflow: hidden;
}
.container .item image {
width: 100%;
}效果如下:
再看一种形式,如下:
<!--pages/test2/test2.wxml-->
<view class="container">
    <view class="item">
        <image src="https://hbimg.huabanimg.com/1143ded46f1808fd460de68bb81d1513d7578d88543aa-cvwFGk_fw236" mode="widthFix"></image>
    </view>
    <view class="item">
        <image src="https://hbimg.huabanimg.com/762eee0f99f9fbbc458fb70b0b86d0f8090ba45e7fb75-z1bDC7_fw236" mode="widthFix"></image>
    </view>

    <view class="item">
        <image src="https://hbimg.huabanimg.com/762eee0f99f9fbbc458fb70b0b86d0f8090ba45e7fb75-z1bDC7_fw236" mode="widthFix"></image>
    </view>

    <view class="item">
        <image src="https://hbimg.huabanimg.com/762eee0f99f9fbbc458fb70b0b86d0f8090ba45e7fb75-z1bDC7_fw236" mode="widthFix"></image>
    </view>

    <view class="item">
        <image src="https://hbimg.huabanimg.com/762eee0f99f9fbbc458fb70b0b86d0f8090ba45e7fb75-z1bDC7_fw236" mode="widthFix"></image>
    </view>

    <view class="item">
        <image src="https://hbimg.huabanimg.com/762eee0f99f9fbbc458fb70b0b86d0f8090ba45e7fb75-z1bDC7_fw236" mode="widthFix"></image>
    </view>
    <view class="item">
        <image src="https://hbimg.huabanimg.com/762eee0f99f9fbbc458fb70b0b86d0f8090ba45e7fb75-z1bDC7_fw236" mode="widthFix"></image>
    </view>
</view>.container {
column-count: 2;
column-gap: 20rpx;
}
.container .item {
break-inside: avoid-column;
}
.container .item image {
width: 100%;
}效果如下:
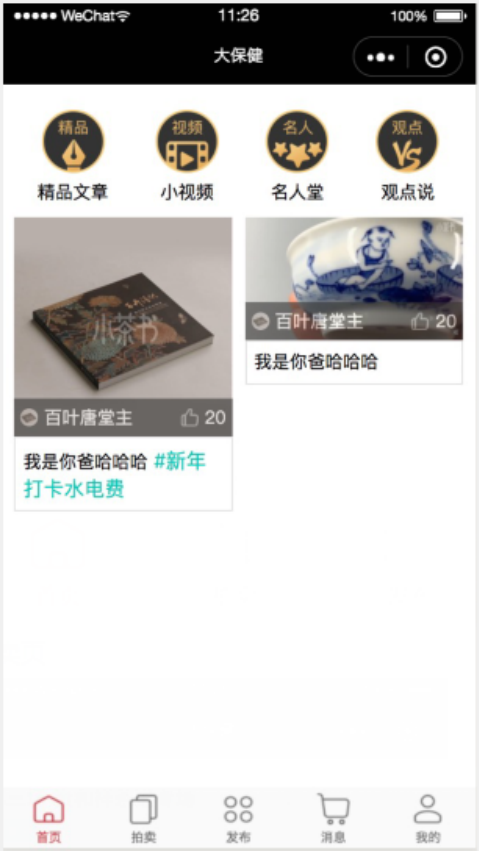
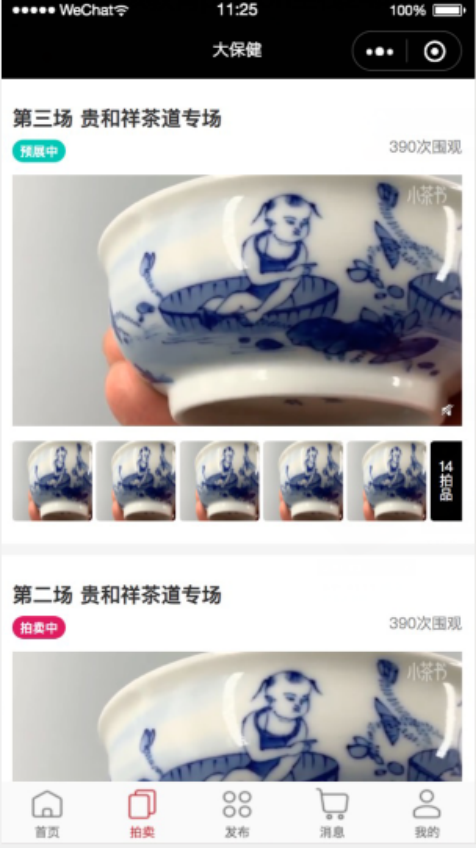
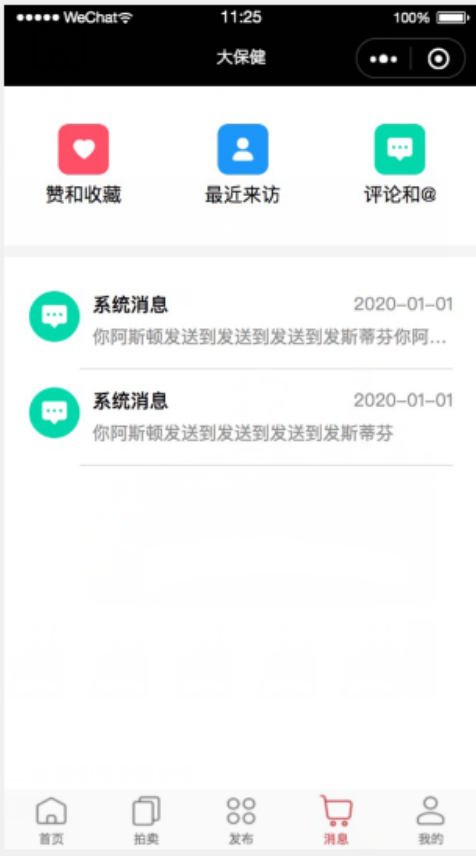
7,整合模块
创建一个新的项目,如下:

删除默认的index和log页面,如下:
创建如下的页面:
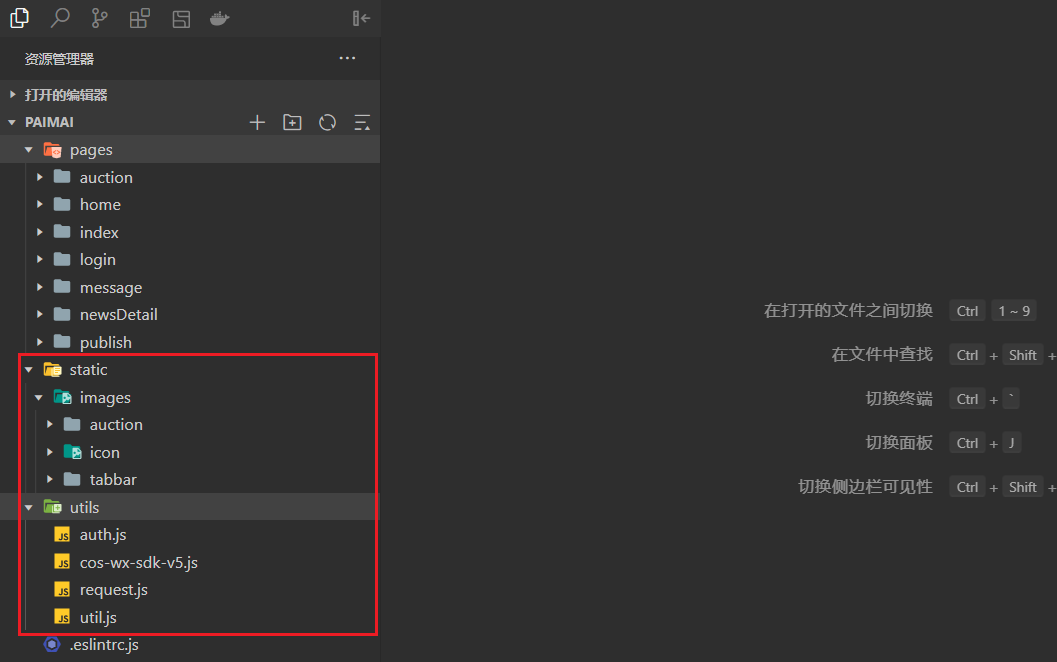
copy图片和utils到项目中,如下:
配置window和tabbar,如下:
"window": {
"backgroundTextStyle": "dark",
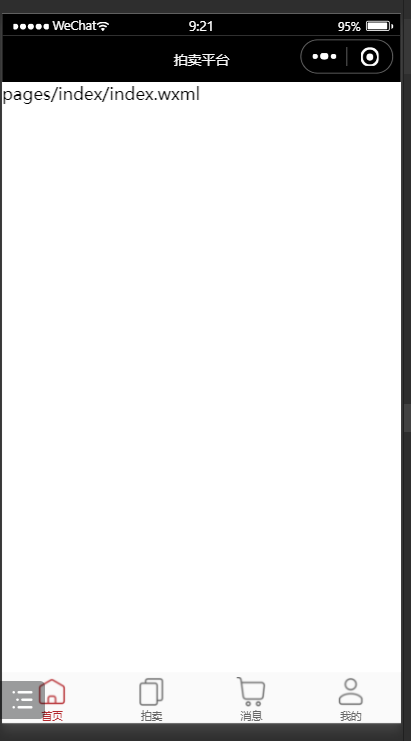
"navigationBarTitleText": "拍卖平台",
"enablePullDownRefresh": true
},
"tabBar": {
"backgroundColor": "#fafafa",
"borderStyle": "white",
"color": "#666",
"selectedColor": "#b4282d",
"list": [{
"pagePath": "pages/index/index",
"text": "首页",
"iconPath": "static/images/tabbar/ic_menu_choice_nor.png",
"selectedIconPath": "static/images/tabbar/ic_menu_choice_pressed.png"
}, {
"pagePath": "pages/auction/auction",
"text": "拍卖",
"iconPath": "static/images/tabbar/ic_menu_topic_nor.png",
"selectedIconPath": "static/images/tabbar/ic_menu_topic_pressed.png"
}, {
"pagePath": "pages/message/message",
"text": "消息",
"iconPath": "static/images/tabbar/ic_menu_shopping_nor.png",
"selectedIconPath": "static/images/tabbar/ic_menu_shopping_pressed.png"
}, {
"pagePath": "pages/home/home",
"text": "我的",
"iconPath": "static/images/tabbar/ic_menu_me_nor.png",
"selectedIconPath": "static/images/tabbar/ic_menu_me_pressed.png"
}]
},效果如下:
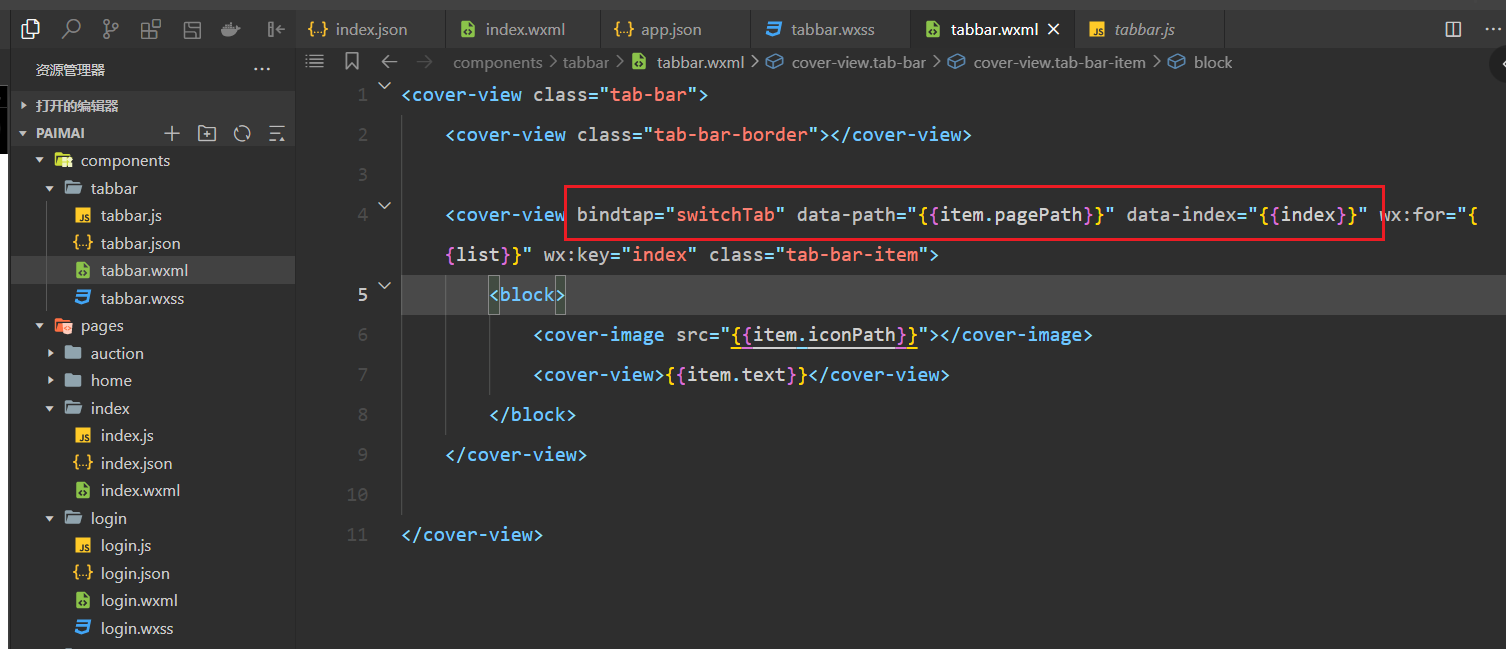
上在的tabbar并不优雅,可以使用自定义tarbbar,创建一个tabbar组件,如下:
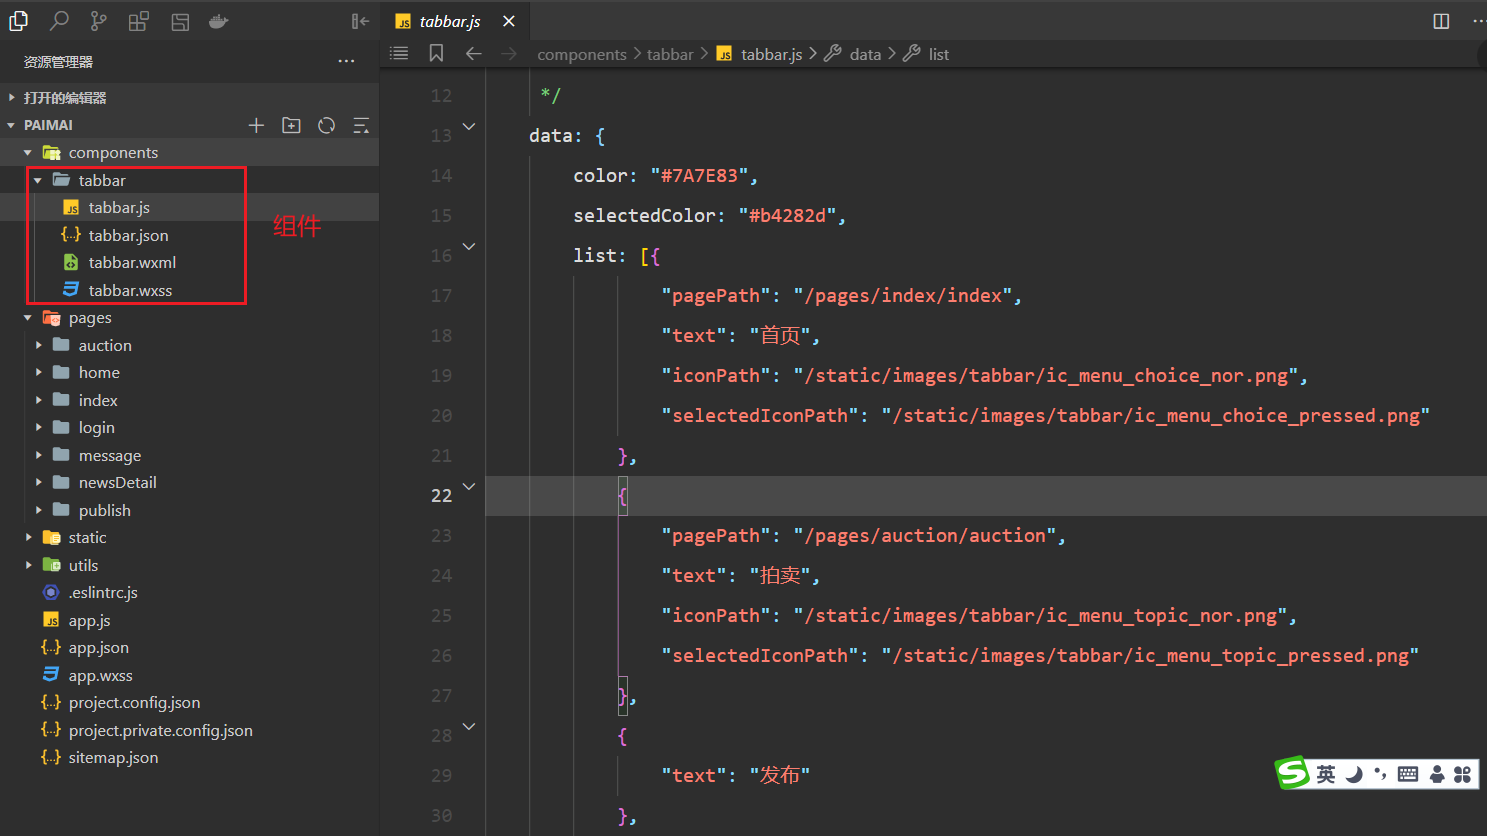
定义的状态,如下:
data: {
        color: "#7A7E83",
        selectedColor: "#b4282d",
        list: [{
                "pagePath": "/pages/index/index",
                "text": "首页",
                "iconPath": "/static/images/tabbar/ic_menu_choice_nor.png",
                "selectedIconPath": "/static/images/tabbar/ic_menu_choice_pressed.png"
            },
            {
                "pagePath": "/pages/auction/auction",
                "text": "拍卖",
                "iconPath": "/static/images/tabbar/ic_menu_topic_nor.png",
                "selectedIconPath": "/static/images/tabbar/ic_menu_topic_pressed.png"
            },
            {
                "text": "发布"
            },
            {
                "pagePath": "/pages/message/message",
                "text": "消息",
                "iconPath": "/static/images/tabbar/ic_menu_shopping_nor.png",
                "selectedIconPath": "/static/images/tabbar/ic_menu_shopping_pressed.png"
            },
            {
                "pagePath": "/pages/home/home",
                "text": "我的",
                "iconPath": "/static/images/tabbar/ic_menu_me_nor.png",
                "selectedIconPath": "/static/images/tabbar/ic_menu_me_pressed.png"
            }
        ]
    },
在html中就可以使用状态,如下:
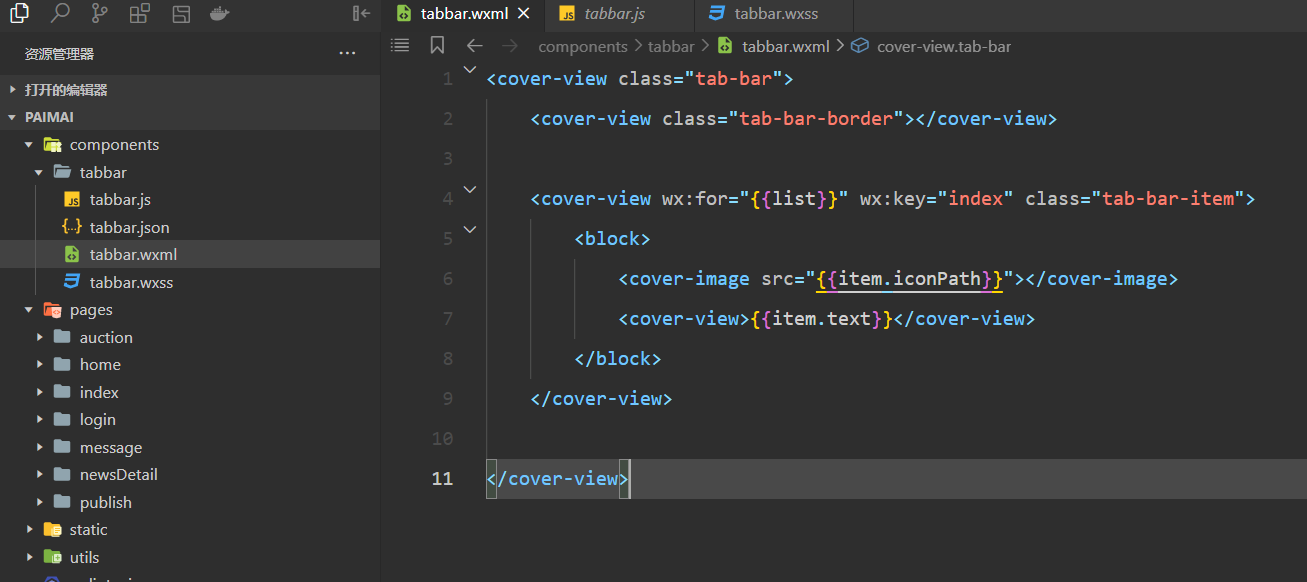
哪个页面需要tabbar,就需要注册tabar,如下:
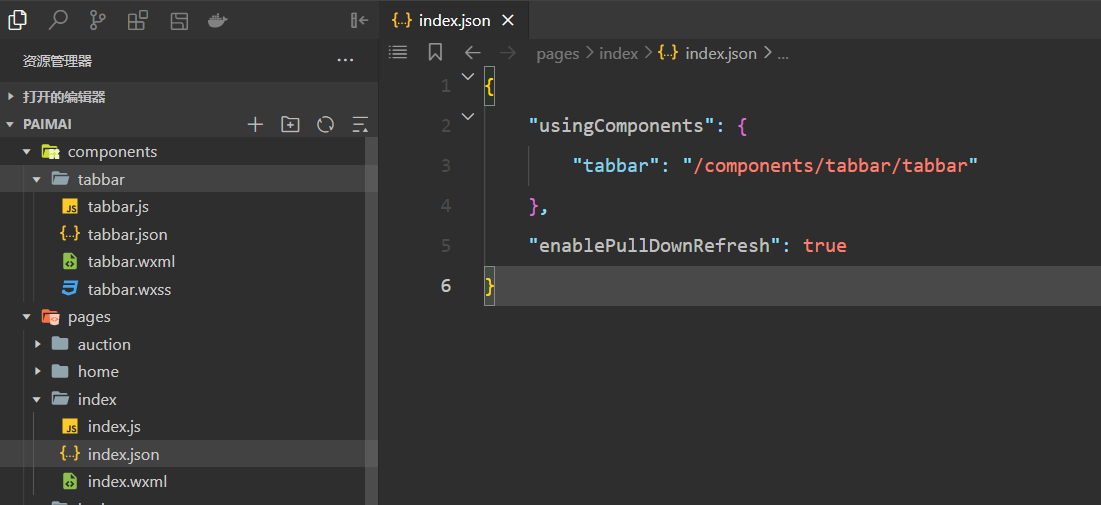
使用之,如下:
要使用自定义的tabar,需要作如下配置:
给tabbar组件书写对应的样式,如下:
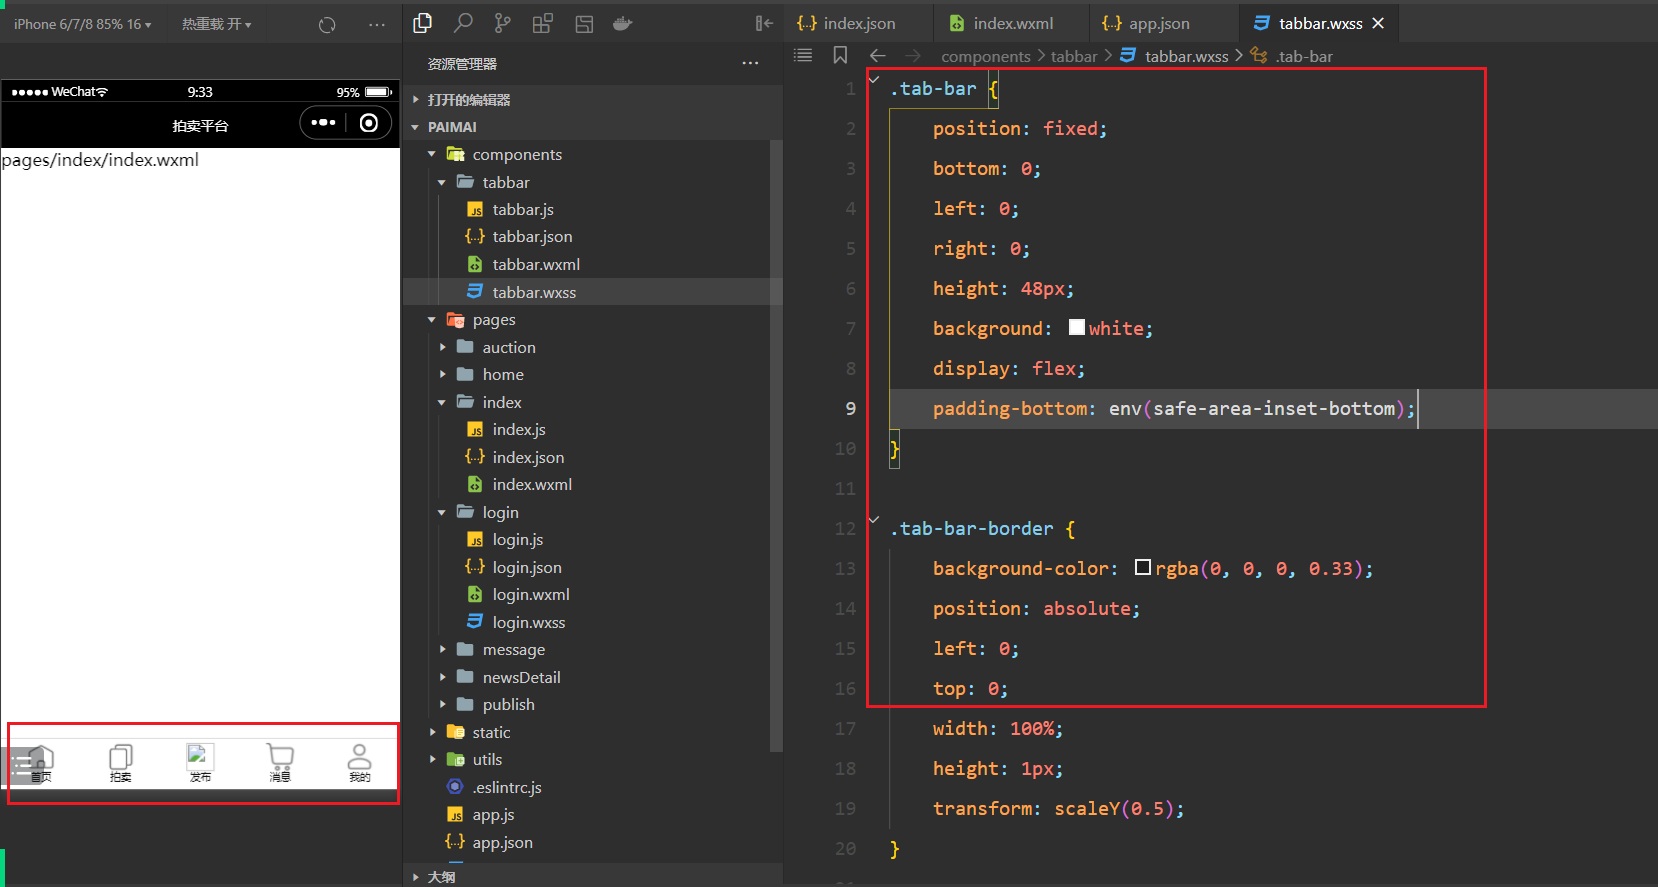
参考代码如下:
.tab-bar {
position: fixed;
bottom: 0;
left: 0;
right: 0;
height: 48px;
background: white;
display: flex;
padding-bottom: env(safe-area-inset-bottom);
}
.tab-bar-border {
background-color: rgba(0, 0, 0, 0.33);
position: absolute;
left: 0;
top: 0;
width: 100%;
height: 1px;
transform: scaleY(0.5);
}
.tab-bar-item {
flex: 1;
text-align: center;
display: flex;
justify-content: center;
align-items: center;
flex-direction: column;
}
.tab-bar-item cover-image {
width: 27px;
height: 27px;
}
.tab-bar-item cover-view {
font-size: 10px;
}
.publish {
width: 80rpx;
height: 80rpx;
display: flex;
justify-content: center;
align-items: center;
font-size: 26rpx !important;
background-color: aquamarine;
border-radius: 50%;
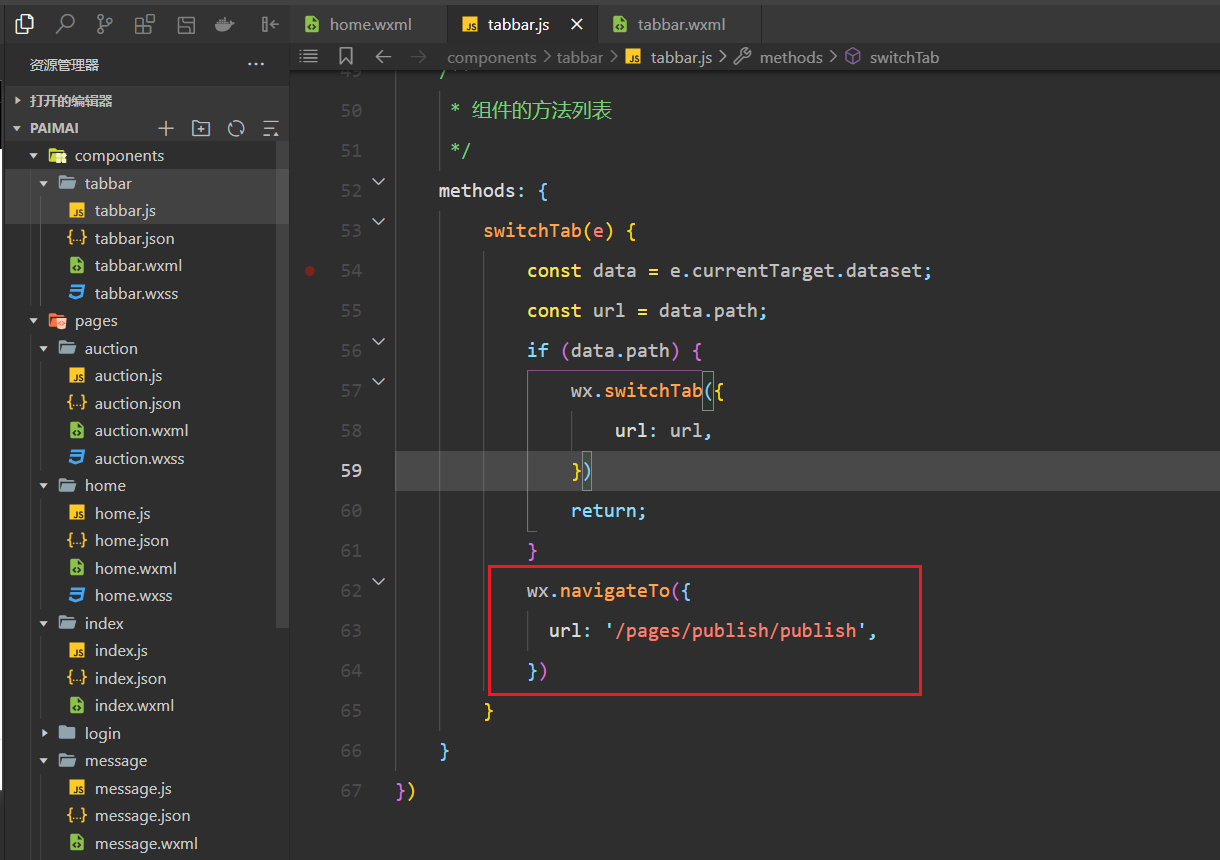
}点谁就要去对应的页面,如下:
实现对应的方法,如下:
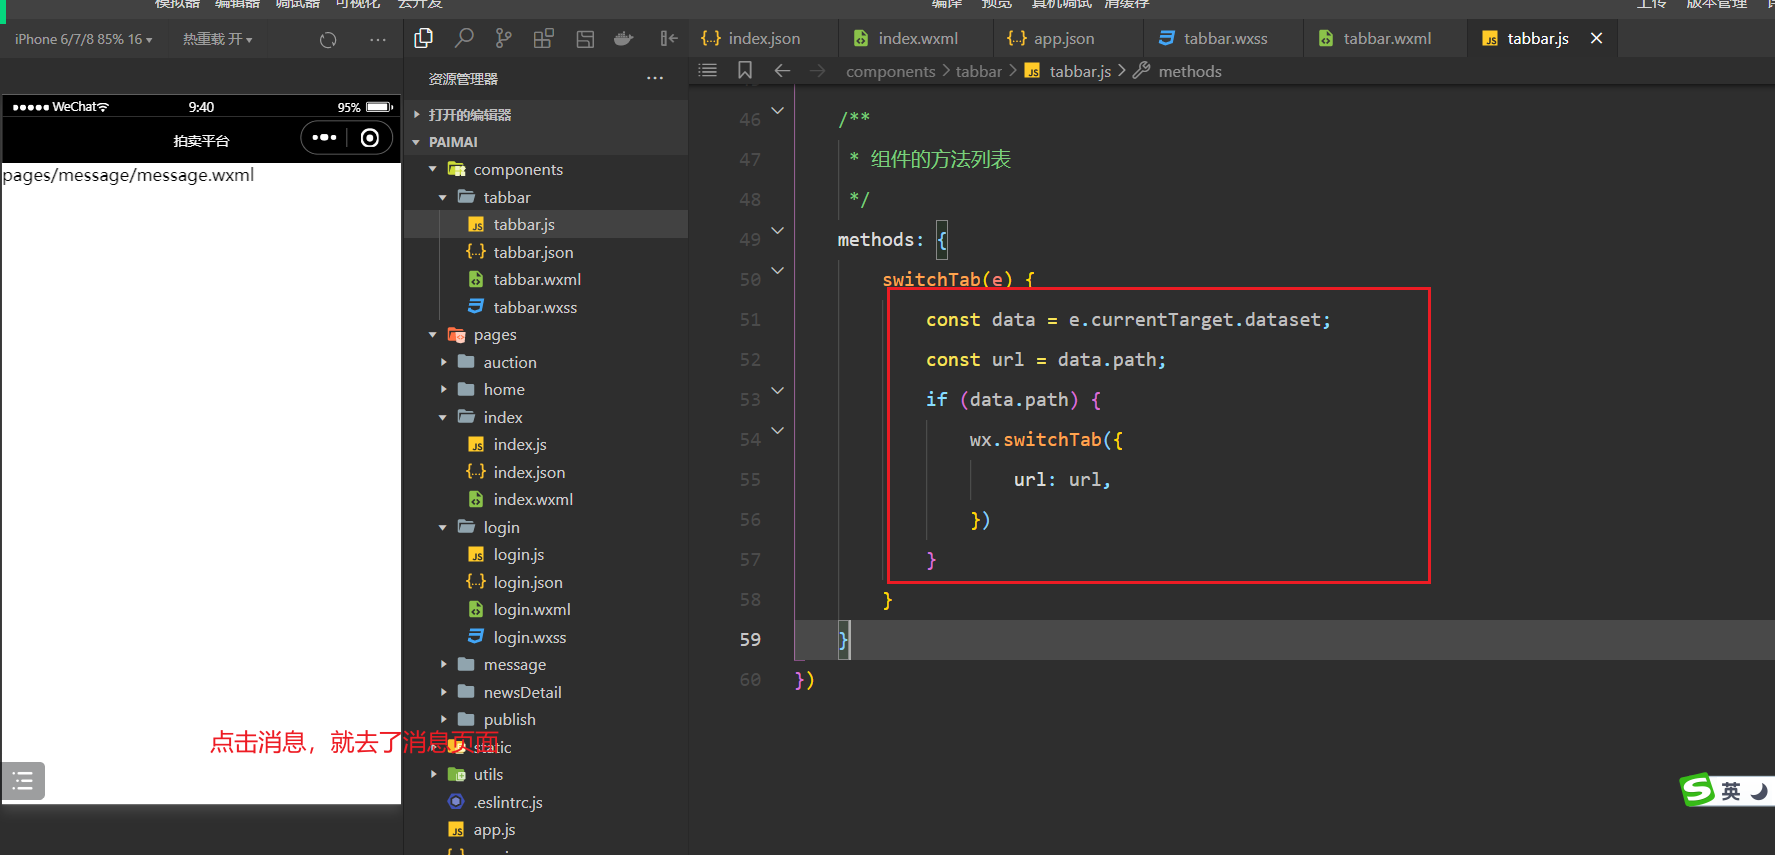
在其它页面也需要使用tabbar,如下:
点谁,需要让谁高凉,如下:
子接收,如下:
在html中就可以使用之,如下:
中的发布还需要处理,如下:
点击发布,如下:
测试OK。如下:

到此,自定义tabar就实现了。
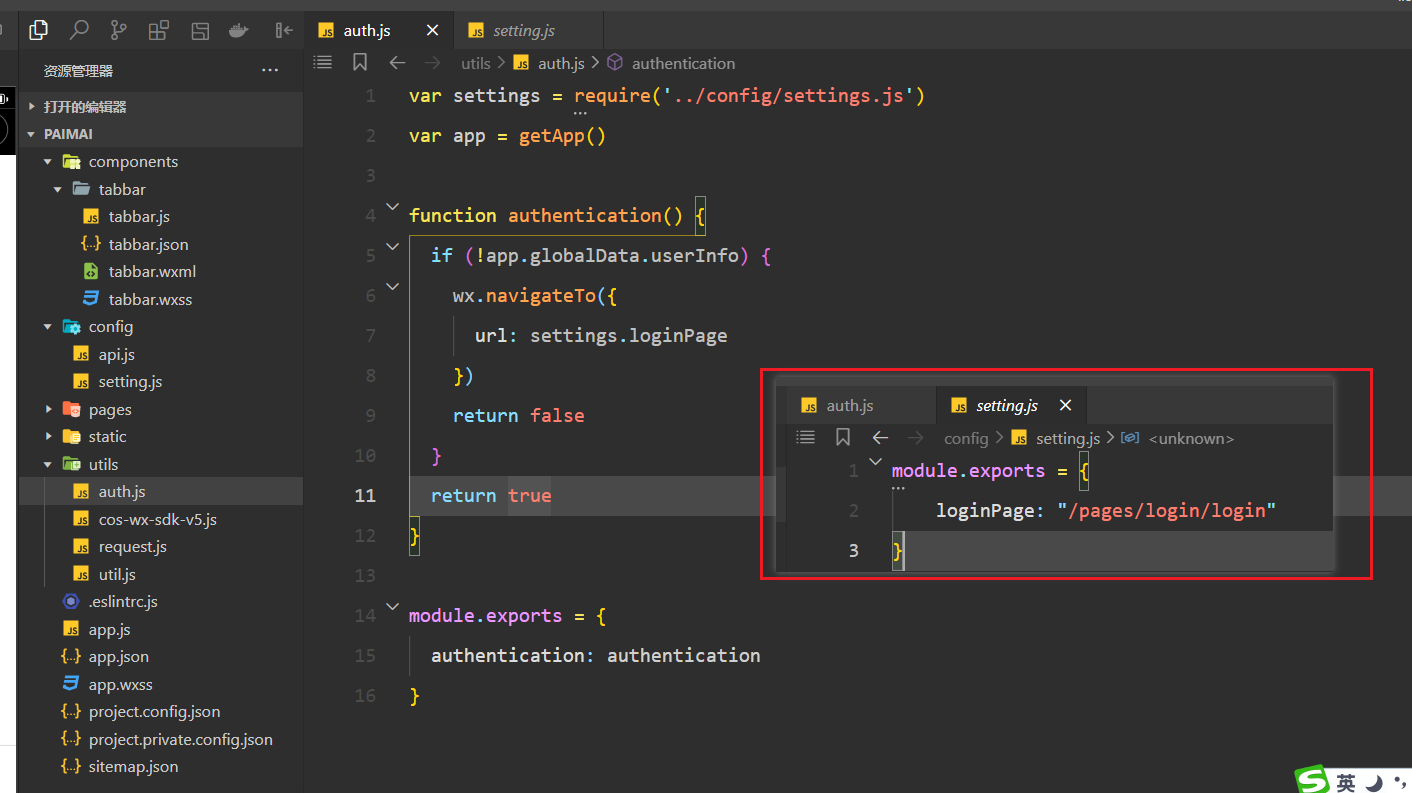
然后,整合登录,创建api目录,如下:
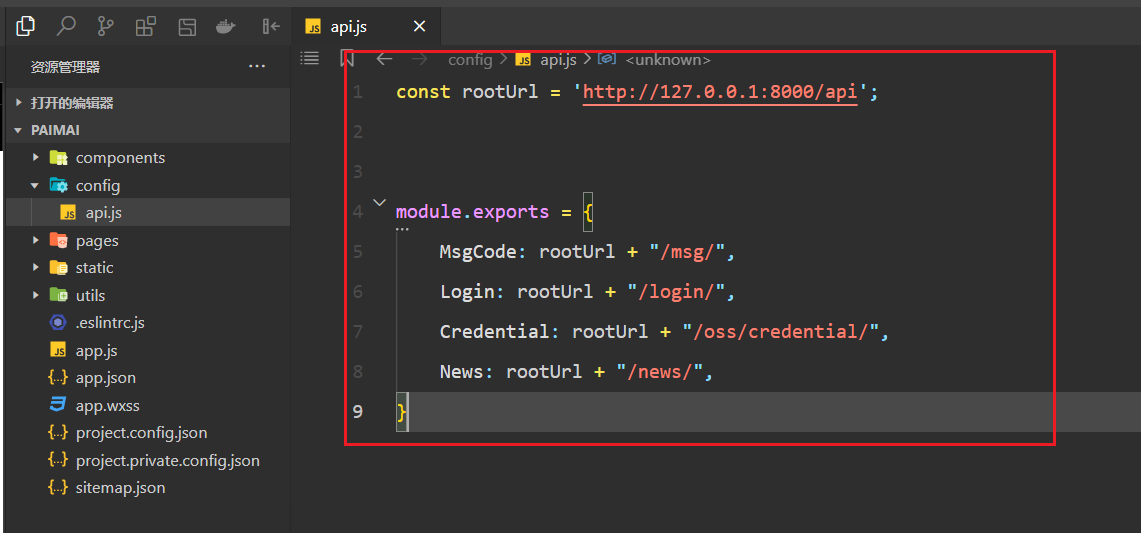
把之前写的代码copy过来,先copy app.js中的代码,如下:
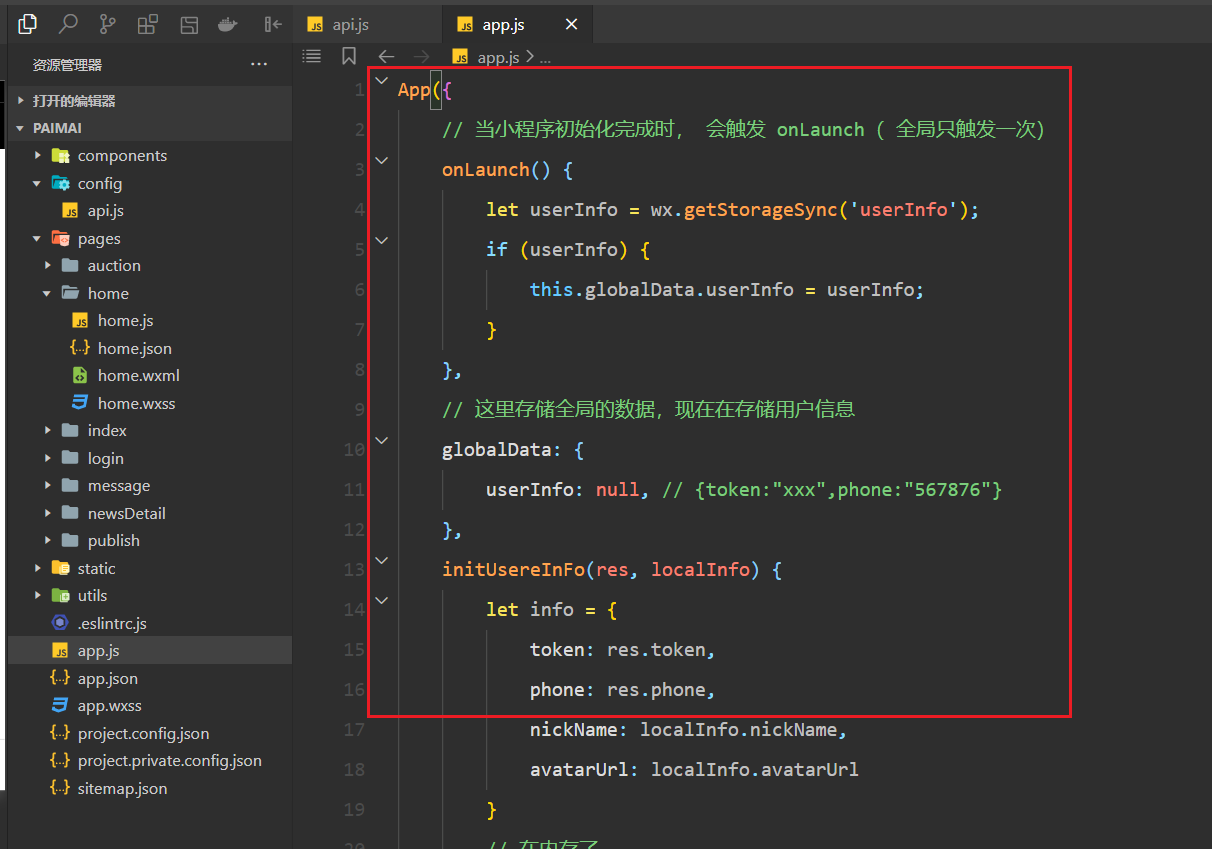
参考代码如下:
App({
    // 当小程序初始化完成时, 会触发 onLaunch( 全局只触发一次)
    onLaunch() {
        let userInfo = wx.getStorageSync('userInfo');
        if (userInfo) {
            this.globalData.userInfo = userInfo;
        }
    },
    // 这里存储全局的数据,现在在存储用户信息
    globalData: {
        userInfo: null, // {token:"xxx",phone:"567876"}
    },
    initUsereInFo(res, localInfo) {
        let info = {
            token: res.token,
            phone: res.phone,
            nickName: localInfo.nickName,
            avatarUrl: localInfo.avatarUrl
        }
        // 在内存了
        this.globalData.userInfo = info;

        // 可以把用户信息存储到本地
        wx.setStorageSync("userInfo", info);
    },
    delUserInfo: function () {
        this.globalData.userInfo = null;
        wx.removeStorageSync("userInfo")
    }
})
然后copy home页面如下:
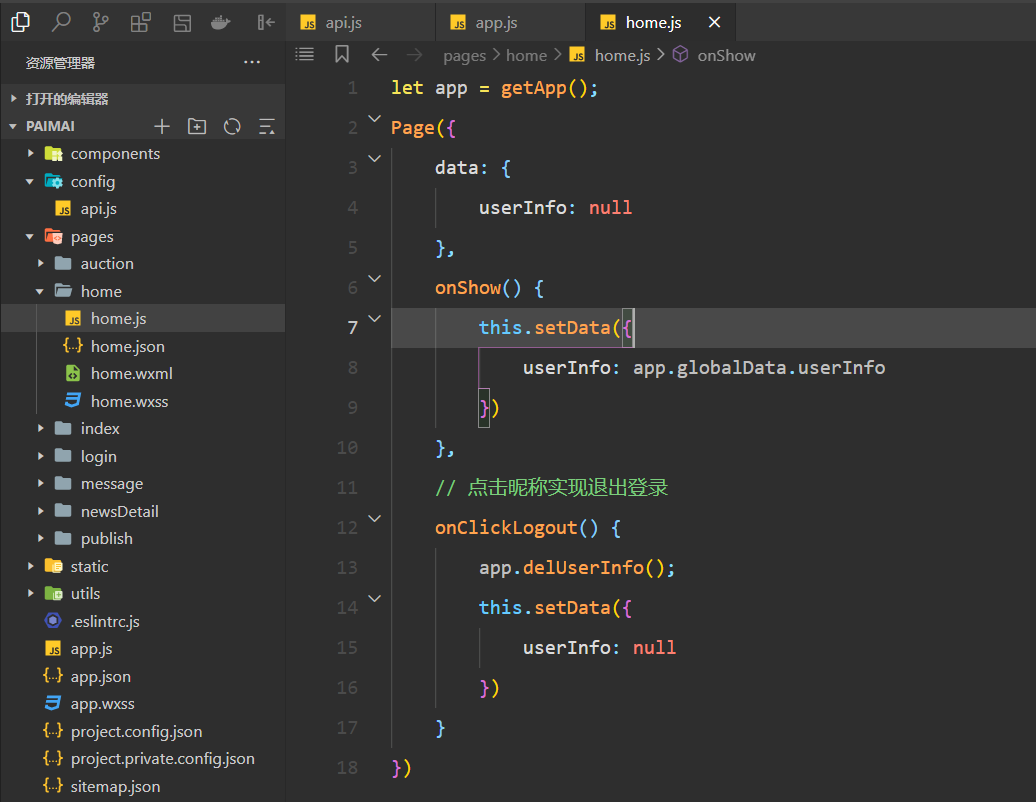
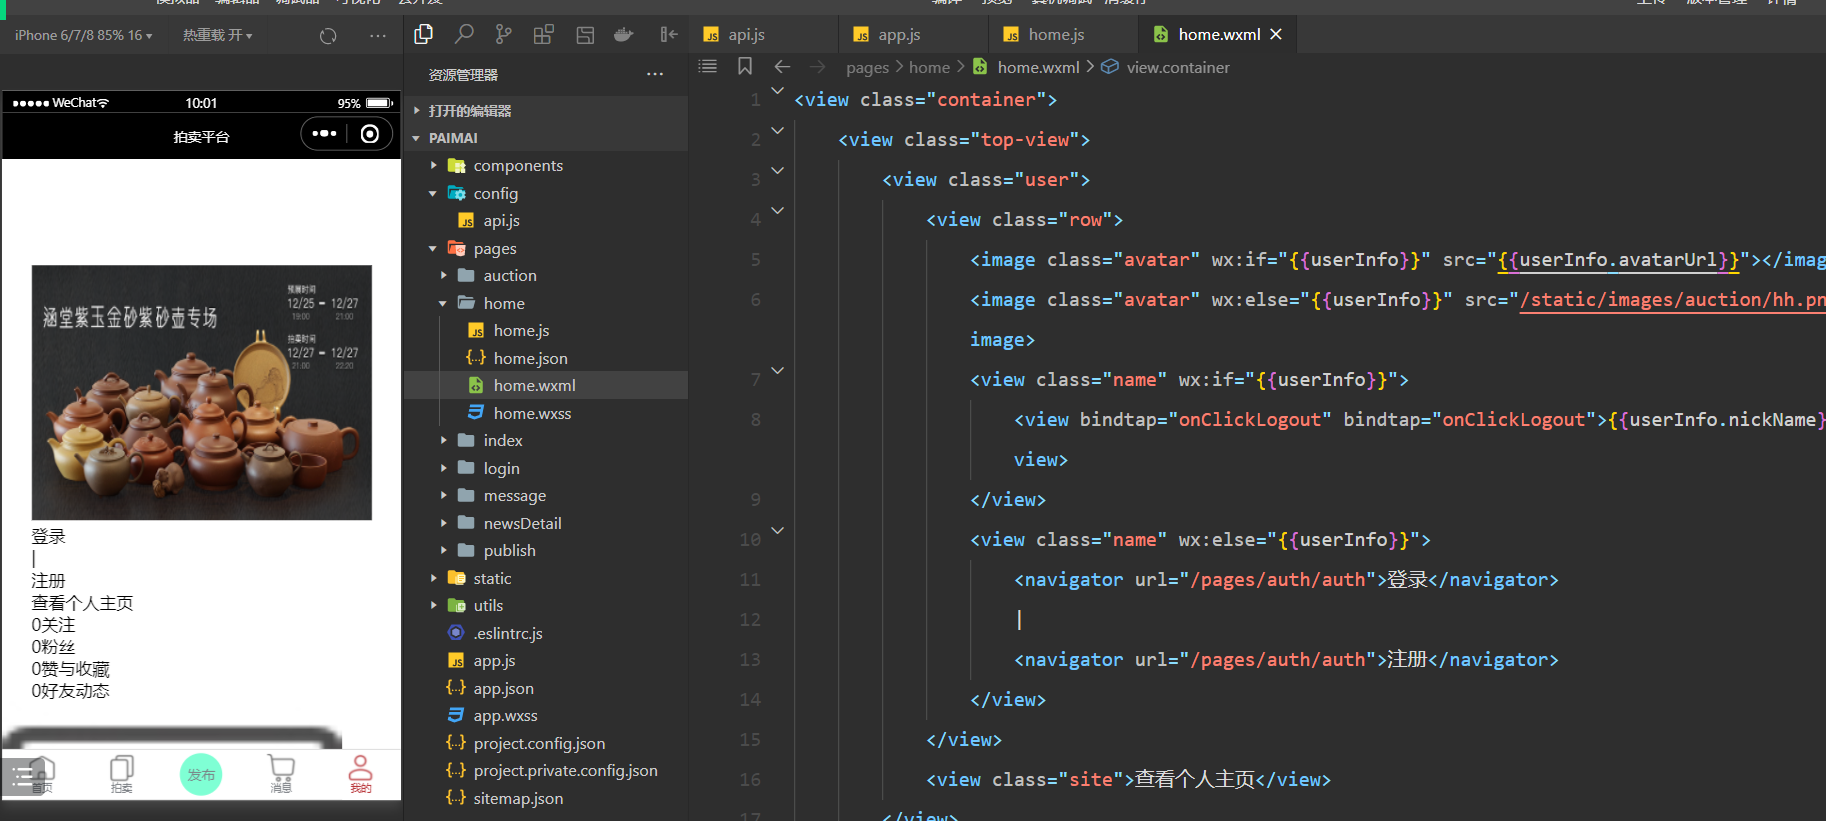
到此home页面就集成好了。点击登录或注册,去登录页,如下:

测试之,如下:
把login页面集成进来,如下:
修改代码如下:
let api = require("../../config/api.js")
let app = getApp();
Page({
    data: {
        phone: "15515818827",
        code: ""
    },
    bindPhoneInput(e) {
        this.setData({
            phone: e.detail.value
        });
    },
    bindCodeInput(e) {
        this.setData({
            code: e.detail.value
        });
    },
    // 获取验证码
    onClickCheckCode() {
        if (this.data.phone.trim().length == 0) {
            wx.showToast({
                title: '请填写手机号码',
                icon: 'none'
            })
            return
        }
        var reg = /^(1[3|4|5|6|7|8|9])\d{9}$/;
        if (!reg.test(this.data.phone)) {
            wx.showToast({
                title: '手机格式错误',
                icon: 'none'
            })
            return
        }
        wx.request({
            // url: 'http://127.0.0.1:8000/api/message/',
            // url: 'https://59l020c612.goho.co/api/message/',
            // url: 'http://hknps.888u.ml:8080/api/message/',
            url: api.MsgCode,
            data: {
                phone: this.data.phone
            },
            dataType: 'json',
            success: function (res) {
                console.log("验证码:", res);
                // 开始倒计时...  去网上copy~
                if (res.data.status) {
                    wx.showToast({
                        title: res.data.message,
                        icon: 'none'
                    });
                } else {
                    wx.showToast({
                        title: res.data.message,
                        icon: 'none'
                    });
                }
            }
        })
    },
    onClickSubmit(e) {

        wx.login({
            success: (response) => {
                // code是一个临时凭证
                // console.log("response:", response.code);

                wx.request({
                    url: api.Login,
                    method: 'POST',
                    data: {
                        phone: this.data.phone,
                        code: this.data.code,
                        wx_code: response.code,
                        nickname: e.detail.userInfo.nickName,
                        avatar: e.detail.userInfo.avatarUrl
                    },
                    success: function (res) {
                        if (res.data.status) {
                            app.initUsereInFo(res.data.data, e.detail.userInfo)
                            wx.navigateBack({})
                        } else {
                            wx.showToast({
                                title: res.data.message,
                                icon: 'none'
                            })
                        }
                    }
                })
            }
        })
    }
})
使用官网推荐的登录流程,如下:
https://res.wx.qq.com/wxdoc/dist/assets/img/api-login.2fcc9f35.jpg
登录成功后,在内存和硬盘上有用户信息,如下:

现在有个需要,有些页面,需要登录后才能访问,有些页面不需要登录,如发布页面需要登录后才能访问。我怎么知道你有没有登录?答:登录成功后,在内存和硬盘上有用户信息。可以通过判断是否有用户信息,从而判断有没有登录。
点击发布,就需要判断,把有没有登录封装一下,如下:
使用此函数,如下:
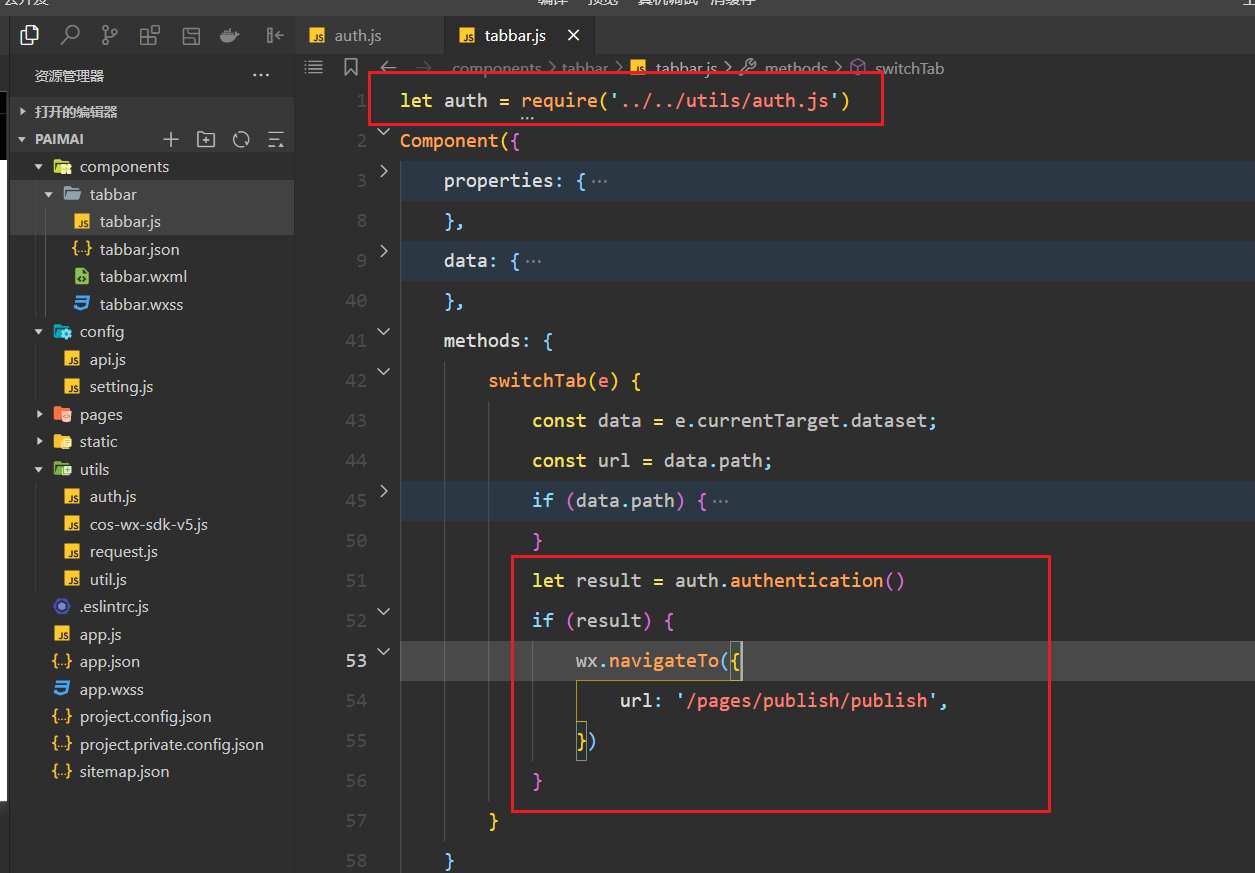
现在已经登录了,是可以点击发布,如果没有登录,是不能点击发布。
整合发布页面,如下:
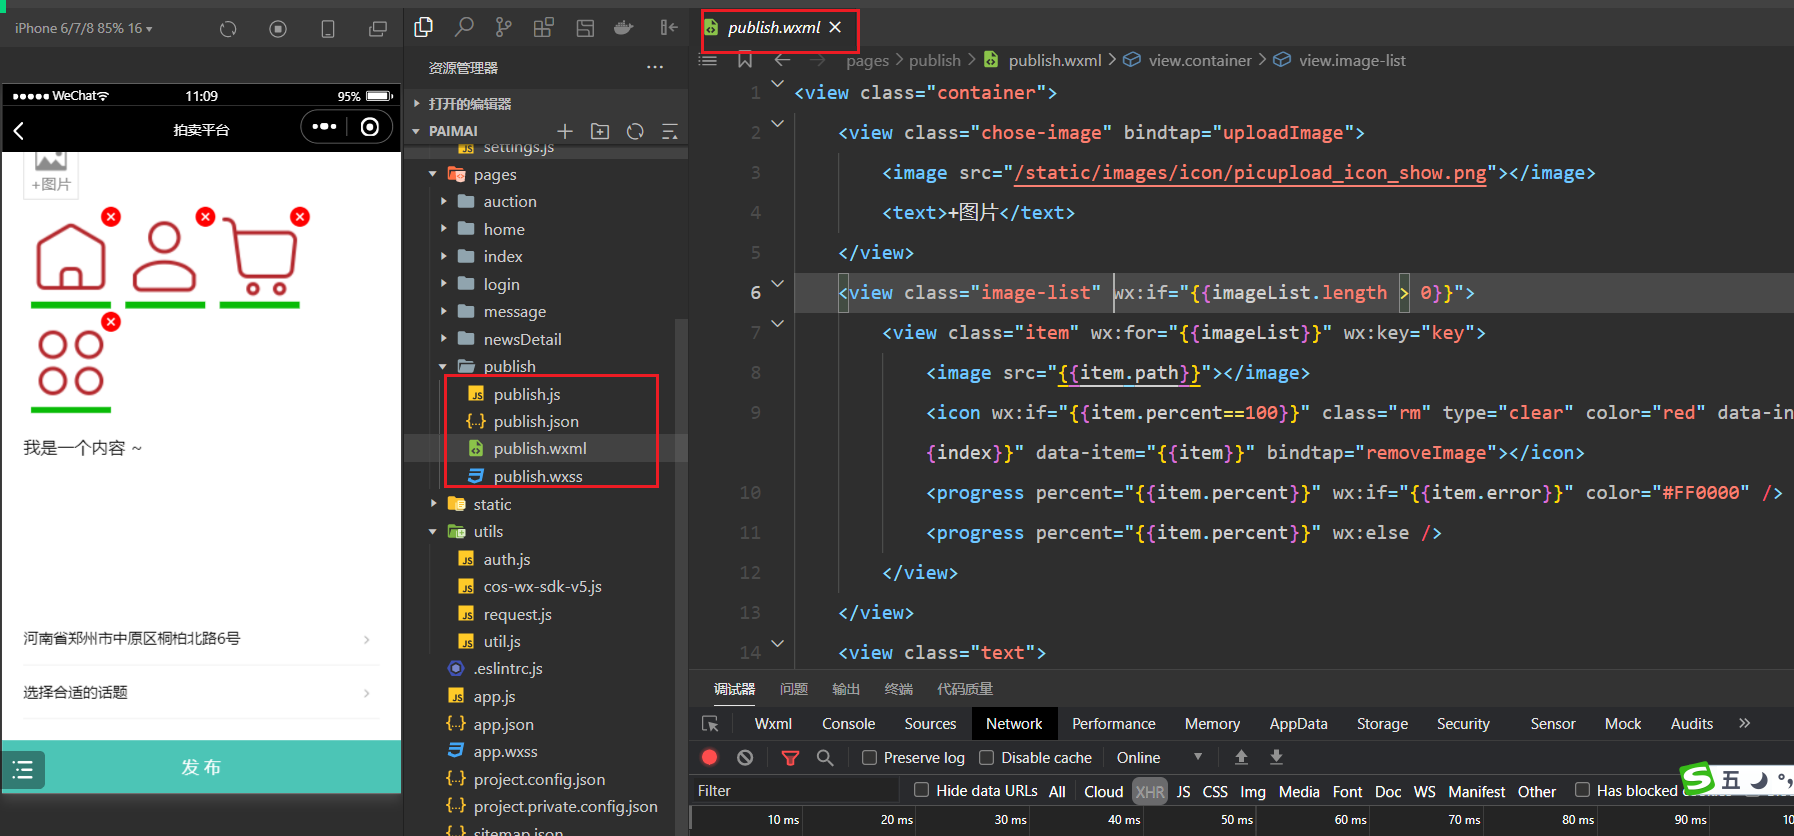
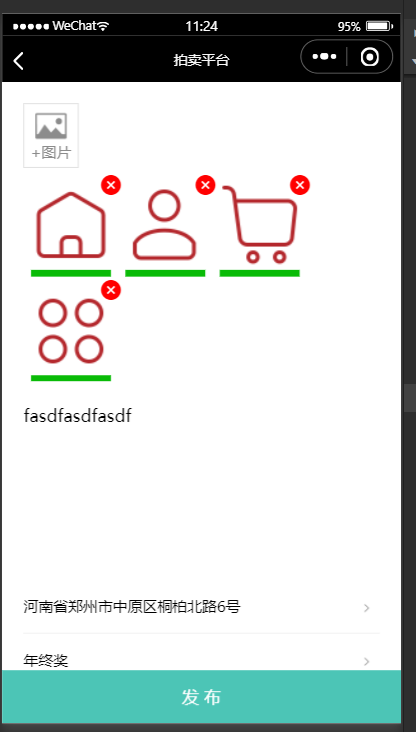
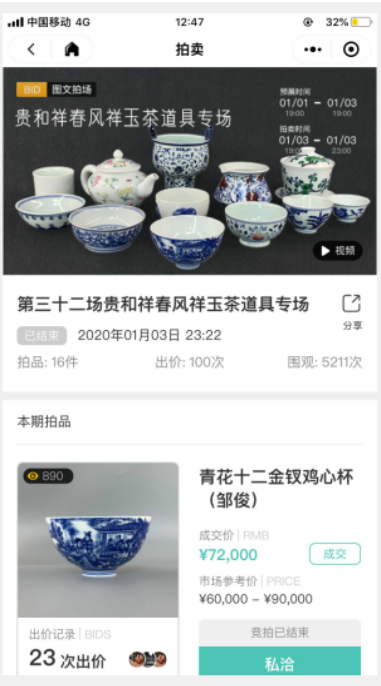
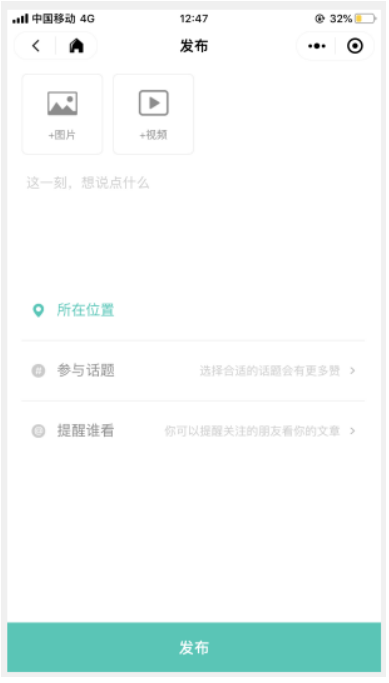
结构如下:
<view class="container">
    <view class="chose-image" bindtap="uploadImage">
        <image src="/static/images/icon/picupload_icon_show.png"></image>
        <text>+图片</text>
    </view>
    <view class="image-list" wx:if="{{imageList.length > 0}}">
        <view class="item" wx:for="{{imageList}}" wx:key="key">
            <image src="{{item.path}}"></image>
            <icon wx:if="{{item.percent==100}}" class="rm" type="clear" color="red" data-index="{{index}}" data-item="{{item}}" bindtap="removeImage"></icon>
            <progress percent="{{item.percent}}" wx:if="{{item.error}}" color="#FF0000" />
            <progress percent="{{item.percent}}" wx:else />
        </view>
    </view>
    <view class="text">
        <textarea placeholder=" 来呀,写下你的心情" value="{{content}}" bindinput="bindContentInput" />
    </view>

    <view class="function-view">
        <view class="row" bindtap="getLocation">
            <view class="left" wx:if="{{address}}">{{address}}</view>
            <view class="left" wx:else>请选择位置</view>
            <view class="right">
                <image class="go-icon" src='/static/images/icon/to_icon_show_small.png'></image>
            </view>
        </view>
        <navigator url="/pages/topic/topic" class="row">
            <view class="left">{{topicTitle}}</view>
            <view class="right">
                <image class="go-icon" src='/static/images/icon/to_icon_show_small.png'></image>
            </view>
        </navigator>
    </view>
</view>
<view class="publish-btn" bindtap="publishNews">发 布</view>
样式如下:
/* pages/publish/publish.wxss */

.container {
    padding: 40rpx;
    padding-bottom: 140rpx;
}

.chose-image {
    width: 100rpx;
    padding: 10rpx 0;
    border: 1rpx solid #ddd;
    display: flex;
    flex-direction: column;
    align-items: center;
    color: #8c8c8c;
    font-size: 28rpx;
}

.chose-image image {
    width: 60rpx;
    height: 60rpx;
}

.image-list {
    margin-top: 20rpx;
    display: flex;
    flex-direction: row;
    justify-content: start;

    flex-wrap: wrap;
}

.image-list .item {
    position: relative;
    padding: 15rpx;
}

.image-list .item image {
    width: 150rpx;
    height: 150rpx;
}

.image-list .item .rm {
    position: absolute;
    right: -10rpx;
    top: -10rpx;
}

.text {
    margin: 30rpx 0;
}


.function-view {
    font-size: 28rpx;
}

.function-view .row {
    padding: 30rpx 0;
    border-bottom: 1px solid #efefef;

    display: flex;
    flex-direction: row;
    justify-content: space-between;
}

.function-view .row .right {
    color: #8c8c8c;
}

.function-view .row .go-icon {
    margin: 0 20rpx;
    width: 16rpx;
    height: 16rpx;
}


.publish-btn {
    position: fixed;
    background-color: #4cc5b6;
    color: #fff;
    width: 100%;
    bottom: 0;
    height: 100rpx;
    display: flex;
    justify-content: center;
    align-items: center;
}
逻辑如下:
// pages/publish/publish.js

var COS = require('../../utils/cos-wx-sdk-v5.js')
var api = require('../../config/api.js')
var app = getApp();

var cos;
Page({

    /**
     * 页面的初始数据
     */
    data: {
        imageList: [],
        content: "",
        address: "",
        topicId: null,
        topicTitle: "选择合适的话题",
    },
    resetData: function () {
        this.setData({
            imageList: [],
            content: "",
            address: "",
            topicId: null,
            topicTitle: "选择合适的话题",
        });
    },
    /**
     * 生命周期函数--监听页面加载
     */
    onLoad: function (options) {
        // wx.hideShareMenu({});
    },

    /**
     * 生命周期函数--监听页面初次渲染完成
     */
    onReady: function () {

    },

    /**
     * 生命周期函数--监听页面显示
     */
    onShow: function () {

    },

    /**
     * 生命周期函数--监听页面隐藏
     */
    onHide: function () {

    },

    /**
     * 生命周期函数--监听页面卸载
     */
    onUnload: function () {

    },

    /**
     * 页面相关事件处理函数--监听用户下拉动作
     */
    onPullDownRefresh: function () {

    },

    /**
     * 页面上拉触底事件的处理函数
     */
    onReachBottom: function () {

    },

    /**
     * 用户点击右上角分享
     */
    onShareAppMessage: function () {},

    uploadImage: function () {
        // 选择图片并上传
        wx.chooseImage({
            count: 9,
            sizeType: ['original', 'compressed'],
            sourceType: ['album', 'camera'],
            success: res => {
                var oldLength = parseInt(this.data.imageList.length);
                // 最多上传9张
                let totalCount = res.tempFiles.length + this.data.imageList.length;
                if (totalCount > 9) {
                    wx.showToast({
                        title: '图片最多选择9张',
                        icon: 'none'
                    });
                    return
                };
                console.log(this.data.imageList.concat(res.tempFiles));
                // 本地图片在页面预览
                this.setData({
                    imageList: this.data.imageList.concat(res.tempFiles)
                });

                // 获取腾讯对象存储上传文件临时秘钥,并设置到全局变量中。
                cos = new COS({
                    getAuthorization: function (options, callback) {
                        wx.request({
                            url: api.Credential,
                            data: {},
                            success: function (result) {
                                var data = result.data;
                                var credentials = data.credentials;
                                callback({
                                    TmpSecretId: credentials.tmpSecretId,
                                    TmpSecretKey: credentials.tmpSecretKey,
                                    XCosSecurityToken: credentials.sessionToken,
                                    ExpiredTime: data.expiredTime,
                                });
                            }
                        });
                    }
                });

                // 上传新挑选的图片(原图片无需再上传)
                for (var index in res.tempFiles) {

                    let imageFilePath = res.tempFiles[index].path;

                    var filePathSplit = imageFilePath.split('.');
                    var ext = filePathSplit[filePathSplit.length - 1];
                    // 创建随机字符串
                    let randowString = Math.random().toString(36).slice(-8) + String(new Date().getTime());
                    var fileKey = randowString + "." + ext;

                    var targetIndex = parseInt(oldLength) + parseInt(index);
                    this.setData({
                        ["imageList[" + targetIndex + "].key"]: fileKey
                    });
                    var that = this;
                    // 上传文件(通过闭包做一个上传文件的操作)
                    (function (idx) {
                        cos.postObject({
                            Bucket: "mini-1252695631",
                            Region: "ap-nanjing",
                            Key: fileKey,
                            FilePath: imageFilePath,
                            onProgress: (info) => {
                                that.setData({
                                    ["imageList[" + idx + "].percent"]: info.percent * 100
                                })
                            }
                        }, (err, data) => {
                            // 上传成功或失败
                            if (err) {
                                wx.showToast({
                                    title: '上传失败',
                                    icon: 'none'
                                });
                                that.setData({
                                    ["imageList[" + idx + "].error"]: true,
                                    ["imageList[" + idx + "].percent"]: 100
                                })
                            } else {
                                that.setData({
                                    ["imageList[" + idx + "].cos_path"]: data.headers.Location
                                });
                            }
                        });
                    })(targetIndex)

                }
            }
        })
    },
    removeImage: function (event) {
        // 判断是否正在上传,如果正在上传就终止,否则就删除;
        // 删除图片,终止 & 删除
        var index = event.currentTarget.dataset['index'];
        var item = event.currentTarget.dataset['item'];
        if (item.percent == 100) {
            cos.deleteObject({
                Bucket: "mini-1252695631",
                Region: "ap-nanjing",
                Key: item.key
            }, (err, data) => {
                if (err) {
                    wx.showToast({
                        title: '删除失败',
                        icon: 'none'
                    });
                } else {
                    var imageList = this.data.imageList;
                    imageList.splice(index, 1);
                    this.setData({
                        imageList: imageList
                    });
                }
            });
        }


    },
    getLocation: function () {
        wx.chooseLocation({
            success: res => {
                this.setData({
                    address: res.address
                })
            }
        });
    },
    updateTopic: function (item) {
        this.setData({
            topicId: item.id,
            topicTitle: item.title
        })
    },
    bindContentInput: function (e) {
        this.setData({
            content: e.detail.value
        });
    },
    publishNews: function () {
        //发布至少需要一张图片
        if (this.data.imageList.length < 1) {
            wx.showToast({
                title: '至少选择一张图片',
                icon: 'none'
            });
            return
        }
        // 发布内容不能为空
        if (this.data.content.length < 1) {
            wx.showToast({
                title: '内容不能为空',
                icon: 'none'
            });
            return
        }

        wx.showLoading({
            title: '发布中...',
        })
        var userInfo = app.globalData.userInfo;
        wx.request({
            url: api.News,
            data: {
                cover: this.data.imageList[0].cos_path,
                content: this.data.content,
                topic: this.data.topicId,
                address: this.data.address,
                imageList: this.data.imageList
            },
            method: 'POST',
            header: {
                Authorization: userInfo ? "token " + userInfo.token : ""
            },
            dataType: 'json',
            responseType: 'text',
            success: (res) => {
                if (res.statusCode == 201) {
                    // 发布成功,跳转到一个页面进行提示
                    wx.navigateTo({
                        url: '/pages/publishSuccess/publishSuccess',
                        success: (res) => {
                            this.resetData();
                        }
                    })
                } else {
                    wx.showToast({
                        title: '发布失败,服务器错误',
                        icon: 'none'
                    });
                }

            },
            fail: (res) => {
                wx.showToast({
                    title: '发布失败,客户端错误',
                    icon: 'none'
                });
            },
            complete: (res) => {
                wx.hideLoading();
            },
        })

    }
})
效果如下:
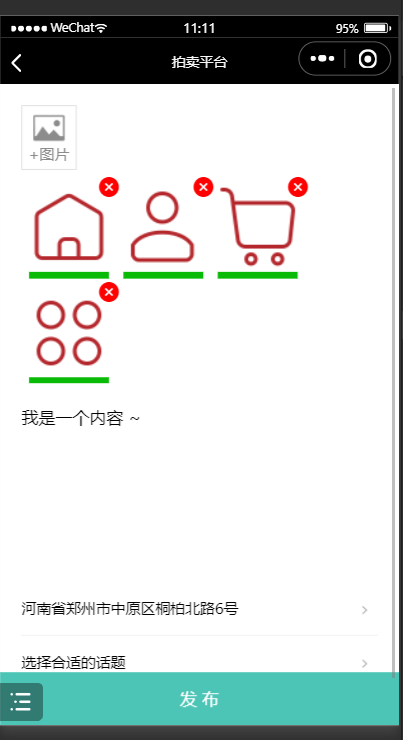
创建选择话题页面,如下:
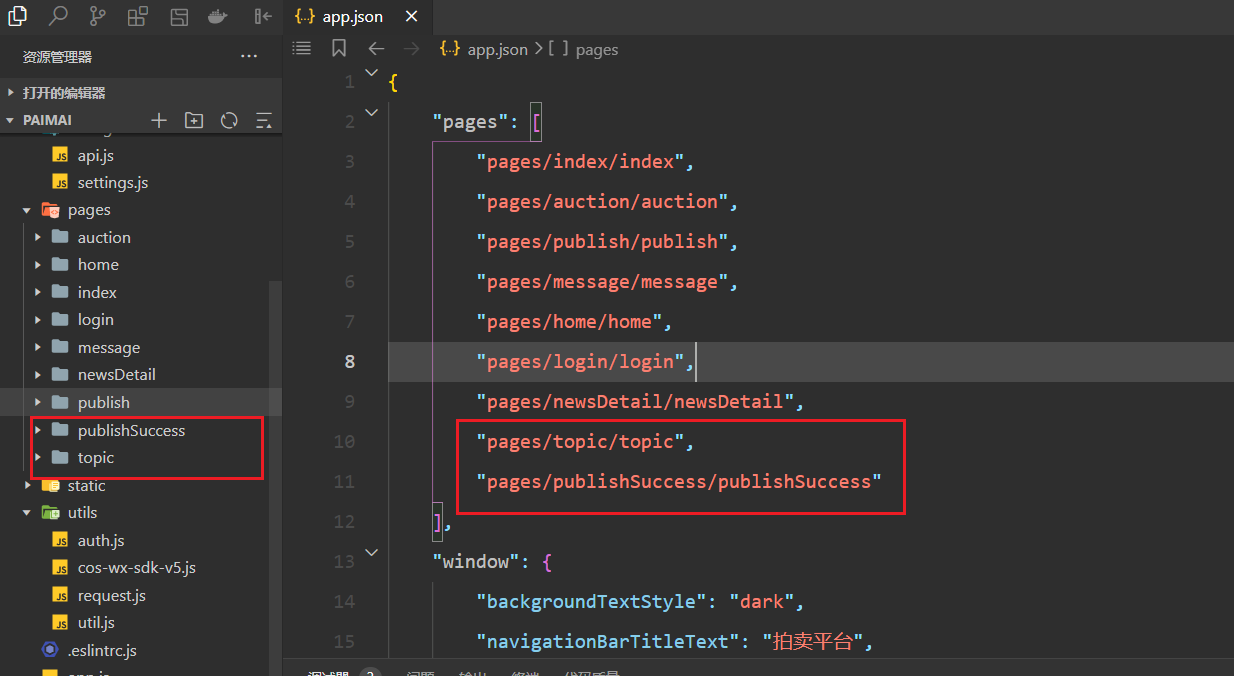
开始写话题页面,如下:
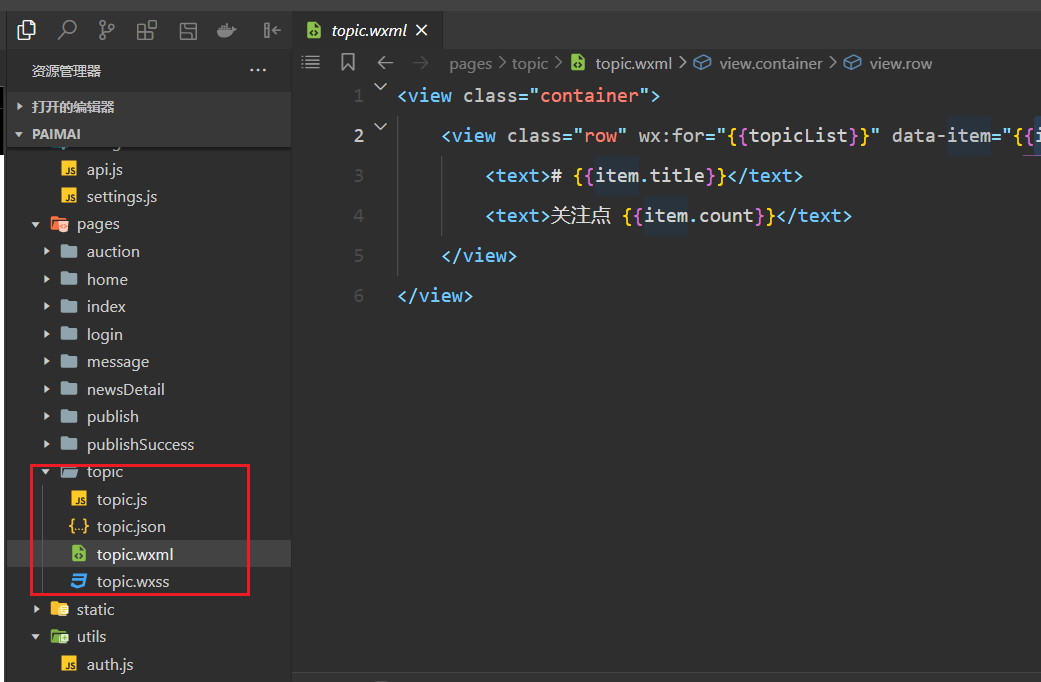
结构:
<view class="container">
    <view class="row" wx:for="{{topicList}}" data-item="{{item}}" bindtap="choseTopic">
        <text># {{item.title}}</text>
        <text>关注点 {{item.count}}</text>
    </view>
</view>
样式:
.container {
    padding: 0 40rpx;
}

.row {
    font-size: 35rpx;
    padding: 40rpx;
    border-bottom: 1rpx solid #ddd;

    display: flex;
    flex-direction: row;
    justify-content: space-between;
}
逻辑:
// pages/topic/topic.js
Page({

    /**
     * 页面的初始数据
     */
    data: {
        topicList: []
    },

    /**
     * 生命周期函数--监听页面加载
     */
    onLoad: function (options) {
        wx.request({
            url: 'http://127.0.0.1:8000/api/topic/',
            method: 'GET',
            dataType: 'json',
            responseType: 'text',
            success: (res) => {
                this.setData({
                    topicList: res.data
                })
            }
        })
    },

    /**
     * 生命周期函数--监听页面初次渲染完成
     */
    onReady: function () {

    },

    /**
     * 生命周期函数--监听页面显示
     */
    onShow: function () {

    },

    /**
     * 生命周期函数--监听页面隐藏
     */
    onHide: function () {

    },

    /**
     * 生命周期函数--监听页面卸载
     */
    onUnload: function () {

    },

    /**
     * 页面相关事件处理函数--监听用户下拉动作
     */
    onPullDownRefresh: function () {

    },

    /**
     * 页面上拉触底事件的处理函数
     */
    onReachBottom: function () {

    },

    /**
     * 用户点击右上角分享
     */
    onShareAppMessage: function () {

    },
    choseTopic: function (event) {
        var topicItem = event.currentTarget.dataset['item'];
        var pages = getCurrentPages();
        var prevPage = pages[pages.length - 2]; //上一个页面
        prevPage.updateTopic(topicItem);
        wx.navigateBack()
    }
})
发布成功页面:
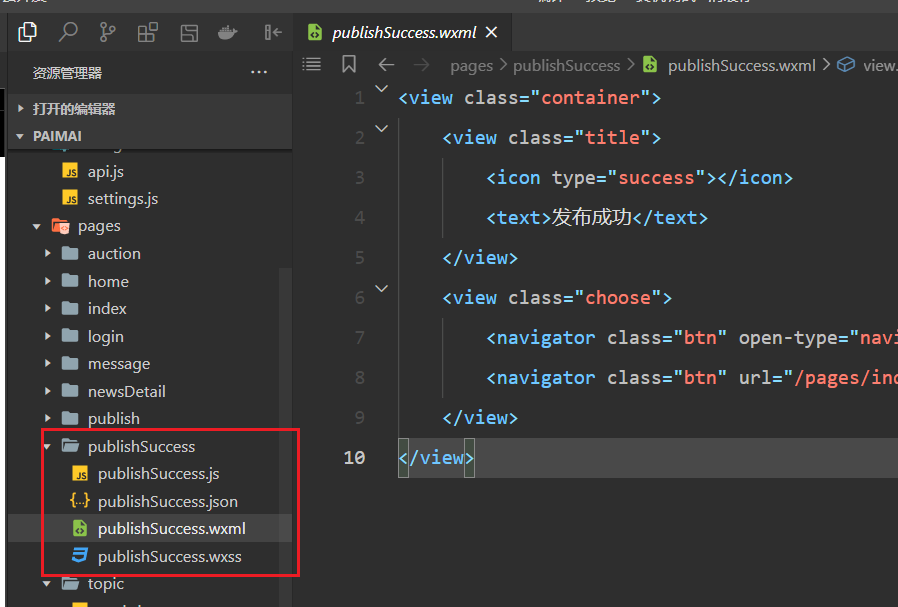
结构:
<view class="container">
    <view class="title">
        <icon type="success"></icon>
        <text>发布成功</text>
    </view>
    <view class="choose">
        <navigator class="btn" open-type="navigateBack">继续发布</navigator>
        <navigator class="btn" url="/pages/index/index" open-type="switchTab">查看动态</navigator>
    </view>
</view>
样式:
.container {
    height: 300rpx;
    display: flex;
    flex-direction: column;
    justify-content: space-around;
    align-items: center;
}

.container .title {
    font-size: 40rpx;
    display: flex;
    flex-direction: row;
    align-items: center;
}

.container .choose {
    width: 100%;
    display: flex;
    flex-direction: row;
    justify-content: space-around;
}

.container .choose .btn {
    padding: 10rpx;
    border: 1px solid #e98778;
    border-radius: 10rpx;
    background-color: #e98778;
    font-size: 30rpx;
}
逻辑:
// pages/publishSuccess/publishSuccess.js
Page({

    /**
     * 页面的初始数据
     */
    data: {

    },
    continuePublish: function () {
        wx.navigateBack({});
    },
    /**
     * 生命周期函数--监听页面加载
     */
    onLoad: function (options) {

    },

    /**
     * 生命周期函数--监听页面初次渲染完成
     */
    onReady: function () {

    },

    /**
     * 生命周期函数--监听页面显示
     */
    onShow: function () {

    },

    /**
     * 生命周期函数--监听页面隐藏
     */
    onHide: function () {

    },

    /**
     * 生命周期函数--监听页面卸载
     */
    onUnload: function () {

    },

    /**
     * 页面相关事件处理函数--监听用户下拉动作
     */
    onPullDownRefresh: function () {

    },

    /**
     * 页面上拉触底事件的处理函数
     */
    onReachBottom: function () {

    },

    /**
     * 用户点击右上角分享
     */
    onShareAppMessage: function () {

    }
})
效果如下: